A neat manicure is an adornment of women's hands. Unfortunately, due to the frantic pace of life, many girls cannot find time to visit the salon. How to be in this case? Everything is very simple! You need to learn how to do simple procedures yourself, at home.
To do this, it is absolutely not necessary to attend expensive courses, because thanks to video tutorials posted on the Internet, you can learn not only how to properly decorate your nails, but also how to make beautiful designs using various tools.
Working with the cuticle
- For gradient manicure, you can use sponges, sponges.
- If you plan to use rhinestones in the design, then you can not do without a special stick with a cut at the end or a pencil with a soft lead.
- For more complex drawings, brushes are designed: thin, fan-shaped, for mixing shades, etc.
- Dots are used to mix colors, even polka dots, swirls and interesting patterns.
- Geometric drawings are made using thin tape.
STEP-BY-STEP PERFORMANCE OF GRADIENT MANICURE
INSTALLING RHINES ON GEL POLISH STEP BY STEP
BRUSH PATTERN STEP-BY-STEP
PERFORMING A PICTURE WITH DOTS
GEOMETRIC DRAWING
Photo of drawing with self-adhesive strips.
Today it is impossible to imagine an attractive woman without well-groomed hands and stylish manicure. Increasingly, modern fashionistas are looking for masters with the obligatory item “gel nail polish” - and the search is not difficult. The secret to the crazy popularity of gel polishes is simply explained - they provide a shiny, pleasing look, smooth coating that will last for several weeks. And the application process itself is quite quick and simple. Do you want to know everything about gel polish? Tips, life hacks, benefits - everything is in this article.
What is gel polish?
Gel Polish is a special plastic gel that is applied to the nail plates like an ordinary varnish, but due to drying for 2-4 minutes under an ultraviolet lamp, it turns into an ultra-durable coating that is not subject to abrasion and various damages. Coatings of different brands differ in the degree of viscosity, polymerization time, and the amount of color pigment. But all gel polishes are united by application technology and record durability - more than 2 weeks, an average of 21 days.
Pros of using gel polish
- ease of application;
- the possibility of carrying out the procedure at home (in the presence of special devices);
- fast curing in a UV lamp;
- resistance;
- durability without the need for additional tinting or manicure correction;
- durable texture;
- intensity of color and gloss;
- gel polish helps to strengthen the nail plate;
- hypoallergenicity;
- the coating does not penetrate into the pores of the nail;
- safe for pregnant and lactating women;
- natural and well-groomed appearance.

Cons of gel polish
The disadvantages of using gel polish seem completely insignificant after the long list of its benefits. But still there are disadvantages:
- complex procedure for removing the coating;
- the relative high cost of such a manicure.
Contraindications
- fresh wounds, damage to the nail plate;
- fungal diseases of the nails and skin around them;
- cuticle damage;
- allergies and individual intolerance to the means and materials used;
- diseases of the heart and blood vessels;
- professionals do not recommend applying gel polish during a course of chemotherapy or taking hormonal drugs.

Gel Coat Features
It happens that a few days after the session, the coating begins to flake off or break off. Most often this happens due to non-compliance with the basic rules for wearing gel polish:
- No need to file and trim nails.
- It must be ensured that there is no direct mechanical impact on the coating.
- When applying conventional varnish over a decorative coating, it can only be removed with an acetone-free liquid.
- During the first days after the session, you should try not to allow the coating to come into contact with water. Give up wet cleaning, washing dishes, and also put off resting in a hot bath.

Subject to the application technology, the manicure will be flawless within 3-4 weeks!
Necessary materials and tools
To carry out the procedure at home, you will need:
- a set of colored gel polishes;
- degreaser or special nail polish remover;
- grinder for leveling the nail plate;
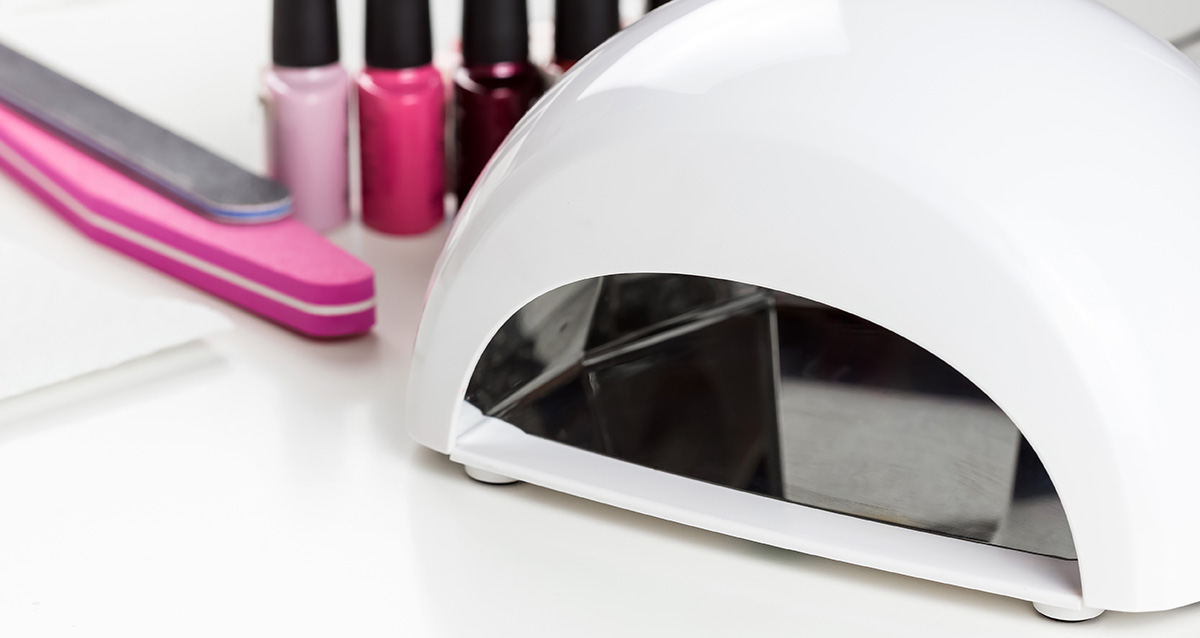
- an ultraviolet lamp with a power of at least 36 W, so that the coating is securely fixed, the color is saturated, and the manicure is neat;
- bond - for drying nails;
- polishing buff and nail file;
- orange stick;
- primer - it will provide better adhesion of the coating to the nail plate;
- base coat;
- a fixative that gives a glossy sheen;
- acetone-free liquid to eliminate stickiness;
- lint-free wipes.
Everything you need for a manicure with gel polish can be purchased at a specialized store. It is better to purchase branded devices and not save on materials, since a low-quality product with constant use will most likely damage the nails.
Manicure technique. Preparatory stage
Covering nails with gel polish begins with preparation.
- First, the master evaluates the condition of the nail plates - if they are thin and brittle, you must first apply a primer to the entire surface.
- Then the specialist forms a free edge, perfectly clean and even.
- With an exfoliating nail plate, the master preliminarily uses a nail file.
- The surface of the plates is degreased and dried for about 10 minutes.
- Then you need to push back the cuticles to avoid peeling off the coating.
- To save your nails from chipping in the future, you need to make the surface matte. To do this, with the help of a buff, the upper keratin layer and various exfoliations are removed.
- Using a brush, you need to brush off the resulting dust.
- Residual moisture must again be removed with a dehydrator or degreaser.

main stage
- The nails are carefully covered from the free edge to the cuticle with a base colorless product.
- Then the fingers are placed for 50-60 seconds in an ultraviolet lamp - this is necessary for the polymerization of the base layer.
- Now you need to collect a little gel on the brush and apply it to the plate.
- Place your nails in the lamp for a minute.
- For a more saturated color, you can repeat the last 2 points two or three times. However, it must be remembered that the varnish cannot be applied thickly in order to avoid delamination and tubercles.
- If desired, you can now apply a variety of nail decorations and designs.
- Now you should cover the nails with a denser layer of the finishing transparent gel.
- Place your nails in a UV lamp for 2-3 minutes.
- To remove the top sticky layer, you need to moisten a lint-free cloth in a degreaser and wipe your nails.
- At the end, the cuticle should be moistened with nourishing oil.
That's all. But with colored gel polish, you need to take into account several nuances:
- Remember that pastel and bright shades of gel polish are applied in two layers, each of which must be cured in an ultraviolet lamp for 2 minutes.
- When applying dark shades, you need not even two, but three very thin layers.
- A tool of any tone must be applied as evenly as possible, painting over the ends.
How to remove gel polish?
To remove a resistant coating from the surface of the nails, it will take only half an hour. For the procedure you will need:
- foil;
- cotton pads;
- orange stick;
- a special gel polish remover or a regular acetone-based product.

Gel Coat Removal Technique
- Wash your hands thoroughly first.
- A cotton pad is moistened in a solvent, and then applied to the nail plate.
- Now you need to wrap your finger with a cotton pad in foil to prevent the liquid from evaporating. It will take 10-15 minutes for the gel polish to soften.
- You should massage the nail, and then remove the foil and cotton pad along with the coating.
- The remaining material is scraped off with a soft orange stick. If necessary, repeat the procedure.

Pedicure with gel polish
The process of applying gel polish to the toenails is almost the same as the procedure on the hands:
- The cuticle must be removed first.
- The nails are carefully polished for better adhesion of the product to the surface of the plate.
- To prevent peeling of the future coating from the surface of the nails, dust is removed and degreased.
- Bondex is applied to the nails with a separate brush so that the product lies as evenly as possible.
- Now a thin base coat is carefully applied. If the product gets on the skin, it is necessary to carefully remove it with an orange stick.
- Nails are placed to dry in an ultraviolet lamp.
- Then a colored layer of varnish and the necessary nail design (glitter or acrylic pattern) is applied to the surface of the nail.
- Each layer of colored gel polish is dried in a UV lamp.
- The top coat is applied in a denser layer and dried again in the lamp.
- Each nail is treated with an acetone-free nail polish remover or degreaser.
 In the process of learning to apply gel polish, certain mistakes are inevitably made that upset novice masters. Let's take a closer look at them so that your home experiments and creativity bring only positive results and impressions!
 Preparing nails for a manicure with gel polish: what you need to pay attention to. Top 10 Newbie Mistakes.
Careful and high-quality preparation of nails will help the master quickly and correctly apply a color coating, as well as ensure good adhesion of the nail with subsequent layers of applied materials. Unfortunately, mistakes happen at this stage in the work of both experienced craftsmen and first-time buyers. What are the consequences of the shortcomings made in the processing of marigolds and the application of materials for degreasing, cleansing, dehydration and improving adhesion?- Mistake #1: the base for gel polish lay down with sagging.

- Mistake #2: microbubbles and mini-voids are visible in the layer of the polymerized base.
- Mistake #3: the color coating peeled off the nail, starting from the base layer.
The same picture is observed if instead of a buff, . He will make the nail instead of rough - smooth, and the coating on the nail simply will not hold.

- Mistake #4: under a layer of gel polish, cracks formed in the nail plate, which led to the breaking of the nail.
- Mistake #5: gel polish peels off with a whole plate.

- Mistake #6: shellac and gel polish chip off a lot a few days after coating.
- Degrease the nail in stages: disinfect your nails and hands with a spray or foam. Next - remove the fat from the nails, and at the end, treat the nails and side rollers;
- Do not skip the application of an acid-free primer. It is advisable to use the product of the same manufacturer as the base for gel polish. Thus, you guarantee maximum adhesion of the base and the natural nail;
- Try not to let your fingers touch the treated nails. If such an incident occurs, re-treat the surface with a lint-free puff.
- Mistake #7: the coating cracks and breaks off in small pieces.

- Mistake #8: in natural nails, even without blows, cracks formed up to the flesh.
- Mistake #9: when using the base directly on the dried primer (the quality of both preparations is good and the expiration date has not expired), after a few days your coating is still chipped and peeled off.

- Mistake #10: your client has long, but thin nails, the length of which you mutually decided not to remove.
The process of creating a design with shellac and gel polish. TOP 10 common mistakes and how to fix them.
If you managed to carry out the process of preparing nails for shellac, avoiding all the pitfalls, do not lose vigilance! Creating an image and decorating it with a design also has its own subtleties and interesting life hacks.
- Mistake #1: you carefully painted your nails with a thin layer, but after drying in the lamp, you found cured streaks.
- Mistake #2: The new gel polish is chipping and cracking, although the design is covered with a heavy top.

- Mistake #3: colored shellac deformed after drying, bubbles and voids are visible in the coating. The shelf life of the gel polish is in order, purchased from a reliable seller with a quality guarantee.
Another common reason is that you vigorously shook the bottle of gel polish before application, which led to the formation of air bubbles in the thickness of the material. The correct way to lift the color pigment from the bottom is to roll the gel polish vial between the palms.
- Mistake #4: your manicure is chipped and cracked, although you know for sure that the gel polish is of high quality and is stored in compliance with all rules and sanitary requirements.

- Mistake #5: when applying layers, you do not smear the free edge of the nail with a brush.
- Mistake #6: you love creating manicures by mixing colors and creating unique shades. However, despite all the tricks, the coating lasts less than 14 days.

- Mistake #7: your manicure shows record wearing times, but decor elements quickly chip off, become cloudy or peel off.
- Mistake #8: you use both brand new finishes and expired and near-expiring materials in the same design.

- Mistake #9: you apply gel polish and shellac on nails with a length of "under zero", and clients soon complain about chips and cracks.
- Mistake #10: your client has little time for design, and you are in a hurry to quickly create a finished look, not respecting the required number of layers, their drying time and the density of the applied materials.
How to properly handle gel polish nails immediately after creating a manicure: do's and don'ts.

Like a lacquer design, a manicure with shellac and gel polish requires care, care and attention. A high-quality, creative, complex design can cost a client a considerable amount, depending on the skill level of the nail-master and the place of his work. So how can you enjoy the image in pristine beauty and not end up prematurely with broken nails, a cloudy coating or an image with cracks and peeling?
It is possible and necessary after creating a gel polish image to do:
- Regular cuticle massage with liquid or cream or lotion. This is especially true when manicure "under the cuticle." Neat and well-groomed periungual skin will help your hands look beautiful, neat and well-groomed. The slow growth rate of the cuticle and pterygium will also have a good effect on the durability of the design. Contrary to popular belief, care products will not adversely affect the wear of the coating after being completely dried in the lamp.
- Do housework in, including cooking with foods that have a strong color pigment (beets, carrots, etc.). If you wear light shades of shellac, covered, then one day you may encounter cloudiness or the fact that the shade is dirty. The situation will be saved by a lint-free cloth and alcohol. Wipe your nails gently and enjoy renewed beauty.

- Have you taken off your manicure and are faced with the fact that your square-shaped nails began to curl at the tips? If the problem is permanent and reappears after treatment, you will need to change the shape of the nails. However, never do this while wearing the design. Cutting or filing nails with shellac, you risk damaging your nails and restoring them for a long time.
- Even the owners of strong and rapidly growing nails, many practicing masters advise after 3-4 designs to allow the nail plate to recover. Practice for a few weeks, or. Strengthened, moisturized and nourished nails will delight you again with high-quality shellac design, without peeling and breaking nails.

Along with the positive aspects of a persistent manicure with gel polish, there are several significant prohibitions regarding this coating.
What absolutely can not be done if you decide to dress your hands in gel polish for 2-3 weeks?
- Try to limit skin and nail contact without gloves with harsh household chemicals, facials with acids in the composition, as well as with hair dyes and products containing acetone. The components of these products can adversely affect the wear time of a manicure, as well as cause clouding of the gloss or significantly change the color of the coating.
- Treat the cover with the utmost care. Do not use gel polish nails as an opener or screwdriver, toothpick or scraper. Remember, nails under shellac retain their elasticity and increased mechanical stress is harmful to them.
- Don't sunbathe for too long. The more intense the sun's rays, the greater the risk of fading bright shades of gel polish.
- Do not try to adjust the regrown design yourself. This type of coverage, unlike , does not imply point correction. After 2 weeks, it is better to completely update the manicure than to tint and polish the overgrown nail space.

How to properly apply gel polish on natural and artificial nails: technology, master classes and video training.
The step-by-step gel polish manicure procedure at home is not too complicated and requires only regular practice. We invite you to get acquainted with our library of training articles and master classes that reveal all the subtleties and details of design with gel polishes: Beginning to master gel polish, amateurs and inexperienced masters ask themselves: is the technology for performing manicure on natural and extended nails the same? We answer and share secrets.What is the difference between performing a manicure with shellac on extended nails (on acrylic, gel, tips).
In practice, the processes of creating an image on natural and artificial nails are quite similar. The main thing you DO NOT do with extended nails is:- Do not use primer. High-quality degreasing and cleaning already guarantee strong adhesion of the base and acrylic or gel. Don't forget to buff the nail just a little.
- Apply gel polish on artificial nails only once, as it will not be possible to remove the design from them to the base. And you will inevitably have to make a correction.

- Create artificial nails as thin as possible so that the subsequently applied gel polish does not create the appearance of excessively thick and unaesthetic nails.
- Choose designs in colors that are close to the natural color of natural nails. So visually you can briefly, but delay the day of changing the image.
- Apply the coating in thin layers, pressing the brush against the nail. Unlike natural nails, the correction of flaws on artificial nails is fraught with violations of their adhesion to the surface of the native nail. If your experience with extended nails is not enough, it is better to entrust such a manicure to the hands of a professional.

We hope that now the bright, beautiful and alluring world of gel polishes and shellacs has become clearer and closer to you. Stylish and durable manicures for you!
The variety these days is simply amazing. In the salon, the masters do incredible things with the fingers of their clients. Now it is possible not only to process the cuticle and skin of the hands in different ways, but also to change the shape of the nail plate. In most cases, special forms, tips and gels are used for this. This article will describe without extension. You can learn about the features of this procedure. Also find out what you need to cover your nails with gel.
Necessary materials and tools
If you decide to produce without building, you will have to arm yourself with some materials and fixtures. The most important thing in the work is the presence of a viscous substance, which will subsequently be laid out on the plate. The gel can be of several types. It is preferable to choose a well-known three-phase system. This includes the base, foundation and top coat. Biogels have also recently become very popular. However, such materials do not stay on the nails for more than two months. They have to be completely removed during the correction and reapplied. There are also three-in-one system gels. Such a coating will replace your base, base and final layer. What to choose is a personal matter of each person.
In addition to the material, you will need tools. This includes abrasive files, buffs and napkins. Do not forget about the primer, which will hold the nail coating with the gel, and the degreaser. You can not do without How is gel nail coverage made without extensions? Step by step instructions will be presented to your attention below.
First step: preparation of natural nails
Before you start gel nails without extensions, you need to properly process the plate. To do this, you need a file of medium hardness. First, decide on the length of the nail and file the edges, making the same shape. After that, grind the top of the plate. This must be done very carefully, do not overdo it. You do not need to completely grind off the nail, but only remove the thin top layer.
When the work is done on all the fingers, you can start coating the plate with a primer. This tool will improve the adhesion of materials and help to avoid delamination in the future. Remember that after such a coating, you should not touch the upper part of the nails to other objects. Otherwise, the thinnest layer will be broken.
Second step: base coat
When the primer dries (usually within one minute), you can apply the base. This must be done in a very thin layer. The gel should not just be laid out on the surface of the plate, but as if rubbed into it.
The base coat must be dried in the lamp for two minutes. Remember not to touch foreign objects with your nails. This may damage the gel layer or cause foreign particles to adhere to it.

Third step: second layer
Covering nails with gel without extension necessarily involves the application of a modeling layer. If you increased the length of the plate, you would do it with this material. Take a brush and apply a thin modeling layer. If desired, this tool can correct the shape of the nail.
It is necessary to dry laid out in a lamp. Depending on the power of the tool, the exposure time should be from three to seven minutes. Alternately carry out the impact on the fingers and proceed to the next step.

Fourth step: shaping
Further coating of nails with gel (instruction) involves filing the lined layer. Arm yourself with an abrasive tool and give the gel the desired shape. If you are completely satisfied with the size and width of your nail, then simply level the modeling layer with a file or a hard buff. Remember that in the process of laying out the gel, you can not wash and wet your hands. A cloth soaked in a degreaser will help clean the nails from dust.
Fifth step: finishing layer
Step-by-step coating of nails with gel in the next paragraph involves the imposition of a finishing layer. It can have two types: sticky and non-sticky base. In the first case, you will need to use a degreaser and a grinding surface in the future. If the coating is non-sticky, then it will be enough just to dry it in a lamp.
Spread the finish layer very thinly. After that, the nail is not filed and is not modeled. When the layer is dry, you can safely wash your hands and start applying the design.

How to carry out the correction covered with gel?
Like an extended coating, your own nails under a layer of gel require periodic correction. It must be done in the following way.
- Saw off the top (finish) layer with an abrasive tool.
- Give the nail the desired shape.
- Apply primer and let it dry. Pay special attention to the processing of the free edge of the plate.
- Lay the base on a natural nail and dry it in a lamp.
- Cover the nails with a modeling layer and process it in an ultraviolet machine.
- Apply topcoat and dry.
- Wipe your nails with a degreaser.

The use of biogel
Increasingly, natural formulations are used in order to produce gel nails without extensions. Reviews of such funds are quite controversial. Some women are satisfied and confident that the gel is completely harmless. Other ladies do not recognize such material and prefer to use classical methods.
Biogel is applied in the same way as a standard coating. However, in this case there will be only one layer. Some materials do not require the use of primers or other bonding compounds. The biogel is dried in the usual way in a lamp. The service life of such a coating is approximately one month. After that, the layer is removed and a new composition is applied.
Application of the three-in-one system
This type of gel nail coating without extension is the simplest and easiest of all presented. To work, you need to follow the following instructions.
- Saw off the top coat of the natural plate. Do not overdo it.
- Wipe the nails with a degreasing compound and remove the resulting dust from them.
- Cover your fingers with primer and let it dry.
- Using a brush, apply the thinnest layer of gel on the nail.
- Place your fingers in the lamp and hold it there for 2 minutes.
- The next layer should be somewhat thicker. It also needs to be treated with ultraviolet light. However, you need to keep the pens in the lamp for up to five minutes.
- Wipe the coating with a degreasing solution.
- Buff the top coat. After that, you can start applying the design or coating with ordinary varnish.

Gel nails without lengthening
What are the advantages and meaning of creating such a coating? The nails of the fairer sex remain in their natural form. They don't get longer. After all, many women consider this technique vulgar.
The undoubted advantage of this treatment is that the plate becomes much stronger. You can do all the usual housework and not worry about the nail breaking or peeling off. Also, the design on such nails lasts a little longer than on natural ones.
Summing up the article
You now know how gel nails are applied without extensions. Photos of the final work are presented to your attention in the article. If you are not confident in your abilities or there are no necessary materials for work, then contact nail salons. Specialists and experts in their field will quickly decorate your nails and do what you want. Take care of your hands and be beautiful!
More and more fashionistas stop visiting nail technicians in salons. Making a high-quality and bright manicure at home is no longer a problem. To date, a huge number of tools, materials and tools have appeared that help simplify the procedure for creating a manicure. Now it is not necessary to study for several months. It is enough to purchase the necessary stencils and stickers, as well as tools, and master the simple technique of applying gel polish at home.
The big disadvantage of a home manicure was its fragility, but with the advent of gel polishes, a manicure can be worn for more than two weeks. It should be noted that many girls call gel polish shellac, but this is a mistake. Shellac gel polish - produced by CND, this is an expensive original product for professional manicure, which contains an organic polymer, respectively, other non-original products are not Shellac.
Gel polish combines the properties of 2 products for nail design - a regular manicure polish and a modeling gel. Under the influence of UV waves, they polymerize, forming a dense film, i.e. there is a transition from liquid to solid state.
Instrument preparation

Popular articles:
In order to put your nails in order and make an interesting manicure at home, you need to prepare certain tools and materials. It is better, of course, not to choose the cheapest ones, otherwise a number of problems may arise and it will end up being more expensive. Everyone knows the saying “the miser pays twice”. It is recommended that you carefully read the characteristics of the purchased tools and customer reviews. Next, we will tell you what tools you will need for home manicure.
UV lamp (ultraviolet lamp) for drying nails. Now, mainly in beauty salons and at home, 36-watt lamps are used. They allow you to significantly speed up the drying process up to 1-2 minutes. Some have a built-in fan, but this is not a required feature. The price range varies from 1100 rubles to 7000 rubles. There are also economical options of 9 watts up to 1000 r, but they dry one element much longer.

Which includes scissors, nippers, double-sided cuticle pusher or orange sticks.

Polishing file - buff with a hardness of 900 grit. Such a file polishes the nail plate to improve the quality of adhesion to the gel polish.

more often choose in the form of a boomerang . The gradation of rigidity (grain) is important here. For natural nails, files with high abrasiveness are preferred, at least from 500 and above. For extended ones, they take more granular files from 100 grit to 180. 4-sided files are very convenient. They are used for both turning and polishing.

You can buy inexpensive milling machine for manicure with various nozzles for nail treatment. For the home, simple devices are suitable, the price of which ranges from 1,700 rubles to 5,000 rubles. Power ranges from 18,000 to 25,000 rpm. Professionals use devices whose power is from 30,000 revolutions / sec. The most popular brand is Strong.

Thin, lint-free wipes necessary to remove excess material or sticky layer after drying.

Necessary materials

When all the basic tools are purchased, you should proceed to the purchase of materials. It is also important to consider various brands of manufacturers and read consumer reviews about the quality of materials. Next, we will tell you what materials are needed for home manicure.
A set of colored gel polishes and glitters, including white, black and nude. You can consider domestic manufacturers of RuNail or Aurelia manicure products, but there is already a persistent recommended list of inexpensive and high-quality gel polishes. These include: Kodi Professional, Laque RuNail, Pnb (Professional Nail Boutique), Canni, Bluesky, Nogtika and Red Carpet Manicure.

Scotch for creating geometric shapes and jackets, stamps, stencils, sparkles, rhinestones, etc. You will also need a set of brushes with natural bristles of various diameters for drawing a picture and attaching rhinestones.

Degreaser or dehydrator needed for pre-treatment of nails and for removing the sticky layer after drying.

primer— means for processing the nail plate in order to eliminate natural fat deposits and dirt to improve adhesion. It softens the horny particles and the base coat adheres better. They are divided into acidic and non-acidic.

Base- a layer for leveling the nail plate. It is divided into ordinary, rubber (used for severe defects in the nail plate) and vitamin (for dry and brittle nails).

Used to soften and remove cuticles and dead skin cells.
Finishing coat (top coat)- applied as a final and fixing layer of manicure after the end of all manipulations.

It is necessary to protect the skin around the nail plate. It is applied after the completion of the manicure. Can be replaced with any other nourishing oils;
Special softening gel polish remover and foil will also come in handy.

Step by step instructions for applying gel polish

When everything is purchased and prepared, you can start applying gel polish at home. At first glance, it seems that this is a very time-consuming process, but after a few procedures, you will quickly manage and hone your skills as an art designer. On average, the procedure takes from 15 minutes to an hour, depending on the complexity and condition of the nails. The procedure for applying gel polish can be divided into 7 main steps.
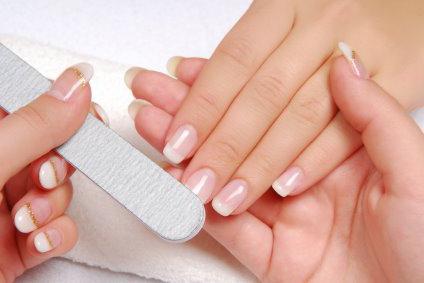
Nail preparation
Step 1 - prepare the nail. In order to start creating a manicure, the nails need to be prepared. To do this, you need to steam your hands in the bath or use a remover in order to remove excess skin around the nail. Then, using a nail file, give the necessary shape to the nail and sand it with a buff, not forgetting to process the edges and base of the nail plate.

Pretreatment of nails
Step 2 - preparatory surface treatment. For surface treatment, a buff nail file is needed. It mattes the nail, eliminating the gloss that prevents adhesion to the coating layer. This process is very important, because if you miss it, the gel polish can crack and chip off after a few days. After the nail becomes matte, it must be wiped with a degreaser. It is necessary to ensure that after this procedure you do not touch the plates with your fingertips. Then, a primer is applied in a thin layer.

Step 3 is the process of applying the base coat. It is important to note here that after the primer has been applied, it is impossible to pause for more than 10-15 minutes between this layer and the application of the base. The base layer is applied in a thin layer, trying to avoid contact with the cuticle and other periungual tissue. Treat the end parts of the nail well so that they do not remain “bare”.
The base layer is applied to all fingers except the thumb and then dried. In a 36-watt lamp, about 2 minutes. After that, the thumb is treated separately and dried. After drying the nails, it is necessary to remove the sticky layer from them with a degreasing agent.

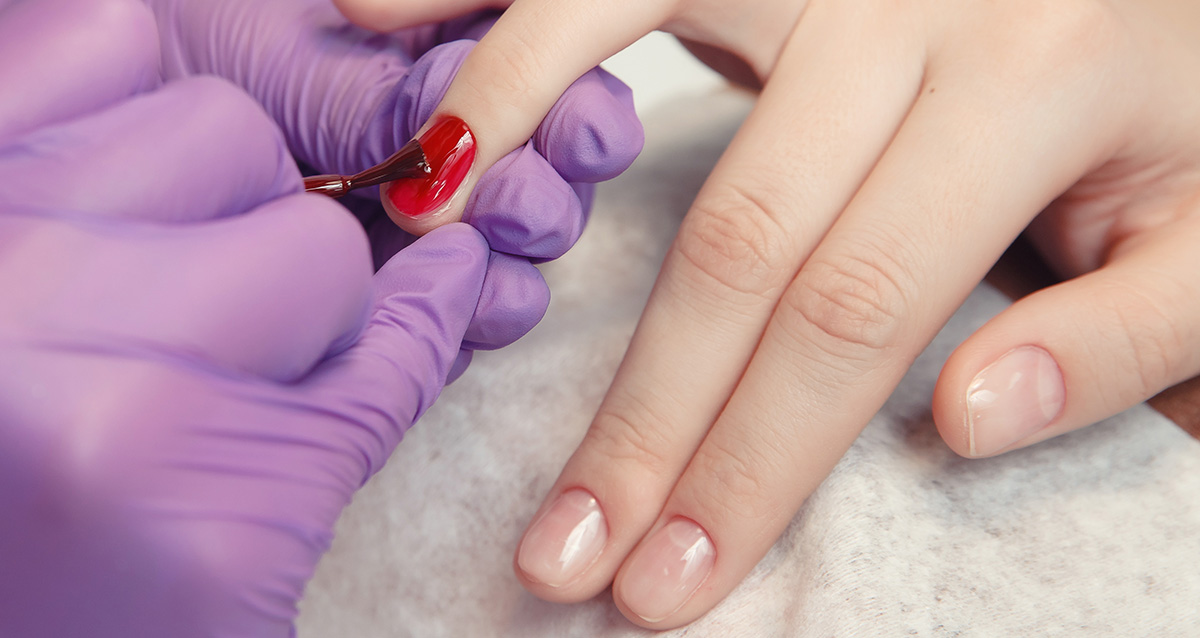
color coating
Step 4 - applying color coating. It is also recommended to apply the selected color gel polish in a thin layer. If something gets on the periungual zone, it must be carefully removed with an orange stick. Colored gel polish is applied in the same way as the base - first 4 fingers, except for the thumb, and then drying. Paint the thumb and dry for about five minutes. If the color is not evenly distributed or the layer is not as saturated as you would like, repeat the manipulations one more time.

Nail design
Step 5 - decorating nails. Stamping, water-based stickers, rhinestones and freehand drawing are applied at this stage. The process takes a minimum amount of time, and any of the techniques does not require special skills.

To use water-based stickers, cut out the pattern according to the shape of the nail or the necessary element and soak it in water as indicated in the instructions. Usually no more than 10 minutes. Then the drawing is wiped off and removed from the substrate, spreading over the nail.

To use stencils, they should be applied to the nails and smoothed. Then, each element of the stencil is drawn with colored gel polish with a brush and dried. Then remove the stencil.

To use stamping, it is necessary to transfer the desired pattern to the stamp without much pressure, rolling it over the plate, and cleaning it of unnecessary details, and also, without strong pressure, transfer the pattern from the stamp to the nail.

To use tape, you need to stick it so as to separate certain areas for staining in other colors.

Finishing layer
Step 6 - applying a finishing or fixing layer. The top layer allows the manicure to last longer, and also gives it a beautiful glossy shine. It is recommended to apply two finishing coats, painting over the inside of the nail as well. Each layer is dried in a lamp for about 2 minutes. But, you can apply it once.

Final stage
Step 7 - remove the sticky layer. It is removed either with a degreaser or a dehydrator with a lint-free cloth. Excess gel polish that protrudes from the sides must also be removed with an orange stick or pillbox. After that, lubricate the cuticle with oil.

As a result, depending on your preferences, you get a beautiful and neat manicure, for which a specialist in the salon would have to pay dearly.


Removal of gel polish
 It's important to know . Regular acetone or nail polish remover will not remove it. In order to remove gel polish you will need: foil, a special gel polish remover and cotton pads.
Cotton pads are divided into 4 parts, each is moistened with gel polish remover, applied to the nails and wrapped in foil for half an hour. After a while, the foil is removed and the remaining varnish is removed with an orange stick. If the coating does not come off well, it is necessary to perform manipulations again.
Major Mistakes

You need to know that when preparing nails, the most important mistakes, which affect the quality of the coating and the time of wearing gel polish. They are as follows:
- Incompletely removed old coating prevents the new coating from lying flat;
- Formation of bubbles in the base layer due to poorly removed cuticle. Because of this, at the base, the new coating will crack and peel off;
- Incorrect buffing can result in a smooth nail plate instead of a rough surface that helps adhere to the coating. Gel polish will not adhere to a smooth surface;
- Gel polish will flake off or chip off if the nail plate is poorly degreased or the primer application step is skipped;
- Sometimes nails suffer from overdrying, due to the use of improperly selected treatment products before applying gel polish. On such nails, it will immediately crack;
- If the nail plate is thin and strongly bends, either length correction or preliminary strengthening of the nail is required, otherwise chips and cracks cannot be avoided;
- If you hold your fingers at an angle during drying, then polymerized sagging may appear;
- You can not apply the coating too thick, it will not dry out, but instead sagging and other defects will appear;
- There may also be coating problems if the materials are not of proper quality;
- If you do not seal each of the applied layers, then peeling is inevitable.
Reasons why gel polish does not last

The procedure for applying gel polish for beginners seems difficult, but in fact, after trying a few times by trial and error, the technique improves. Often, beginners ask questions about why gel polish does not hold well, cracks, lags behind. To prevent this from happening, the masters recommend that you carefully and carefully follow all the steps for applying, without missing a single one.
Gel polish does not hold for a number of reasons:
- The old coating has not been completely removed;
- The cuticle is not completely removed;
- The nail is poorly degreased;
- The step of applying the primer was skipped;
- The nail is incorrectly buffed;
- The applied layer is too thick;
- Some of the layers are not sealed;
- Poor quality material, or materials of different quality are mixed.
It is important to know that gel polish does not hold on weak and brittle nails. If you have fragile, brittle nails, it is necessary to strengthen your nails before starting the procedure for applying gel polish at home.