Temari is a traditional type of Japanese needlework, a decorative ball embroidered with an ornamental pattern. The word "temari" is translated from Japanese as "princess ball", and the history of these balls begins in the eighth century.
Then the game "kemari" - "kick ball" came from China to Japan. In this game, you had to toss a small leather ball with your feet, and only aristocrats played it. Gradually, the game passed to noble ladies, and they preferred not to kick the ball with their feet, but to throw it from hand to hand. Since the balls were now handled much more carefully, they began to be decorated with rich silk embroidery. It became traditional women's needlework - aristocrats competed in making temari, coming up with the most intricate patterns. Thus, the game gave rise to decorative art, and temari turned into an ornament, a luxury item, an expensive gift and a talisman.
In this master class, we will try to master the simplest, basic techniques for making temari.
Materials for making temari:
- unnecessary scraps of knitted fabric
- multi-colored threads ("iris" or floss)
- scissors
- pins (better with multi-colored heads)
- a strip of paper about a centimeter wide and about 20 cm long
- bobbin threads;
- needle.

DIY temari ball decor
First of all, you need to make the basis for our ball. To do this, we take knitted scraps and cut them into narrow (1–2 cm) strips, which we wind into a ball. We try to wind tightly and evenly so that the shape is as close as possible to the ball.

The next layer is bobbin threads. We wind them over a knitted ball, pulling harder. It is important to change the winding direction more often to make it smoother. If at the previous stage the ball turned out to be crooked, then here you can just fix it.
The layer of thread should be thick enough, it took me almost the entire coil. When you finish winding, leave the long end of the thread, thread it into the needle and make a few stitches in different directions to further fix the upper turns. Then make a regular knot, hide the thread under the winding and cut it off.

Now we proceed to the most important stage - markup. This is where pins and a paper strip come in handy.
Pin the end of the strip to the ball.

We wrap the strip around and, where it meets the pin again, bend it back. This is where you can cut.

Our strip needs to be divided into four parts, for this we bend it in half and again in half (“accordion”). Just keep in mind that you need to bend to the hole from the pin. The short tail on the other side is not included in the total length.

At each fold, we cut out small triangles, they should reach approximately the center of the strip in width. Again we pin the tip with a pin and wrap the strip around the ball. The second pin must be inserted on the opposite side of the first, in the corner of the triangle.
These two pins will represent the "poles". To make sure that the "poles" are really equidistant from each other, rotate the strip, approaching the second pin from different sides. It should always fall exactly into the corner.

Now we mark the "equator" (it is better to use pins of a different color for this). We find the center between the poles, stick one pin there.

Then we pull the strip harder so that it breaks away from the “pole” to which it was pinned. We wrap around the equator and find the rest of its points.

It is better to double-check all distances, just in case. After all, the more accurately the markup is made, the better the pattern will lie.

And now we come to the most interesting and creative part - embroidering a pattern. In this master class, we will master the “squares” pattern, the simplest and most basic.
In order to embroider this pattern, you must first set the guide lines. We thread a sufficiently long thread into the needle, tie a regular knot at the end. We stick the needle into the ball and bring it out as close as possible to one of the "poles". We stretch and pull harder so that the knot is hidden under the winding.

We make a revolution around the ball, at the starting point we turn ninety degrees and one more revolution.

Again approaching the starting point, we fix the coil with a small stitch.

Another cross stitch, and we take the thread to the side.

We move to the nearest point of the equator, sticking the needle where the thread came out on the previous stitch. Thus, these "jumps" will hide under the winding and will not be visible.
Having brought the thread at one of the points of the equator, we make another turn.

We fix it with a “cross”, like the previous one. And then, also making our way under the winding, we go around all the intersection points and make “crosses” there, fixing the markup. Everything, the pins can be removed.

We hide the already unnecessary thread as follows: a few stitches under the winding, pull, cut. We do this with all the threads that need to be finished.
We start a new thread, it needs to be brought out next to one of the "crosses".

Look closely at the next photo. This stitch will form the basis of our pattern.
Be sure to hook not only the marking thread, but also several winding threads.

With these stitches, we move in a spiral, placing them very close to each other. Gradually a square emerges.

In the process, you can change colors to make the pattern look more interesting. We need to drag the corners of the square to the midpoints of the lines connecting the markup nodes (for simplicity, it's better to immediately mark these places with pins).

Now, if you repeat such squares in each markup node, they will meet with corners and you will get a solid pattern.

Temari are bright balls of happiness, the patterns of which are embroidered using threads of various thicknesses. These balls have long been made for the games of Japanese children. In modern times, they have become so popular due to their bright, interesting design. Usually they are presented as gifts, decorate houses or Christmas trees with them. In order to learn how to make temari, you need to study a master class on embroidering them.
How to make a Japanese temari ball: a simple master class
Learning the art of temari is best to start with simple geometric patterns.
To embroider such balls you will need:
- 1 container from kinder surprise;
- 2 beads;
- 1 skein of woolen threads;
- 1 needle with a wide eye;
- 1 set of pins with hats of different colors;
- 1 set of pins without tips;
- 30 cm strip of paper, 0.6 cm thick;
- 1 skein of thick cotton thread;
- 1 skein of thin cotton thread;
- 4 colors of satin embroidery threads.
Instruction for beginners:
- A few beads are placed in the container from under the kinder surprise. In the future, this element will create a ringing effect when the ball moves.
- The tip of a thick woolen thread is placed inside the container, and then the yarn is wrapped around it. The closed container should be wrapped until it acquires a round shape and a dense structure. The optimal size of the ball diameter is 7-8 centimeters.
- To smooth out all the irregularities, the ball is wrapped with thick cotton yarn. It is necessary to ensure that new threads completely cover the previous layer.
- The third layer is formed by thin cotton threads.
- To fix the thread break, it should be pressed against the plane of the ball and insert the free tip into the eye of the needle. Then 3-4 free stitches are sewn on the ball surface in different directions.
After the base for the ball is completely ready, you need to make markings.
You can make the basis for temari embroidery from a variety of materials. Since ancient times, Japanese needlewomen have used leather balls for these purposes, but today this material is expensive and rare.
Therefore, modern technology allows you to use the following materials to create the foundation:
- tennis ball;
- tights;
- foam ball;
- film;
- socks;
- cotton wool;
- napkins.

You can make the basis for temari embroidery from a variety of materials.
Some needlewomen, making the base, put special aromatic fillers inside it. This technique allows you to get not only a beautiful craft, but also a practical one that can be used as a home air freshener.
Gallery: do-it-yourself temari (25 photos)


DIY Temari: The Art of Embroidery for Beginners - Markup
One of the most important stages in the work on creating a temari ball with your own hands is marking. The simplest markup is considered to be “by 4”.
It is done according to the following instructions:
- Using a pin with a blue bead, the paper tape is fixed in the area of the north pole.
- Then the ball is wrapped with a paper strip, passing through the south pole. The strip is bent in the zone of contact with the pin, the excess part is cut off.
- The strip is folded in half, the south pole is marked. In order to mark this area on the paper tape, you need to cut a triangle.
- Then the strip is folded in half again. This is necessary in order to measure the points of the equator.
- A pin with a red head is stuck into the south pole, and without a tip into the points of the equator.
- Then the strip turns 90 degrees, after which 2 more points of the equator are marked.
- A piece of thread is cut off, 4 times the diameter of the ball.
- A knot is formed at the end of the thread. A needle is inserted 2 centimeters to the right of the north pole. The thread is dragged until the knot made is at the north pole.
- Then 4 meridians are drawn: from the north to the south pole through each point of the equator. A stitch is made in the region of the poles.
- Then the thread cut is pulled to any equatorial point, fixed with a stitch and drawn through the entire equator.
- The free edge of the thread is hidden in the base of the ball.
- The pins are removed.

One of the most important stages in the work on creating a temari ball with your own hands is marking
It is worth considering that in addition to the “4” markup, there are other schemes with which you can create not only a geometric, but also a floral pattern, an abstraction.
Types of temari markings
There are several types of temari markings, which are divided into complex and simple, as well as odd and even.
Even marking allows you to draw the following figures on the surface of the ball:
- triangles;
- intersecting rhombuses;
- turtle;
- stars.

There are several types of temari layouts.
Of the even markings, “on 4, 6, 8, 10 and 12” are most often used. Floral ornament is most often embroidered using odd markings. The best option for this is the markup "by 5".
Do-it-yourself ball of happiness: scheme
Temari technique should be studied from the simple winding method, supplemented with embroidery elements.
- On all meridians and the equator, 6 turns of the darkest color are made. To do this, you need to bring the thread next to some marking intersection. An indent of 1-2 millimeters is made to the left side, and then the base begins to be wrapped so that the thread is tightly laid parallel to the marking guides. The movement should be carried out to the right side. Thus, 6 turns are made.
- Then, with a gold or silver thread, 1 turn is made on each side of the formed dark stripe.
- Next, next to the silver or gold thread, a 6-turn strip of medium saturation color is laid out.
- The resulting strip should be framed with 1 more layer of silver or gold thread.
- Next, a 6-turn strip is made of a light-colored thread, which is framed with a cut of a metallic shade.
- In order for the pattern not to slip, it should be fixed in the corner areas. Fixing is done with pins.
- So that after removing the pins, the pattern does not disintegrate, it should be carefully stitched. The best option would be to embroider square elements at the intersection of patterns.
- In the zone of intersection of the belts, the warp threads are hooked away from you. The thread is pulled in the direction towards itself, the next corner rushes. Thread should be threaded counterclockwise. Then the warp threads are again picked up by the needle. Similarly, a square of 4 layers is embroidered.

Temari technique should be studied from the simple winding method, supplemented with embroidery elements.
If desired, empty spaces can be filled with additional elements, however, such balls with a geometric pattern look elegant and noble.
Basic Rules
In order for the development of temari technique to be as interesting and effective as possible, during work it is necessary to follow a few simple rules:
- when creating the base, the winding should be done tightly, directing the yarn in different directions;
- during marking, pins of various colors should be used: at the initial stage, the designation of each shade should be written out on a paper sheet;
- you should start working on embroidery only from the largest node, or from one of them;
- each line drawn during embroidery should be secured with a 2-5 mm stitch;
- if the thread ends, the needle should be pulled out from the opposite side of the ball, and then cut off the free end as close as possible to the base.
The main rule of temari: the embroidery thread should never be loose, and should not pinch the warp too much, as this will deform the final pattern.
How to make temari balls How to embroider a temari ball
The art of "temari" is the embroidery of bright patterns on balls. Patterns can be simple or abstract, with shapes intersecting at different angles (triangles, rhombuses, ovals, squares, ellipses, and so on). This is a very fun and relaxing handicraft that you can do at home, sitting in front of the TV, or on a trip.
Decided to make your own temari balls? How to make this craft, you will understand by reading this article to the end. But first, let's find out where these amazing products came from.
History of occurrence
So, what are temari balls, how to make them with your own hands? You are probably interested in such questions. Let's start with the history of the emergence of "temari".
This is quite an ancient art. It originated in China. And about six hundred years ago, these extraordinary beauty balls were brought to Japan.
Initially, they were made for the ball game, which was called "kemari". As a filling, the remnants of fabric from old kimonos were used, which were then wound and stitched so that a ball was obtained. Later, the game changed, they stopped kicking the ball, but began to pass it with their hands. This is how temari appeared.
The game became popular among young girls who were from noble families. The girls began to decorate their playing balls - to embroider with silk. Thus, the unpretentious ball game turned into a fine art.
Over the years, the craft of embroidering temari balloons has become popular throughout Japan. In the future, each region of the country had only its own ornament, not like the others. 
In Japan, a temari museum has been opened, which tells in detail about the origin of this art. And there are also specialized schools that teach how to make temari balls, and upon completion of training a diploma is issued.
Today, temari balls are valued as gifts, symbolizing sincere friendship and devotion. According to Eastern tradition, the Japanese give them to their kids for the New Year. Inside put a piece of paper where they write wishes.
The patterns that are embroidered on the balls, and the threads themselves often have a certain meaning. For example, gold and silver threads symbolize the wishes of prosperity, wealth and well-being. The Japanese believe that temari brings good luck and happiness.
Now this art of embroidery is known in different countries, and many people fell in love with it.
You can make balls with your own hands and present such an unusual gift for the New Year to the kids. And this is a great idea! We offer you to make temari balls on your own.
How to make balls from multi-colored threads
To create such a masterpiece you will need:
1. Foundation. To do this, you can use shreds of elastic fabric, polystyrene foam, a tennis ball.
2. Pins with multi-colored heads.
3. Bobbin threads. They will be needed to wind the base.
4. Threads "Iris" of various colors. Required for embroidery patterns.
5. A needle with a blunt end.
6. Silver thread (will be a guide).
7. Scissors.
8. Sheet of paper. You can take the office.
9. Plastic bag.
10. Measuring tape. 
These are the materials you need to prepare in order to make temari balls. How to make the basis for a ball of fabric, read on.
Making the base
Take the pieces of fabric. Stuff the bag tightly with them. Form a ball with a diameter of five centimeters (you can make the size of the craft larger if you wish). Cut off excess polyethylene. Wrap the base tightly with thread, thereby you also secure the package. Do it evenly, apply each turn to a new place, so that you get the perfect surface of the base, because in the future patterns will be created on it. Then fasten the thread. Thread the needle and sew the base several times.
In Japan, small bells are sometimes placed inside the ball, it turns out something like rattles.
markup
To embroider a temari ball, you must first apply the markup. Cut out a strip of paper one centimeter wide and thirty long. 
Marking must be done to indicate the top ("North Pole"), the bottom ("South") and the middle ("Equator"). Take a red pin and stick it anywhere. This will be the top of the ball ("North Pole"). Attach the end of the tape there. Wrap around the ball. Thus, you seem to draw the diameter of the workpiece. The strip should fit snugly against the ball. Then fold it in half. So you determine the lowest point - the "South Pole". Mark with a pin of a different color. Then fold the tape in half again and cut off the corners on one side only. Then wrap the strip around the balloon again. In those places where the corners were made, put pins.  This will be the equator. Take a centimeter. It will be needed to determine the distance between the segments. Measure them. It is important that they are the same. In our case, we should get segments of six centimeters. When all points are marked, start wrapping the base with silver thread from pin to pin (this will be the guide). We can say that this is how you designate the axes. Now you can apply beautiful embroidery.
How to embroider temari balls
Pattern patterns can be found in specialized magazines. So, let's start embroidery.
Take a needle and thread the yellow thread. Make the first turn as follows. Pull the thread from the "North Pole" through the "South", return to the "North" again. Then make a second turn perpendicular to the first. Start again at the North Pole. Bring the needle out so that the thread hooks the guide and winding. You should get four identical sectors.
Then pass the needle inside the ball to the pin, which is located on the "equator". Make four turns. 
Insert brown thread into the needle. Make four turns along the guide on each side. Repeat these steps for each color. At the same time, the width of the "belts" should gradually increase. Pay attention to how the threads lay down. There should be no gaps!
As soon as the threads begin to fall off the ball, it's time to finish the job. Make a couple more rows with a bright-colored thread along the last “belts”, fasten the thread. That's all, the temari balls are ready.
Step-by-step instructions, detailed marking and embroidery schemes will allow (with at least minimal needle and thread skills) to easily master such an original skill. Good luck with the difficult but surprisingly beautiful art of "temari"!
Temari do it yourself, make Chinese balls
DIY Temari are a kind of decorated handballs that look artistic, unusual and elegant in the interior of every home.
Temari (handball) is an ancient Chinese art of embroidering on balls, which allows you to create and create extraordinary, attractive with their beauty, splendor components of the decor. Temari is used both for home decoration and as a children's toy, rattle. A colorful, high-quality and soft DIY craft will become a favorite toy of any child.
To learn how to make temari, you need to stock up on perseverance, concentration and perseverance. The procedure for such an elite, interesting embroidery is tedious, lengthy and time-consuming. With a great irresistible desire, perseverance and patience, you can create with your own hands an exquisite fashionable masterpiece of art.
Before proceeding with the concentrated work, you need to prepare the necessary working material:
ball shaping
The basis for future balls is formed using unnecessary wool, pieces of fabric, old holey socks. To make the ball sound and rattle, you can insert a container from Kinder Surprise into the middle, after putting a bead or a small bell into it.
With a good mood and desire, we begin to make Chinese temari balls with our own hands.
The work begins with the formation of the foundation:
- We take the cut pieces and form a circle.
- The resulting patchwork figure is tightly wrapped with woolen fiber. We observe that a clear, round shape of the product is kept.
- An iris of bright, expressive shades is wound onto a finished woolen ball so that there are no gaps at all. Blue, red, green, yellow and orange balls look unusual and fabulous.
- When the ball is completely wrapped, the end of the working thread is threaded into a darning needle and inserted into the middle of the temari, piercing the figure through and through. We take out the pointed edge of the needle using the prepared pliers.
- The thread is cut off at the very base of the sphere. You can leave the tail of the thread to make a loop in the future.
Making a schematic outline
Before you start embroidering on the made ball, you need to make an accurate markup. This is done so that in the future it will be easy to create an invented original ornament.
The outline starts with the following steps:
A thick dark thread is threaded into the needle and stuck into the resulting ball, secured with a pin with an eye - this is the north.
The ball is diametrically surrounded by a thread, returning to its original position. It is fixed with a pin at the bottom - this is the “south”. We measure the distance between the pins with a measuring tape.
Crosswise from the strapping, we make the next girdling from the selected main point.
To achieve uniformity, we repeatedly measure the gap between the points.
We get an object that looks like a small globe, pierced by meridians and with poles. The ball can be divided by a different number of sections. The last thread wrap is made in the center, the thread is wound in a horizontal position along the diameter of the ball.
Important! A very dense winding deforms the ball, a weak one - the ornament loses its smoothness. It is necessary to comply with the measure.
The rounded ball model and scrupulous clear markings are important principles for creating temari. Therefore, there is a need for constant measurement of the gaps between the intended contours. Observing the necessary principles of planning, the ornament lays down evenly and clearly.
Having finished the basting, we do embroidery on Chinese temari balls with our own hands.
Ball embroidery
It is better for beginners to start embroidering with a simple, uncomplicated ornament - a square.
The geometric pattern is made from coils of multi-colored fibers prepared in advance.
- At one of the intersections of the lines, a pin is lifted and a needle with a colored thread is pushed very close to it. Embroidery is done carefully so that the previously marked stripes do not move.
- Then, clockwise, a needle and thread are inserted in the original place and threaded through four cross lines. When we enter the thread under the line, we grab a little thread of the background warp to prevent the pattern from floating.
- We sew the thread evenly, counting the number of stitched rows. Usually six single-color stitches are sewn.
- If after the formation of the first square the thread remains, it is carried out under the base, leaving it on the next rhombus at the next crossroads of the ball.
- We do the same steps with the remaining colored threads. The embroidery ornament is emphasized by a border. Between different shades, we make a stitch from a contrasting thread.
Temari decoration
The unsewn places of the finished Chinese ball can be decorated with a variety of beads, pearls, beads.
The open parts of the temari are decorated with gold, silver, contrasting thread. A triangle is made, measured and divided evenly into two parts. Then it is fixed on all sides with a pin.
The pin rises and a thread with a knot is pulled, a seam is made from this triangle to the pin on the other side.
Ribbon for Chinese handball
To make it possible to fix the temari, it is best to make a braid and attach it to an embroidered ball.
Thus, the product will be attached to a handbag, backpack, pieces of furniture. To avoid disturbing the ornament, the ribbon is attached to the non-embroidered part of the ball.
There are two types of Chinese art lace:
Pigtail manufacturing technology consists of the following techniques:
A thread is taken in six additions and threaded into the eye of a large gypsy needle.
A tight knot is tied.
It is threaded into the unsewn part of the ball.
Six strands are divided into three equal parts.
The braid is braided. The length of the lace is selected at will.
In the course of working with this technique, fixing the threads, the fibrous ends are pulled out with a needle from different sides. To keep the pigtail firmly, the ends of the threads are not immediately cut off. A strong knot is tied from the finished cord at the base of the ball, then the excess narrow strips are cut off.
After reviewing and studying the article and a step-by-step description of the creative process, you can make Chinese temari balls with your own hands. Oriental colorful handballs will decorate your interior, create a festive, joyful atmosphere in your home. Friends, seeing such an unusual, beautiful little thing will be delighted.
podelkiruchkami.ru
We create balls for the Christmas tree using the temari technique
I bring to your attention a master class on making unusual Christmas tree balls using the Temari technique.
Materials:
fine cotton yarn ("Iris", "Rose", etc.);
metallized threads;
threads for the warp (ordinary bobbin threads will do);
strips of fabric about 2 cm wide;
pins, scissors;
long needle with a large eye;
foam base (optional).

Stage 1. Making the base.
We take fabric strips (it is desirable that they be the same color as the warp threads) and evenly wrap the foam base with them. If you don’t have a foam ball, you can perfectly do without it, just then the fabric will need a little more. Inside, you can also insert a container from under shoe covers or a kinder surprise with a few beads or rice. We make sure that the ball turns out to be even, there are no bulges or pits anywhere.


When the size of the ball reaches about 7 cm, we take the warp threads and wind them evenly around it.

We try to pull the thread with the same effort, gradually smoothing out the bumps. When the fabric stops showing through, we wind it a little more. The ball should be quite dense.

Stage 2. Markup.
This pattern will require complex C8 markings.
We stick a pin into the ball. We take a strip of paper about 0.5 cm wide, cut out a small triangle at one of its ends. We hook the pin with this corner and wrap the ball with a strip of paper strictly in the center. Where the strip meets the pin again, make a fold.


Cut out a corner at the fold. We fold the strip of paper so that the corners match and cut out the corner again at the fold. We divide each of the segments in half again. We get only 5 serifs.

Again we hook the pin with the extreme serif, wrap the ball around, we also stick pins into the center of each of the three empty serifs. Leaving only the first pin hooked, turn the strip of paper 90 degrees and repeat all the steps.


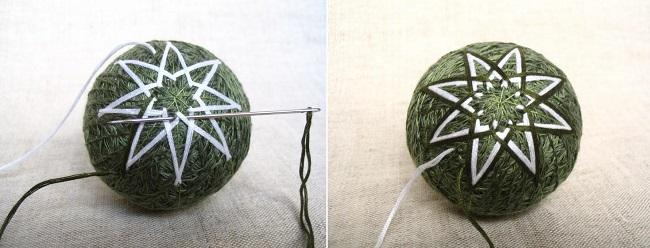
For marking, you can choose one of the colors of the main pattern, or you can make it invisible by taking threads close to the background color. I used a thin metallic thread. We stick a needle with a thread at a distance of about 1.5 - 2 cm from the plus and bring it out strictly at the pole. The knot should hide in the thickness of the ball.

We wrap the ball along two meridians, fixing the thread at the poles. Visually divide each sector in half and wrap the ball around two more meridians. The pins can be removed from the poles.


Now we draw the thread through 4 points of the equator, also fixing it only at two opposite points.

One of these points becomes a new pole where 8 meridians will converge. We repeat all the steps. We take out the pins from the poles.

There are still a couple of pins with which you need to do the same. The result is such a grid, on which you can see large squares, rhombuses and triangles. We check that they are even, symmetrical, slightly move the marking threads where necessary.

Stage 3. Winding.
This is a very simple and pleasant stage of work. To begin with, we take metallized threads (preferably floss) and wrap our ball around two meridians and the equator. In each turn, it is better to fasten the thread in only one place. Since the winding belts will intersect, it must be taken into account that all the places where the thread is fixed and the overlaps are in the lower layer. This can be calculated by looking at a photo of the finished temari. Each belt, when crossing with another, must alternately be either above or below.

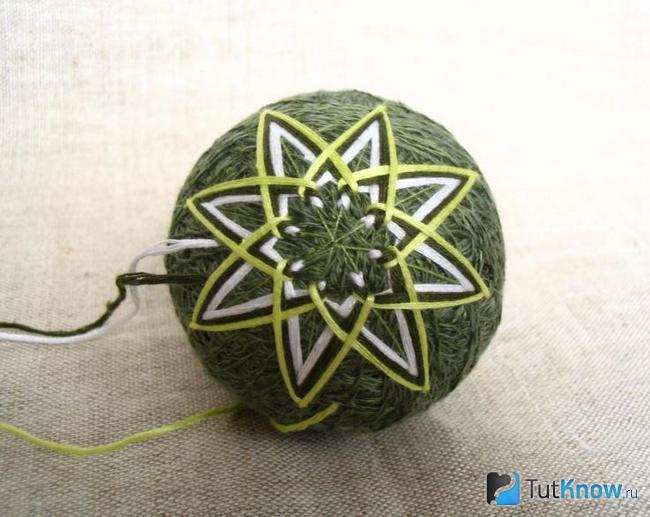
Then we wrap the ball with one of the main colors on each side of the metallized thread 3-4 times. The coils of the thread should fit snugly against each other. It is not necessary to fasten the thread in each turn. In the process of winding, you can change the color of the thread. I used 2 shades of blue, 2 rows of each color.


Then we repeat all the steps with the other two belts. Do not forget about the correct weaving of belts.

We take a thread of the same color as the background (in my case it is white). At the intersection of the belts, we embroider a square using marking threads (bisectors of right angles). The needle needs to capture not only the marking thread, but also the base of the ball.


Then we sew another row with metallic threads. We repeat all the steps at other intersections of the belts.

Stage 4. Ornament.
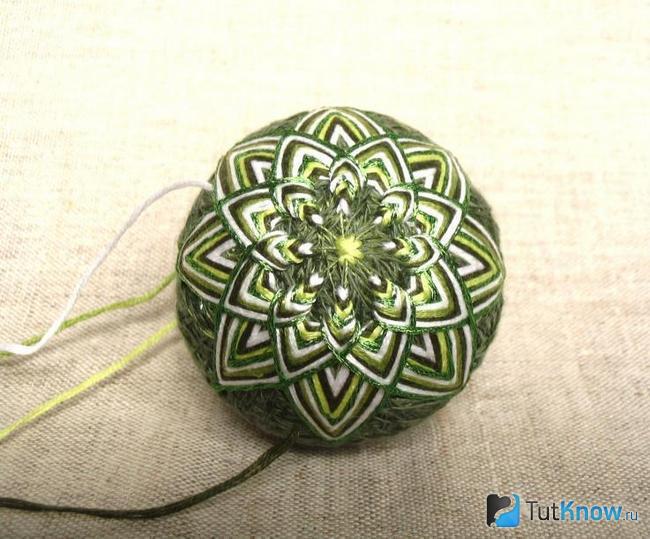
We take a white thread and do the embroidery as shown in the diagram, moving clockwise (you can also go against it, but it seems to me that it is more convenient).


With a thread of a different color (for me it will be the lightest shade of blue), we sew the next row, sticking the needle a little higher than the first (closer to the center of the triangle, this should be done almost closely, and at the ends of the “star” approximately at a distance of 1 - 1.5 mm)


So we embroider a few more rows, finishing everything again with a white thread.


Repeat this pattern for each triangle.

Sew on a small loop for hanging the ball. Ready!

Temari originated in China. Then women made balls for children from scraps of old kimonos. To do this, the fabric was wrapped with threads, and then decorated with patterns.
In the eighth century, such balls made their way to Japan, where they were first used as toys. Since these objects were very tight, they were played with their feet, like soccer balls. Then the properties of temari balls were appreciated by street jugglers, who began to use these attributes in their work.
Later, the daughters of the samurai saw the decorativeness of these items and began to make them even more elegant, embroidering various patterns on the surface. It was in the XIV-XVI centuries.
In the nineteenth century, temori art became popular, and embroidery motifs became more diverse. To this day, this art form is very popular in Japan. There are thematic museums, the Association. And in Temari schools they teach this type of art, after which students are awarded a degree of mastery.
If you briefly talk about how to make a temari ball, then a fabric is taken for its base, which must be cut into strips and in a certain way give it a spherical shape. Sometimes balls, bells, and other objects that make ringing or noise are inserted here. The round base must be wrapped with threads, then mark its surface, which is then embroidered. You can decorate your creation with beads or a thread tassel.
We invite you to mentally transfer to Japan to make temari with your own hands. You will see that anyone can master this simple science.
Temari - Japanese art of embroidery on balls

Here are the materials you will need to get started:
- polystyrene or fabric for making a ball;
- colored threads;
- woolen threads;
- pins;
- gypsy needles;
- dark fiber;
- ribbon;
- scissors.
If you want the temari ball to rattle, then pour grits inside the plastic egg.
Then the base is tightly wrapped with woolen thread, giving it more and more round shapes. To make the ball pleasant to the touch, wrap it with a smooth thread. It is important to hide the tip of the thread well at the end of the work. To do this, you need to pass it through the eye of the needle, and then pierce through several layers of thread and fabric to remove the tail.
But you can leave it by making a loop in this place, with which you hang your creation.

After the base is ready, you need to make markings. To do this, use a needle to thread a thread through a ball so that it is on any part of the ball. Here you need to stick a pin. This part will be called the North. On the other side, you need to install another pin, which will be called the South part.
In the process, you need to use a centimeter to make a uniform markup. Focusing on the pins, they need to be wrapped with thread, creating embroidery.

It remains to decorate the unsewn parts of the ball using pearls or beads. You can also decorate these places with shiny threads, the ends of which must be securely hidden inside the workpiece. If you wish, decorate your work with a thread tassel and a loop.

Now that you know how to make temari balls, we suggest that you familiarize yourself with a step-by-step master class. He will teach you how to create specific work.
Temari - master class
You can make Christmas balls using this technique and decorate the Christmas tree or the surrounding area. See how this lesson describes the process in detail.
First of all, take:
- fine cotton yarn such as floss or iris;
- threads;
- metallized threads;
- pins;
- fabric cut into strips;
- gypsy needle;
- foam ball.
Cut the fabric into strips 2 cm wide and wrap them around this item. It is better to use stretchy fabric so that it stretches well.

Now wrap the resulting workpiece with threads, you should get a rather elastic ball.

Stick a pin into the ball, attach a strip of paper to it, with a pre-cut recess, so that this blank is held on the pin. Wrap it around the ball strictly in the middle.

Cut off the excess in this paper tape, and where the end meets the beginning, you need to make the same notch on it.

But you will need to make several. To do this, bend this paper strip in half, make another notch with scissors, and then in the middle of each half section you need to make another notch.

Wrap the ball with this tape, and where you made the serifs, stick a pin in the following way: stick them into each of the corners to mark two points of the equator and two poles.
Now turn the paper strip so that it is perpendicular to the first meridian and mark a couple more points of the equator with pins. See if the pins are even. If not, make an adjustment at this stage by moving them a little.
With the help of a thread and a needle, it is necessary to flash this ball crosswise along two meridians. In the photo, this step is indicated by a light green thread. If this is your first time doing this work, then it is better to take a thread of a contrasting color so that it differs from the yarn. Then you can clearly see the work done.

These meridians need to be divided in half again so that you have 8 rays departing from the poles, and they are located at the same distance.

Hide the end of the thread in the main ball. Now you can move on to decorating the ball using the temari technique. To do this, you can take the rest of the threads, since in total there will not be so many of them.
Pierce the ball with a needle so that its tip comes out near the pole, but about 3 cm short of it. Now insert it so that it is 5 mm from any of the meridians.

In this case, the knot should hide inside the glomerulus. Now, moving to the right, fasten the thread as shown in the following photos.

As a result, you should get a four-pointed star. In the next step, make it eight-pointed, placing one more between each two rays.

Now sheathe this figure with threads of a contrasting color.
Here's how to decorate the temari balls next. Embroider another octagonal star next to the resulting one, taking threads of a different shade.
Do this for several rows.

Fill in the center of this asterisk by also embroidering the thread here.
Wrap the equator with two or three rows of threads, fasten them and make a loop on one side.

This is how you can make balls for the Christmas tree with your own hands using the temari technique.
This pattern is quite simple, when you master it, you can move on to more complex ones, for example, to this one.

First, you also need to create a base, and then markup for the future product.
To do this, you need to make 5 notches on a paper tape.

Using this template, you need to make marks on the surface of the ball by sticking pins here. Now you will need to embroider, focusing on them. It is necessary to form such rays, stepping back about a third from the North and from the South Pole.

Now bring the thread towards the opposite pole and make an identical pattern on this side.

Then return to the same side again and near this pole with a thread of a different color, embroider a stitch next to the first. In the same way, you need to make the rest of the elements of the picture thicker.

And at the intersection of the resulting rays, make rhombuses. In this case, threads of white and red.

We continue to decorate the ball using a golden thread.

Now stick the thread near one of the poles to make a loop here. You will need it in order to hang the resulting temari ball.

That's how wonderful he turned out.
Check out another master class that is great for beginners. After all, using the temari technique, you can make a lot of all kinds of patterns. Some of them are easy to come up with yourself, and some that are already ready can be taken as a basis.
How to make a temari ball - diagrams for beginners

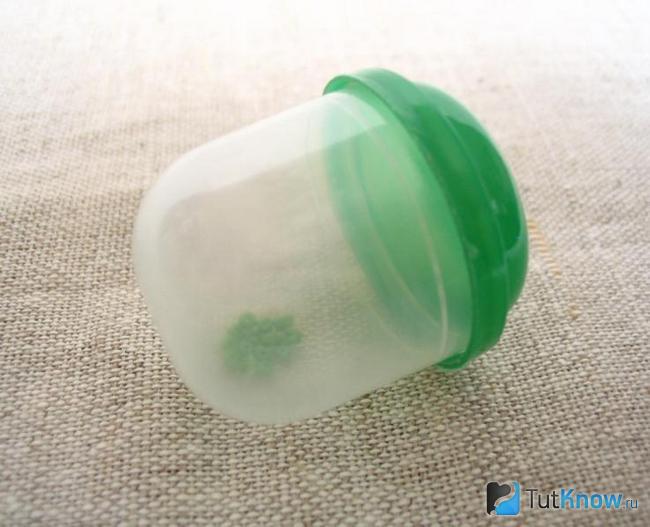
This is the result of handiwork. Not everyone will guess what is hidden under the round ball. And there is an ordinary plastic container from Kinder eggs. See what you need to bring for the master class.

As you can see it is:
- thin and thick cotton threads;
- woolen threads;
- container from Kinder eggs;
- two beads;
- embroidery threads.
- pins with tips in the form of colored beads and without them;
- needle with a wide eye;
- scissors;
- paper strip.

For a rattle effect, place a couple of beads inside the container. You can also replace them with dry peas, beans or beans, or use a Chinese bell.
Wind the woolen threads around the container from the Kinder egg, placing the coils closer to each other. At the same time, give the resulting workpiece a rounded shape.
Usually they make a temari ball as a base so that its diameter is 7–8 cm. Now wrap the resulting woolen ball with cotton thread.

When you cover woolen threads with a thickness of this material, then wind thinner ones over thick cotton threads.

To make a scarf of the diameter indicated above, you will have to spend about a spool of thread. Now break the thread, and fasten the end of it inside the ball.
Take the prepared paper strip, which is about 30 cm long, wrap it around the axis of the ball, cut off the excess.

Fold the paper tape in half, notice where the middle is. Now you will know where not only the originally created North Pole is located, but also the South Pole. Pin to these places on the ball of one pin.

Stick one more pin on both sides of it, but without tips.

Make one more such mark, and wrap the ball with a thread, directing it crosswise.

Then pull the thread through the entire ball. It must pass from the North to the South Pole through the Equator. Next, return to the starting point. Here you will secure the thread with a stitch, then rotate the ball 90 degrees and wrap the thread around it so that the workpiece is divided into 4 sectors.

In the next step, you will need to stretch the thread from the pin located at the North Pole to any one at the Equator. Secure it with a stitch. Now you need to stretch the thread to the next pin on the Equator and fasten. Proceed in the same way until you return to the initial pin located on the axis.

Then the temari embroidery itself begins. To do this, take a dark blue thread and make 6 turns with it, placing them on all mark lines. It is necessary to wrap it so that as a result there are 18 layers on each section.

Now you need to do the same winding in the other two directions.

Next, take a golden thread and wrap it with dark blue elements on both sides.

Then blue threads are used, we decorate the temari ball with them further. A silver thread completes all this splendor.

At the junction of the resulting ribbons, you will make a pattern that resembles a square. It will help to secure the threads and will be a great decoration for the temari ball.

Try to repeat any of the three presented master classes or come up with and embody your own pattern. If you still have difficulties along the way, then the video selection will certainly help you.
See how to make a temari ball. For beginners, this master class is perfect, as it shows how to divide the ball into 12 sectors for further decoration so that they turn out to be even.
The following video tutorial will introduce you to how to then embroider a ball according to these markings.
Having mastered the first two video lessons, you can make the same temari ball, which is described in the third. Get beautiful diamond-shaped patterns.

DIY Temari are decorated handballs that look artistic, unusual and elegant in the interior of every home.
This is an ancient Chinese art of embroidering on balls, which allows you to create and create extraordinary, attractive with their beauty, splendor components of the decor. It is used both for home decoration and as a children's toy, rattle. A colorful, high-quality and soft DIY craft will become a favorite toy of any child.


To learn how to make this product, you need to stock up on perseverance, concentration and perseverance. The procedure for such an elite, interesting embroidery is tedious, lengthy and time-consuming. With a great irresistible desire, perseverance and patience, you can create with your own hands an exquisite fashionable masterpiece of art.


Material for creative work
Before proceeding with the concentrated work, you need to prepare the necessary working material:
| Illustration | Material |
 |
various unnecessary rags in the house: wool, shreds, torn pom-poms |
 |
threads of several colors: bobbin, floss, iris |
 |
darning needles in different sizes |
 |
pins with hat |
 |
tape measure |
 |
medium scissors |
 |
handy pliers |
ball shaping
The basis for future balls is formed using unnecessary wool, pieces of fabric, old holey socks. To make it sound and rattle, you can insert a container from a kinder surprise into the middle, after putting a bead or a small bell into it.

With a good mood and desire, we begin to make Chinese balls.
The work begins with the formation of the foundation:
- We take the cut pieces and form a circle.
- The resulting patchwork figure is tightly wrapped with woolen fiber. We observe that a clear, round shape of the product is kept.
- An iris of bright, expressive shades is wound onto a finished woolen ball so that there are no gaps at all. Blue, red, green, yellow and orange balls look unusual and fabulous.
- When it is completely wrapped, the tip is threaded into a darning needle and inserted into the middle, piercing the figure through and through. We take out the pointed edge of the needle using the prepared pliers.
- The thread is cut off at the very base of the sphere. You can leave a tail to make a loop in the future.
Making a schematic outline
Before you start embroidery, you need to make an accurate markup. This is done so that in the future it will be easy to create an invented original ornament.

The outline starts with the following steps:
1. A thick dark thread is threaded into the needle and stuck into the resulting ball, secured with a pin with an eye - this is the north.
2. The ball is diametrically encircled, returning to its original position. It is fixed with a pin at the bottom - this is the “south”. We measure the distance between the pins with a measuring tape.
3. Crosswise from the strapping, we make the next girdling from the selected main point.
4. To achieve uniformity, we repeatedly measure the gap between the points.
We get an object that looks like a small globe, pierced by meridians and with poles. It can be divided into different number of sections. The last twist is made in the center, the thread is wound in a horizontal position along the diameter.
Important! A very dense winding deforms the ball, a weak one - the ornament loses its smoothness. It is necessary to comply with the measure.
A rounded model and scrupulous clear markings are important principles of creation. Therefore, there is a need for constant measurement of the gaps between the intended contours. Observing the necessary principles of planning, the ornament lays down evenly and clearly. After finishing the basting, we do embroidery.
Embroidery on the workpiece
Beginners should start with a simple ornament - a square.

The geometric pattern is made from coils of multi-colored fibers prepared in advance.
- At one of the intersections of the lines, a pin is lifted and a needle is pushed very close to it. Embroidery is done carefully so that the previously marked stripes do not move.
- Then, clockwise, a needle is inserted in its original place and threaded through four cross lines. When we introduce the thread under the line, we grab a little background warp yarn to prevent the pattern from floating.
- We sew evenly, counting the number of stitched rows. Usually six single-color stitches are sewn.
- If after the formation of the first square the thread remains, it is carried out under the base, leaving it on the next rhombus at the next intersection.
- We do the same steps with the remaining yarn. The embroidery ornament is emphasized by a border. Between different shades we make a stitch from a contrasting color.
Product decoration
Not sewn places can be decorated with a variety of beads, pearls, beads. The open parts are decorated with gold, silver, contrasting colors. A triangle is made, measured and divided evenly into two parts. Then it is fixed on all sides with a pin. The pin is lifted and the needle with the knot is pulled out, a seam is made from the triangle to the pin on the other side.
Ribbon for Chinese handball
To make our creation possible to fix, it is best to make a braid and attach it to the finished creation.

Thus, the product will be attached to a handbag, backpack, pieces of furniture. To avoid disturbing the ornament, the ribbon is attached to the non-embroidered part of the ball.
There are two types of Chinese art lace:
- eyelet
- pigtail
Pigtail manufacturing technology consists of the following techniques:
1. A thread is taken in six additions and threaded into the eye of a large gypsy needle.
2. A tight knot is tied.
3. It is threaded into the non-sewn part of the ball.
4. Six are divided into three equal parts.
5. A pigtail is braided. The length of the lace is selected at will.
Advice:
In the course of working with this technique, fasten the yarn, pull the fibrous ends with a needle from different sides. In order for the pigtail to hold tight, the ends are not immediately cut off. A strong knot is tied at the base from the finished cord, then the excess narrow strips are cut off. After reviewing and studying the article and a step-by-step description of the creative process, you can make Chinese balls. These products will decorate your interior, create a festive, joyful atmosphere in the house. Friends, seeing such an unusual, beautiful little thing will be delighted.


Video master class “Temari Balls”
As you probably already guessed, this word is of Japanese origin. In translation, it means "ball of thread" or "ball". What is temari and why can this thing serve as an original handmade New Year's gift?
The art of temari is quite ancient. It first appeared in China, and about 600 years ago, these beautiful colored balls were brought to Japan. Initially, they were made by mothers and grandmothers for children and grandchildren to play. The remnants of old kimonos were used as the "stuffing" of temari balls - they were wound and stitched to form a ball. Much later, when rubber was invented, the manufacture of such balls became an arts and crafts, by the way, very popular in the high society of Japan - noble Japanese ladies even competed in who would invent a more intricate pattern.
Today, Japanese temari balls are highly valued as gifts that symbolize devotion and sincere friendship. According to tradition, mothers make such balls for their daughters on New Year's Eve - they say it brings happiness and good luck. So, if there is a young girl in your family whom you wish happiness, making such an unusual gift with your own hands is a great idea.
What do we need to create temari?
- The foundation. It can be scraps of fabric that need to be rolled into a ball, foam balls, or anything that easily takes the shape of a ball.
- Pins with multi-colored heads.
- Bobbin threads to wrap around the ball (if a foam ball is used as the base, you may additionally need a soft and thick woolen thread).
- Threads "Iris" - we will embroider a pattern with them.
- A needle with a blunt end, thick enough for such a thread to pass into the eye.
- Scissors.
- A strip of paper (about 1x30 cm, can be a little narrower). It can be cut, for example, from a magazine.
- A centimeter tape (for the first temari you may not need it, but if you want to make balls with more complex markings, you can’t do without it).

We have prepared the materials - let's get to work!
Making the base of the ball
We wind a ball with a diameter of about 5 cm from pieces of fabric (more can be optional). Remember that the fabric base is heavier than foam plastic, so if you want to make not a gift, but an original Christmas tree toy, choose foam plastic.
Wrap the finished base with bobbin threads. You need to do this tightly and evenly, each new turn should lie down in a new place - this way you will get the perfect surface of the ball for the subsequent creation of a pattern on it. It is better to wrap the foam base with thick woolen yarn first.
The base has ceased to shine through the winding? Great - now you need to fasten the thread. To do this, we thread the end of the thread into a needle with a sharp end and sew the base several times in different directions with a simple “forward needle” seam.
"Equators" and "poles" - everything is simple!
Cut out a strip of paper (width - 5-7 mm, length - more than the circumference of the temari). One end of the strip must be pinned to the surface of the ball with a pin - this is the “north pole”. Now we wrap the strip around the ball and bend it where it meets the pin.
There is a North Pole - we need a South Pole! Bend the strip in half, holding the "north pole" with your finger, and in half again - this will be the "equator". In places of folds, in order not to be mistaken, cut out small triangles.

You can make markings for 8 or 16 segments - just bend the strip in half one or two more times. If you want to get, for example, 3, 5 or 10 sectors, this is more difficult - use a centimeter tape.
Let's start marking the poles. Wrap the strip around the temari ball and stick a pin in the south pole. For the accuracy of the pattern, it is imperative to check whether the “southern” pin is equidistant from the “northern” one. To do this, you need to rotate the strip a few degrees - if the cut out triangle coincided with the pin, then everything is fine. Repeat the measurement several times.

Insert pins into the vertices of the triangles at the equator, then wrap the strips around the equator and insert two more pins into the remaining triangles. This is where we need pins with colored heads - this way it will be easy to distinguish the “poles” of the temari ball from the “equator”.
Return the strip to the north and south poles and check the accuracy of the location of all four pins on the equator. If they are uneven, correct using a strip.
Marking the pattern with a thread
To mark the pattern, take a metallic thread slightly longer than three full circles of the ball. Secure it with an ordinary knot, thread it into a long thick needle and insert it into the base at a distance of about three centimeters from the north pole, and bring it out as close to the pole as possible. The node must hide under the winding!
Wrap the thread over the pins around the ball. At the "north pole" turn perpendicular and wrap again, securing at the poles with small stitches.

Unnoticed, under the base (several stitches possible), bring the thread as close as possible to one of the pins on the equator and draw it along the pins, also securing with a stitch on each meridian. Then secure the thread with 2-3 stitches, insert the needle into the warp near the anchor point, bring the thread out at a distance of 3 cm and cut. Be careful - it is important not to cut the base here !!!
Half of our New Year's gift - a temari ball is ready! The most difficult part is over, the most beautiful thing begins - the execution of the pattern. And we'll talk about how to properly embroider a beautiful pattern on a Japanese temari ball in!