Enterlac technique. Detailed MK from the site 3knosu.ru


How to knit such beauty? The site 3knosu.ru has a detailed master class, which I quote. I found pictures before and after MK on the Internet, including on gallery.ru.
What does this newfangled word mean?
Enterlak- knitting technique, the fabric looks like it was made in a patchwork technique, but the whole thing is knitted as a whole without tearing off the thread. It used to be called a braided pattern, but now Enterlak sounds more interesting. But this technique has been knitted for a long time and in old magazines there are a lot of models knitted in a similar way.
How is Enterlak different from other knitting methods.
Intarsia? - in my opinion, has nothing to do with Enterlak.
Modular knitting or patchwork - we knit in separate modules, shreds.
Enterlak is a canvas, the whole thing is knitted without breaking the thread! Using this technique, a canvas is created from multidirectional rectangles, reminiscent of basket weaving. This technique is suitable for both single-color and multi-color designs.
Consider the main points of knitting using the Enterlak technique
1.
If we want the edge of the product to be even, the beginning of knitting consists of triangles.
Decide how many loops the triangles will consist of, and later on the squares. To start any knitting, you need to knit a test sample. So you will calculate how many triangles you will need to knit, how many loops to dial for the initial row, and also practice knitting with this technique.
Let's say I will knit a sample of five triangles, the width of one will be 6 loops.
I type loops on the knitting needle for all triangles at once! = 30 loops. 
You need to knit using partial knitting, shortened rows.
It just sounds scary, but it's actually quite simple.
Good afternoon!
Outside the window is warm autumn, and at home ... almost winter.
Until the heating is turned on, it is cold and uncomfortable, and you just want to wrap yourself in a warm blanket.
It’s probably not for nothing that I’ve been met in the networks lately beautiful plaids knitted in patchwork style.
These are plaids from crocheted motifs, but not from the center, as we are usually used to, but from the corner.
If you have never knitted like this, let's try to master this technique.
Plaids in patchwork style.
Crochet from the corner
Let's start with the selection of yarn. Choose any one you like. Can be used if there are a lot of them. It is only necessary that they be of the same thickness and match well in color. Properly chosen colors are the main key to the success of patchwork plaids.
On a blanket measuring 2000x1800 cm, about 2 - 2.5 kg of yarn is usually consumed.
It is better to use yarn of medium thickness, it can be a wool mixture or acrylic.
We will consider three options for knitting from the corner - three patterns for knitting blankets.
Plaid crochet in patchwork style. Diagram of a simple motif associated with an angle
Such a beautiful plaid, and knits quite simply.
Knitting pattern for a plaid motif

We start knitting a plaid motif with a ring of 4 air loops.
2nd row: columns with one crochet in each column of the previous row, and in the corner of the motive above the arch of air loops: 2C1H, 2VP, 2C1H.

To assemble a patchwork crochet plaid, we tie all the finished square motifs around on four sides with single crochets of yarn of the same color. In this case, black.
You can, of course, connect motifs to each other in the process of knitting. But for a large product, this is not always convenient.
I like to sew all the motifs already connected with a needle and thread, or crochet.
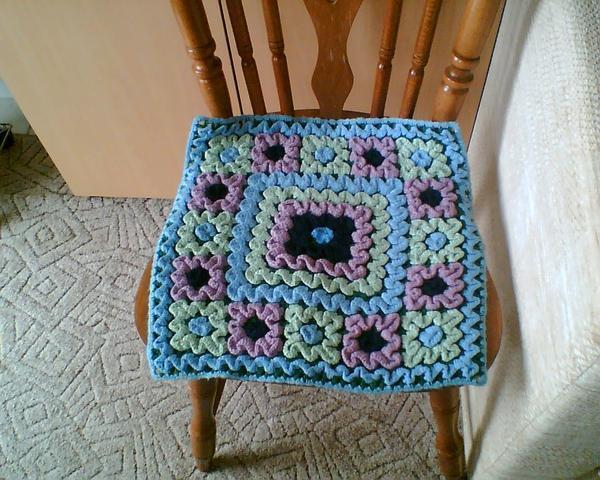
Knitted plaid in the style of a patchwork granny square pattern from the corner
This plaid uses the scheme of the well-known, maybe even boring, but nevertheless popular and always fashionable pattern "".
And the highlight of the plaid is the knitting of such a square from the corner.


In the first two rows, we knit a small square in a circle.
1st row: 3VP, 2S1N, 3VP, * 3S1N, 3VP * - repeat two more times. We connect the first and last loops.
2nd row: in each arch of air loops we knit 3S1N, 3VP, 3S1N.
From the 3rd row, we knit in reverse rows only on two sides of the square motif: three double crochets each, introducing a hook between the groups of columns of the previous row. There are three air loops in the corners.
Having connected the motif to the desired size, we knit the last row already round on four sides.

Knitting a plaid in the style of a patchwork in reverse rows
As you already understood, knitting motifs of patchwork plaids is done in reverse rows.
The plaid shown in the next photo is made according to the same knitting principle on both sides alternately: first from above and to the right, then from below and to the left.

This is a photo from a foreign magazine, without a knitting pattern. Let's figure out together how to knit such a beautiful plaid.
For clarity, I enlarged the fragment of the plaid.

It uses knitting with double crochets, it seems to me, and
First, we knit a small orange square.
Then we knit from the left and bottom a row with single crochets with white yarn, two rows with double crochets and another row with single crochets.
We attach the brown melange yarn and also tie it with single crochet and double crochet on the right side and on top.
Again, knitting from the left-bottom with white yarn with a “knob” pattern.
Then a bump pattern with burgundy yarn on top and on the right.
With beige yarn, we knit three rows with double crochets on the left and bottom.
And the last stage is brown yarn on top and on the right with a “bump” pattern.
We collect a crochet blanket from squares.
Patchwork baby blanket
Another patchwork plaid I really liked. Although here knitting does not start from the corner, but from the middle, but further, according to the principle described above, we knit alternately from different sides with different yarns in reverse rows.

Such bright juicy colors are perfect for.
Knitting a flower motif for blankets from the corner
Another interesting pattern for patchwork blankets, knitting on which starts from the corner. In the corner of this motif there is a small flower, let it be a chamomile.

First we knit a chamomile:
1st row: * C1H, 2VP * - 8 times.
2nd row: over the arches of the air loops we knit 5 C1H, between them - 5VP.
The 3rd and 4th rows of the motif according to this scheme are knitted in a circular fashion in a spiral, here one row passes into another.
And from the 5th row we knit in reverse rows on both sides of the square motif.
I connected the motif with a granny square pattern with a chamomile in the corner.

By connecting the motifs, you can also knit a fun cushion cover for the set.
It will look something like this in my photoshop:

As you can see, patchwork style blankets are very interesting to knit. And how beautiful it turns out and original to the same.
The ideas of all the blankets of our blog are collected in this video:
In patchwork technique, along with traditional sewing, knitted patchwork is also popular. The product is created according to the same mosaic principle, only instead of patches with knitting needles or crocheting, details (motifs) are knitted from multi-colored yarn. Creating new schemes and patterns, designers and experienced craftsmen create original blankets, bags, tablecloths, cardigans, dresses, sweaters, jackets, mittens, toys and other interesting extraordinary things.
Patchwork is a convenient and exciting type of needlework for beginners, because knitting a motif in the form of a simple geometric figure with a thread of the same color is easier than knitting a large canvas. A variety of colors pleases the eye, besides, an unsuccessful square can always be bandaged, achieving perfection. You can see the product options in the video and photo.
There are 2 ways to use this technique:
- Knit individual motifs(squares, rhombuses, polygons, shells). The elements of the canvas are formed according to the chosen scheme and the individual parts are sewn (with a needle or crochet).
- Fragments are connected already in the process of knitting. For this method, it is enough to know how to read diagrams, be able to cast on loops, decrease and knit facial loops.

Knitted patchwork with knitting needles: schemes
Before knitting mittens, jackets and sweaters, you need to master the technique of knitting a square. For example, you can take a width of 15 loops. It is convenient to use the pattern and circuit calculations.

All squares in the technique of patchwork knitting are performed as follows: facial loops on both sides. In the second row, decrease by knitting 3 loops in the center together with the front one.

After decreasing the last 3 loops, the thread is cut and fastened by pulling it through the last loop.

The second square is knitted in the same way, with decreases in every second row in the center. A number of squares are knitted to the planned width of the canvas by analogy with the second square.
After the end of the first row of squares, they move on to the second row, for which 15 loops are cast on the upper edge and 16 more in another way: throw air loops on the knitting needles.

To cast on for the second square, cast on 15 sts along the edge of the first row, one more from the corner and 15 more sts along the edge of the adjacent square of the second row. We knit a square. Continue knitting in the same way until the fabric reaches the height of the intended thing. Using the prepared patterns, knit rows of squares using the same method.

Knitting a patchwork tablecloth (video)
Patchwork knitting: socks and slippers
In patchwork technique, you can knit anything: a plaid, a hat, a cardigan, a pullover, mittens and even socks. A master class on making patchwork slippers will help you master knitting socks. First you need to prepare yarn of the same texture and thickness, but in different shades and knitting needles of the corresponding number.
Master Class:
- Starting with a control sample. It will be a square with a diagonal, 2 times shorter than the foot. On the needles you need to dial 35 loops.

- Continue knitting, decreasing loops in the center until 9 stitches remain. Now you can measure the foot and compare with the diagonal of the sample. If the results match, you can continue knitting, if not, bandage the square, increasing (or decreasing) the density of knitting.
- Let's move on to the second square.. On a free needle, cast on 13 loops from the edge located on the left, and knit them with facial loops.
- Should do the same and with 13 loops on the right side.
- There should now be 35 stitches on the needles.. We knit them with facial ones.
- We continue knitting according to the scheme, which was used in step 3, until 1 loop remains.
- Now you can cut the thread and dial 34 loops on the knitting needle with yarn of a different shade.

- In the same way the other side is also tied.
- We return the thread, which knitted a sock. Cast on 34 edge stitches and dec heel to 9 stitches.
- Dial 13 edging and knit a row of facial.
- Similarly, on the right sides.
- Knit the last square to the top, using the same scheme for decreasing.

- Knit in this way 8 rows and close the loops. You can try on - the slippers are ready. If you increase the number of rows for tying to the required height, you can also tie a sock. Mittens are also knitted according to this principle.
Knitted sweaters in patchwork technique
For those who have mastered the general principles of knitting - socks, patchwork-style mittens from photos, videos and master classes, you can swipe at a cute sweater or pullover, especially since a detailed master class is available even for beginners.
The scheme is designed for the 36th size, if you need to increase the pullover, you need to calculate the loops for your size as in normal knitting.

mesh pattern
The main part of the product is connected with a mesh pattern, for which it is necessary to dial loops that are multiples of the number of 4 + 1-a + 2-e edge.
Front side: hem + rappoport: 2 loops together crossed front + 2 yarn over + 2 front together. The latter are one front and edge.
Purl: hem +1 out. + rappoport: 1 out. + nakid (out.) + nakid (out.) + 1 out., hem.
Pattern "braids"
Cast on 20 stitches + 2 edge stitches. Use the diagram, the photo shows only the front side, since the wrong side is knitted according to the pattern, where the yarns are knitted with the wrong ones. A fragment of the pattern is repeated from the 1st to the 10th rows.

It should be noted that the back and front on the pattern are knitted separately, then sewn according to the pattern. The direction of knitting is shown by arrows.

Each part of the front and back is knitted 2 times.
Instruction step by step:
- The pullover is started by knitting part A with a gray thread. There are 39 loops on the needles, the fabric is knitted with a mesh pattern to a height of 24 cm (58 p.).
- To knit part B, 27 loops are cast on with a gray thread, 74 rows (30.5 cm) are knitted with a mesh pattern.
- For detail A, 22 loops are collected with a beige thread, knitted with a “braid” pattern 58 p. (24 cm).
- For detail B, 22 loops are cast on with a beige thread and knitted with a “braid” pattern 74 p. (30.5 cm).
- The pullover is sewn using a pattern.
- To tie the shoulder strap, 86 loops are cast on the edge of the upper edge with a beige thread, 4 p. (1.5cm) purl stitch. Then the loops must be closed.
- For the lower bar, you need to dial 86 loops with a gray thread, tie the fabric with the wrong side by 1.5 cm (4 p.) And close the edge.
- The next step is knitting the sleeves. Gain 42 loops with a gray thread, knitting a bar for 1.5 cm (4 p.) With the wrong side. Then knitting is continued with a mesh pattern, using only rappoport. For the bevels of the sleeves, add 9 loops from the strap on each side in every eighth row, then in every 6th - 12 times in a loop.
- There should be 60 stitches left on the needle. When the sleeve length reaches 33.5 cm (80 p. from the bar), you can close the loops.
Gather a pullover, starting from the shoulder seams - 13 cm on each side. Then in the middle there are 22 cm of open loops for the neck. It remains to sew on the sleeves, connect the side seams and the seams on the sleeves - the pullover is ready, and you can proceed to the fitting.

It is better to master the technique of patchwork knitting - socks, mittens, cardigans and hats, a video master class will help.
Knitting in the style of patchwork (video)
Even those who have not had to work in the patchwork technique before should master it, which opens up new horizons for creating exclusive products.
Creative inspiration to you!
Knitting in the style of patchwork knitting needles (photo)


Knitting in patchwork technique


The work of Tatiana S.
Author of the master class: NatalkaPl
Even the most novice knitter can knit in this technique, it is enough to be able to knit front and back loops
So, for knitting we need threads, you can take the leftovers: different balls, just pick them up by colors and stocking knitting needles. 
For one square, we collect 22 loops, 11 on each side. 
First row: knit 10 stitches, knit stitches 11 and 12 together, and knit to the end of the row.
Important! We always knit the first loop with the front one, and remove the last one inside out (the thread before work), without knitting! 
This is necessary so that if we knit with colored stripes, so that the first loop does not move in a row in color.
We knit the purl row with the front ones, Do not forget - we knit the first loop with the front one, remove the last one without knitting, the thread before work.
Next, in each front row, we knit the central three loops together until one loop remains on the knitting needle. 

The small square is connected.
Now let's see how the half of the large square is knitted.
For him, we need to dial 44 loops.
Knit 1 row, knit 10, knit 2 together, knit 20, knit 2 together, knit to end of row. Do not forget - we remove the last loop inside out. Purl rows knit facial. Further, in all front rows we knit together three loops, where in the first row we knitted two together. 

The last piece is knitted according to the same principle - three squares.
For him, we collect 66 loops.
First row: 10 facial, two faces together., 20 facial, 2 faces together., 20 facial, 2 faces together, facial to the end of the row. We remove the last loop inside out. 

These are the three main elements when knitting a patchwork with knitting needles. It is from them that all patterns are made. Next, I will show how they are interconnected.
So, let's start connecting our pieces into a single canvas. 
From the edge of the two squares we raise 22 loops - 11 from one and 11 from the other. And we knit the third square in the same way as the previous ones. 
Ready! 
If you need to knit a square on the side, and we have only one edge, then we raise the loops from the edge (11 loops) and pick up 11 more loops on the knitting needle. 

Thus, we knit the fabric of the desired size. 
Other elements are connected to the canvas according to the same principle.
You can connect elements of different sizes, arrange them in a different order - it's all just your imagination.
To make it easier to work, I advise you to first make a pattern on paper and draw a diagram of the location of your pieces on it. 

And another option for knitting. 
Patchwork with knitting needles is most often knitted from square motifs.
The first option - needlewomen knit motifs, and only then form products without using any patterns.
The second option - the squares are not sewn together, but connected during the knitting process. To perform knitting in this technique, the needlewoman must be able to make a set of loops, knit facial loops and make decreases.
1. First you need to choose a yarn. It is best that the yarn is of the same type. The number of yarn colors you choose is up to you.
2. Dial 21 sts on the needles and knit with a garter stitch: front and back rows - faces. n. Form the edge of the squares with knots, for this, at the beginning of the row, remove the edge loop, without knitting, the thread at work, knit the edge loop at the end of the row.
In each 2nd row, decrease, knit three central loops together (the second and first loops are interchanged, 2nd loop from above, then knit 3 loops together).
In the last row of the square, knit the remaining 3 loops together, cut the thread and fasten
Then proceed to knitting the second square. To do this, along the edge edge of the first square, dial 11 sts on the knitting needle, then dial 10 more sts on the knitting needle (thread air loops on the knitting needle with a working thread).
Knit in garter stitch, decrease in every 2nd row, as in the first square
Knit the remaining 3 stitches together, cut the thread and fasten off.
Cast on the third square and knit like the second.
Knit the first row of squares to the desired width of the product, cast on and decrease loops, as indicated in the second square.
Having knitted the first row of squares, proceed to knitting the second row of squares. To do this, cast on 10 loops on the knitting needle (put air loops on the knitting needle with a working thread), 1 st from the corner and 10 sts, dial along the upper side of the first square.
Knit in garter stitch and decrease as indicated in the previous squares. In the last row of the square, knit the remaining 3 loops together, cut the thread and fasten off.
To knit the second square of the second row, along the side edge of the first square of the second row, dial 10 sts on the needles, from the corner 1 st and, along the upper edge of the second square of the first row, dial 10 sts on the knitting needles.
Then all the other squares are dialed and subtracted, like the second square of the second row.
Next, knit the 3rd, 4th, 5th, 6th, etc. rows of squares according to the principle of the second row of squares.

It seems that everyone can master crocheting - and indeed, this needlework submits to all ages and levels of training. And even for beginners, not just napkins and hats are interesting, but more complex things, including patchwork - in this case, patchwork knitting.
This truly outstanding technique was invented by Virginia Woods Bellamy, she also called it numerical knitting. You can also find such a name - modular knitting. For example, you knit a square in the most familiar way. And these squares need to be connected a lot, then to connect. Not firmware, mind you, but also crocheted.
What is most often done in this technique:
- Plaids- big and small. Knitting a blanket for babies is especially popular today; it is often given to young parents.
- Rugs. Only the yarn needs to be taken thicker, but otherwise it fits like a blanket, but the purpose will be different.
- Tablecloth. Long work, but the result is worth it.
- blind. For framing the kitchen window - a very interesting option.

Actually, you can figure out for yourself what you use this technique for. But for home comfort, this is one of the best tools. And most importantly, everything is simple, and even beginners can cope with this with due perseverance.
Schemes and samples: crochet patchwork for beginners
In this technique, you can do a lot of things that will decorate, for example, the kitchen. And if it has the same geometric rigor that does not go well with home comfort, warmth, then such home-made things will solve the problem.
One of the trendy ideas is knitted table mats. Yes, not napkins, namely rugs. They are not one hundred percent practical, but they look charming. To knit such a rug, you need very dense threads. Preferably, even tough ones. And the knitting will also be tight. These are either colored stripes, quite wide. Or the same connected squares.
Stool cover. It's also a cozy item. It's warm and cute and knits pretty quickly. And if you want more fresh ideas, then they will be found. How do you like the idea to wrap the window sill?

Yes, you can knit a bedspread on the windowsill. For a wide window sill, this idea will be especially relevant if you like to sit on the windowsill and drink a cup of tea. A cozy knitted rug made of fragments will contribute to that desire.
Patchwork Crochet: Patchwork Rugs, Filet Crochet
Very often, the filet method is used to knit patchwork rugs. This is knitting in the technique of fillet lace. Fillet from French - mesh, this is the essence of this method. Knitting in this technique is simple, and even beginners will understand the patterns.
The canvas in sirloin technique can have a different shape - it is a rectangle, and a circle, and an oval, and a polygon. The edge of the canvas can be shaped with teeth, waves and scallops. And for a patchwork rug, a border knitted in the sirloin technique can also be used. It's cute, refined, and compliments to your work will be the words "fine work", which really reflect the essence of things.
How to crochet a patchwork plaid
To work, you will need woolen or cotton threads. Choose skeins of juicy, bright colors. But do not forget about the principle of balance of color accents.
Crochet plaid:
- Dial a circle of air loops. The next three air loops will be the beginning of the first column, then knit two columns with a crochet.
- Then cast on two double crochets, then three double crochets, repeat this twice, then cast on two more air loops. Connect the ends of the workpiece.
- In the second row, the corners of the motif are indicated. Two air loops are dialed between double crochets.
- According to different schemes, blanks can be made - in only two rows, in others four - in the third six, etc.
- Details can be connected to each other arbitrarily, but it is better to do it according to the scheme.
- Change the thread every two knitted rows. Motives can be used the same size.
.jpg)
This scheme is simple. But if you are just starting out, then learn to knit on such simple patterns. A small plaid usually consists of twenty large squares. Such a blanket is suitable for a kitchen sofa or a sofa in a nursery.
Bedside rug (photo master class)
With your own hands, using a hook and threads, you can create a unique piece of furniture that can not only decorate the house, but also become a practical and convenient favorite thing. If there are no knitting threads available, it doesn’t matter: in this case there is a simple solution. Everyone in the closet has a couple of old unnecessary knitted things.


Crochet patchwork (video)
Patchwork knitting is an exciting needlework that results in cute and cozy things that create an atmosphere of home. From them it immediately becomes warm and joyful, after all, this is the work of living hands.