A universal selection of gift ideas for every occasion and occasion. Surprise your friends and loved ones! ;)
Friends, hello everyone! Today I wanted some romance, a beautiful manifestation of feelings. And what if not hearts allow you to do it best? That is why I will tell you about how to make a heart with your own hands.
Hearts are generally my favorite theme - I often give them to family and friends. They are so versatile that they are suitable for literally any holiday, from the classics (February 14) to the exotic (Halloween, for example). If it weren’t for the time limit, then hundreds of these wonderful things would be churned out and flunked by all my friends))
The variety today will be terrible - from unusual paper ideas to mind-blowing fantasies from wire. For every taste and color, so to speak.
How to make a heart with your own hands: amazing ... simple
I have prepared for you as many as three dozen ideas, so there will be clearly plenty to choose from.
Balloon heart
You can make an amazing heart with your own hands if you prepare two long balls (from which different animals are still twisted), thick threads, scissors and silicate glue (you can try experimenting with other glues, the main thing is that they are transparent).
The process is simple: inflate the balloons, as in the photo and wrap them with threads soaked in glue. You can apply several layers to make the design more weighty. After the glue dries, the balls need to burst and get them out of the finished frame. The tubes then need to be glued together, slightly cutting one. All that remains is to hang.

paper heart
Gentleman
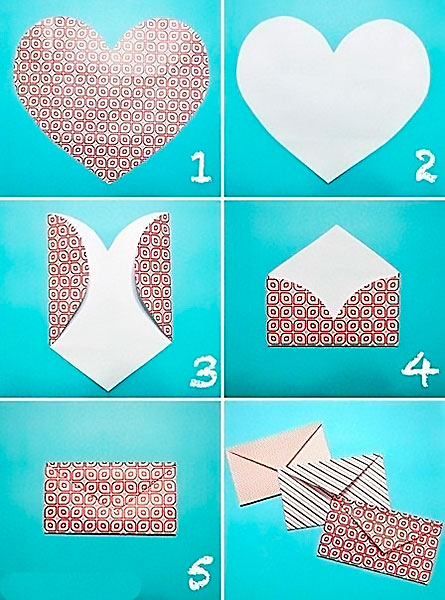
This is a two-in-one craft: you can make a designer box or leave it as a valentine. Probably, it can even be called an almost voluminous postcard due to the presence of an intermediate box between the two halves of hearts.
You will need cardboard or thick paper, scissors, glue, satin ribbon and decorative elements. Cut out all the details according to the photo and connect. If you want to make a box, then make it as well (numbers 6-7). Glue everything together.

The envelope
A very simple idea. A heart shape is cut out of paper, in which the side, and then the lower edges are bent. The corner becomes a closing element. If the edges are loosely fastened, then on the heart itself you can write wishes in advance and only then fold.
Heartfall
To implement this decorative idea, you will need several dozen hearts, in each of which make an incision in the center and glue. Such a composition can be placed not only on the wall, but also on the panel.
Tip: you can decorate a pillow with such hearts if you make them from felt.

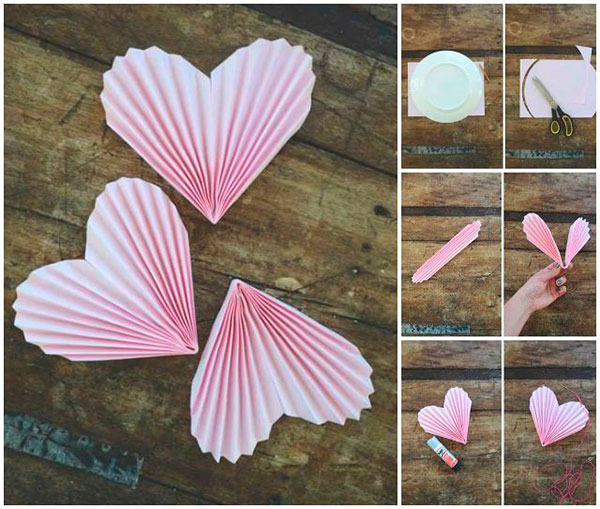
mermaid tail
The unusual shape of this souvenir is achieved by repeatedly folding the cut circle with an accordion. After that, you just need to fold in half and glue.
The geometry of love
What if not she will help you create this heart card. The most important thing here is not to make a mistake with the folds. Great option for Valentine's Day

The heart of a loved one with your own hands
Undoubtedly, all previous options fit perfectly into this category. But I want to highlight a few romantic patterns in particular for this occasion.
From felt
A classic, but such a cute heart, which can become both a separate souvenir and an element of an interesting project. For her, you just need to cut out two parts and connect them with a “forward needle” seam. Before finishing, fill the souvenir with padding polyester and sew to the end.
Tip: decorate a hearty gift with beads, sequins or buttons - then it will sparkle with new colors.

clip
And again wire fantasies. This time the heart is for the ear. It is only necessary to twist the wire so that it forms, as it were, a clamp consisting of two hearts.
Finally, I advise you to read articles about homemade gifts for your sister and dad - there are also ideas for homemade hearts here.
On this I end and say goodbye to you until the next article. Tell us about your impressions, share links in social networks. networks and subscribe!
Sincerely, Anastasia Skoreva
29.05.2018 3 198 0 Anya
skillful hands
It is always nice to receive a heart as a gift. And it’s even more pleasant to make it yourself and with a soul for those you love. Paper hearts can be made in a variety of techniques and have different sizes and different interpretations. In our article you will find several ways to make a heart out of paper, and be sure to choose the right one for yourself.
Content:
simple paper heart

For work, take a rectangular sheet of colored paper. Mark its middle on each side and bend from it as if you were making an airplane. Then unbend. And so repeat on all sides. As a result, the fold lines form a diamond in the center of the sheet. Then, first fold all corners about 2 cm, and then fold the paper along the fold lines. Follow the diagram below and in the end you will get the desired craft.

Such a heart can be used as a postcard, inside which wishes are written.
Volumetric paper heart

To get started, prepare the following materials:
- colored paper;
- simple pencil;
- scissors.
Do the work following the following points:
1. Take colored paper, draw a rectangle so that its dimensions are 2:1. Then fold the paper along the diagonal lines four times. Expand. You should have 2 crosses.

2. First, on one side, fold the paper along the X-shaped lines, guiding towards the center. Do the same from the opposite end of the sheet. As a result, you should make triangles. Turn towards you with the side that is visible in the photo.

3. From the center, turn all the parts towards the top. After that, you need to open all the valves, and tuck one of the sides of the workpiece.

4. Turn the workpiece over with the other side facing you. In this case, the corners must be bent. Then turn over again and open the valves one by one.

5. All valves (8 pieces) must be opened and closed one by one.

As a result, you will get a very original craft with which you can decorate the interior, a gift, or simply hand it to the addressee.
Bookmark heart
A gift in the form of a beautiful bookmark will be appreciated by lovers of reading at their leisure, and simply by those who have to work a lot with books. Moreover, there are such bookmarks that help to fix the desired page, and at the same time decorate the subject of knowledge. Even better, give a set of cute bookmarks made in different ways.
Method 1

Take colored square paper and get started.
- Fold the paper from left to right, and then from top to bottom. Expand.
- The result is a line in the middle, to which you need to attach the bottom edge of the sheet. Turn the piece over.
- Wrap the corners on the bottom side so that they touch the vertical in the middle. You must use this action to make a corner at the bottom. Turn the workpiece over to the front side.
- Wrap the corners up so that the extreme top point of the corner lies in the middle of the top of the sheet. Turn over again.
- Bend the top element on the strip and you will see triangles that will need to be straightened.
- Bend the small corners, and behind them the 2 lower ones.
- Turn the almost finished craft over and wrap the sides away from you. Got a bookmark.

Method 2
- Cut a square paper sheet into 2 identical pieces.
- Take one of them, put the long side down and fold from the bottom up.
- Next, bend from right to left.
- Unfold all folds.
- Bend the bottom 2 corners to the fold line in the center to form a corner. Turn the piece over.
- Bend the third part of the upper edge, and then wrap the corners on both sides on one and the second strip.
- Turn the craft over and see what happened to the heart.
Advice! The corners can bend and cling to the pages at the wrong time, so you can fix them with glue. The same can be done with the middle of the bookmark, where the center line may diverge.
box heart
Method 1

You can put any gift in such an original and cute box: a watch, a soft toy, beads, cosmetics, etc.
Gather the following materials before you begin: high-density colored paper, glue, a pencil, scissors, a ruler.
Having prepared the workplace, proceed to the manufacture of crafts.

1. Print or redraw the diagram below on the prepared sheet of paper.

2. Take the scissors and cut out the workpiece, carefully passing along the contour. Tuck the extreme elements (refer to the photo).

3. Attach the parts to each other in order, having previously smeared the joints with glue.

4. Wait until the glue dries and you can use the resulting heart-shaped box.

The most interesting thing is that such a box can be made in any size, depending on what you plan to put there.
Method 2

You can combine the box with a postcard (2 in 1) to make an original and complete gift.
Take the following items to work:
- high-density colored paper (there is an option to replace with cardboard);
- pencil;
- ruler;
- scissors;
- glue;
- felt-tip pen.

Draw on paper the exact template for the box you want.

Draw the lines of future folds with a dotted line, and circle the contour itself with a felt-tip pen 1-2 tones darker than the color of the paper.

According to the dotted line, make bends and fold the box, gluing it in certain places with glue. After everything dries, write your wishes or just a couple of nice words on the front side. In the middle you can put something suitable in size or sweetness. In this form, you can present a gift to your dear person.
Heart-envelope


If your choice fell on this or that person and you have a recognition for him, then it's time to think not only about specific words, but also about their beautiful design. For this, an envelope in the shape of a heart is the best fit. which you can do by yourself.

Prepare a square sheet of red paper.


Fold the corners neatly to make a triangle. Unfold and fold on the other side. Expand again.

Bend one of the corners to the center so that its top touches the most central point of the sheet.

Turn the sheet over to the other side and wrap it from the bottom so that the bottom top falls on the border of the top side.

Wrap the left side so that its edges coincide with the extreme line of the large triangle from below.

On the right side, do the same. It turned out something like an angular heart.


Turn the wrong side towards you and slightly bend the corners on the sides.


Then 0.5-1 cm fold the corners on top and turn the craft over. Now you can put an ambiguous note in such a thematic envelope.
Heart with wings

A handmade heart with wings will look original as an independent gift.
One has only to stock up on a square-shaped sheet of paper of the desired color (200 by 200 mm). It will make a craft 2 times smaller.
How to do?
- Fold the prepared sheet in half, first on one side, disperse, and then on the other side and unfold again. There are fold lines.
- Fold the top of the material and the bottom so that the edges touch the fold line in the center. Turn the piece over.
- Fold the bottom corners into the center. Flip.
- Fold the strip into the center.
- Bend the upper element of the strip back, smooth out the corners that have formed.
- Make triangles at the ends of the strip by folding them. Turn the piece over.
- On the upper points of the heart, also slightly bend the corners. Enjoy work!

Ring with a paper stone in the shape of a heart

On the hand, such a ring is unlikely to have to be vilified for a long time, but it is quite possible to decorate a marker or a pen.

You should get a ring with a pebble-heart in front.

Paper heart: modular origami
From the many modules you can make a very beautiful gift for Valentine's Day and not only. Such a heart will come in handy at any time and will bring a lot of joy to your loved ones.

Necessary materials:
- paper of any color;
- scissors;
- glue.
We do the following:
1. Build many separate modules from prepared paper, from which you will later assemble a single structure.
Advice! Offer to help the children with this activity. They will be happy to spend time doing an exciting business with colorful elements.
You can find the assembly diagram of the modules below.

2. The most difficult process is fixing the made particles (modules). This will require some physical strength of the fingers and dexterity. You will find an approximate scheme for fastening modules below.

Having caught the essence of fastening elements-modules, you can recreate the heart of any variation.

Paper hearts: printable template


Video instructions
There are many techniques and methods for creating a paper heart. We will present some interesting videos on this topic:
1. Volumetric origami heart:
2. 3D heart:
3. Origami Heart with Wings:
4. Wicker Paper Heart:
Good afternoon - today I will show the most interesting ways to fold a heart using the ORIGAMI technique. That is, we will add voluminous puff heart from an ordinary square sheet of paper. I will show simple quick techniques that can be used as a paper heart craft for kids. I will also show beautiful origami crafts in the shape of a heart with which you can decorate a gift for Valentine's Day or inside which you can hide the gift itself(jewelry). You can make little hearts, big paper hearts. Use the heart as an idea for decorating valentine cards. Make a heart bookmark for a book with your own hands as a gift to your loved one. And even a heart in which you can wrap a lollipop. Anything from the simplest ideas to more complex paper heart folding techniques. Templates, schemes, master classes are waiting for you in this article.
Paper origami heart
PLUSH INFLATABLE.
Here in the photo below we see a beautiful paper heart made of paper, which is filled with air and due to this it turns out to be plump like a donut.

The basis for this origami heart is a regular square of paper - red on both sides. Office crane paper is suitable. We fold the square in half twice - vertically and horizontally. We get a strip (a square folded in half) in which the line of the previous fold is visible in the middle. Now we raise the corners of this strip - not reaching half a centimeter to the center line (fold).
Turn the craft over so that it lies with the top of the triangle up. And now we raise the edges of the lowered sashes up - flush with the sides of the triangle.

Now lower the newly raised edges of the flaps again. We lifted them only to get the fold lines. And now we bend both corners of the triangle (left and right) with a sharp edge to the beginning of this fold line (which we just got). We get the upper triangular ears.
Now you need to raise the corners - sticking out below the ears. Bend these corners up. And then hide under the upper ears.

The finishing touches of this simple origami paper heart craft are left. We see that the craft resembles a pentagon with sharp corners on the sides. We need to smooth out these sharp corners, so we knead them slightly with our fingers (as shown in the photo of the paper heart).
Now turn our heart craft face up. And we notice that at the bottom of the sharp tip of the heart we have a hole. It is necessary to blow into it - so that our heart straightens, fills with air and becomes lush like an airy soufflé.

HEART ORIGAMI
WITH WINGS
From red and white paper.
For this craft, we need paper that is painted red on one side only.

Here's an easy way to make this origami paper heart with one side dyed red.

We take an even square of paper as a basis. We bend the square in half - 2 times, vertically and horizontally. Then again we straighten the square with the white side up - it turns out 2 fold lines - cross to cross.
We raise the lower edge of the square to the horizontal fold line in the middle. And immediately turn the craft over with the colored side up - so that the fold line of our edge is at the top. And now we bend 2 corners down to the middle vertical line - the right corner and the left corner below - it turns out as in photo 2.
We turn the craft with the white side up - we get the position as in photo 3. And then something that I could not decipher begins. No matter how I twisted the module, I could not figure out what to do with it in order to get picture 4 from picture 3. Maybe I'm stupid, but you have a bright head and you can understand how to make such an origami heart. I am publishing this step-by-step puzzle for those who like to brainstorm.


I have Another way out of this puzzle... Below we see a heart that can be made with wings. If we go through this master class, we get just the stage of a heart with a piece of white paper behind. This white part can be folded into an accordion in the form of a fan and decorated as wings.

2 easy ways
Quickly make an origami heart
from paper.
Here are two step-by-step diagrams for how to make a beautiful little paper heart.
The size of the future heart will be 4 times smaller than the sheet you have chosen. That is, the side of the square of your sheet of paper should be 2 times longer than the intended origami heart.

And here are more step-by-step photos for folding a heart from a two-color sheet of paper.

Such hearts can decorate a card or gift wrap for Valentine's Day.

And here is a way to make a simple paper heart FROM A TRIANGULAR piece of paper. And you can also immediately rob this heart for good - wrap a lollipop in it.


Lollipop sticks can be designed as cupid's arrows. A great souvenir gift for Valentine's Day.

You will find even more simple ideas with a heart craft for children's creativity in a special article.
heart envelope
with a surprise or a note inside
in origami technique.
Here is an interesting master class that will help you make an interesting heart craft. A square of paper with the contour of a folding heart extended upwards. The upper part of the square opens and inside under the heart can hide a note or a small gift (ring, chain, keychain, earrings).


And here is another very simple packaging-envelopes in the form of origami hearts. Where inside the heart - in its two halves triangular pockets are formed in them, you can hide coins or small jewelry gifts.
And here is another folding envelope decorated with a heart made of soft but thick paper napkins. The master class below is quite simple - follow the arrows on the diagram and repeat all the simple operations of the template.

You can find other interesting ideas for heart-shaped envelopes in the article.
And also we have an article that will teach you how to make boxes in the form of a heart simply and quickly.
Bookmarks
in the form of a paper heart.
Here's a pretty little heart that can work as a bookmark for your book. A great gift for Valentine's Day is a book and a simple handmade heart.


And you can make a bookmark-heart - which is put on the corner of the book. Because it has a triangular pocket at the bottom, which you can just put on the corner of the page you are reading now.

And here is another option for bookmarking books, also in origami technology. The heart that wears anything, on the edge of a gift bag, on the edge of a book, or on a clothesline in the bathroom… that you have filled with the scent of a bubble bath and strewn with rose petals. Great idea for a romantic evening on Valentine's Day.

big complex
ORIGAMI HEART
With a large flower.
In the photo below, we see a detailed master class for crafting a pink heart with a beautiful origami flower in the center of the heart. It looks complicated to the eye. But in fact, this is a very understandable way to fold origami hearts. The photo looks scary. But when you start doing it with your hands, everything folds up by itself and easily turns in the right direction.


Minor manipulations, with the eversion of the flower petals, are best done with an auxiliary tool (nail file). So even the smallest almost jewelry paper crafts-hearts can be made without difficulty with your thick fingers. As in the photo below.

These are the step-by-step, step-by-step lessons on creating a do-it-yourself paper heart using the origami technique you found today in our article. Simple ways and easy options are good for warming up your arms. To quickly get the result and be happy, but you can take a picture of complex things on your phone and someday sitting in a boring place (queues at the clinic or in the waiting room waiting for the customer) - you can tear a page out of a notebook and get a new skill - the ability to make a small symbol out of paper love. A great gift for the eighth of March, for Valentine's Day.
Inspiration to you and love.
Olga Klishevskaya, specially for the site
Which your "soulmate" will be so pleased to unexpectedly find on a pillow or in a book. On the outer or reverse side, which, when folded, will be inside, you can leave a message and write the cherished "I love you." We offer you four origami heart diagrams- from simple to more complex options - try it yourself!
Method 1. Origami heart with reverse lapel
If you have not done origami before, this method is just right to start, it is too easy not to try :). Thanks to the lapel, such a heart can be placed vertically.
Explanation for the scheme:
1. Take a square sheet of paper and divide it into three equal parts
2. Bend corner A until it meets the fold on the left
3. Bend corners B and C so that they match A
4. Rotate the sheet as shown in the picture
5. Fold the top corner back
6. Make folds around the edges, forming roundings
Method 2. Origami heart - bookmark for a book


Explanation for the scheme:
1. Take a square sheet of paper
2. Fold the sheet in half
3. Then fold in half again
4. Expand the sheet
5. Fold the bottom half in half to the fold line in the middle
6. Turn the sheet over to the other side and fold the bottom corners into a triangle
7. Flip back
8. Fold the bottom corner up until it meets the top edge of the sheet.
9. Flip the sheet to the other side
10. Expand the fold with your finger, giving it the shape of a triangle
11. Flatten the Triangle
12. Repeat the same on the left side
13. Trim the edges up
14. Fold the bottom corners up into small triangles
15. Turn over to the other side and fold along the dotted lines. Ready!
Method 3. Origami heart from two halves
Another interesting way, shown in detail in the video master class. From the front, the origami model turns out to be similar to the previous version, only on the reverse side it is also completely folded in the shape of a heart.
Method 4. Heart with a flower

This method is a little more complicated than the previous ones, but don't let that stop you! For such a heart, it is better to use paper with sides of different colors so that the flower in the center turns out to be expressive.

1. Take a rectangular sheet of paper, the length should be twice the width. Initially, this method was invented for dollar bills.
2. Bend the triangles on both sides. Make a good fold
3. Flatten the sheet
4. Repeat step 2 on the opposite side
5. Flatten the sheet and mark triangles A and B
6. and 7. Connect triangles A and B together in the center
8. Smooth out in such a way that a flat triangle is obtained from the right edge
9. Repeat the same on the other side
10. Bend the edge of the triangle

11. Expand the triangle from the previous step
12. Smooth out to make a square
13. Bend 2 small triangles on the square
14. Expand Triangles and Flatten Them
15. Repeat steps 10-14 on the other three sides
16. Gently fold in half vertically and fold

17-18. Unfold and lift the right half
19. Lower it so that it is in contact with the left half
20. Lift the right half again
21. Fold the corners into triangles
22. Lower the right half to the position in step 20
23. Fold the top corners back
24. Flip to the other side
25-26. Bend the corners on the sides to make a heart. Flip back.
Which option did you like the most? Share in comments!
Today we want to tell you how to make a garland of hearts with your own hands, and this review will present not one example of a “heart garland”, but seventeen! From such a variety, you can definitely choose for yourself the product that is suitable for the material and method of supply. Well, with a ready-made garland you can decorate your house or apartment for Valentine's Day. A heart garland would look great on a window cornice, fireplace, furniture, or simply hung on a wall.
Valentine's Day is dedicated to all couples in love, traditionally on February 14, various souvenirs and postcards in the form of hearts are given, and the house or apartment where the holiday is planned is also decorated with hearts.
1. A garland of paper hearts and threads.
Cut out identical hearts from red or pink paper. The heart template is presented below, you can print it or redraw it, then cut it out and create the required number of hearts from it). Then, using a sewing machine, attach the hearts in a row. According to this scheme, create the required number of garlands with which you can decorate windows and doors.

 2. Garland of paper hearts.
We cut white and pink sheets into strips 1 cm wide, 10 cm long. We bend each segment in half, in the center, bend the upper ends inward and fasten with a stapler, it turned out to be a heart. We take the next strip, also bent in half, thread the segment into the previously prepared heart, and also bend the upper ends inward and fix them with a stapler. According to this scheme, we create a garland of the required length.

3. Unusual paper garland of hearts.
We cut out a heart from paper (the heart template can be printed or redrawn above or below), bend it in half. Next, we take a sheet of paper, apply a heart bent in half to it, circle this half with a pencil, retreat to the side of 8 mm, circle the second part of the heart with a pencil. The result is a heart with a wide stripe in the center, cut it out, bend along the lines of each half of the heart. According to this scheme, we prepare the required number of wide hearts, glue two such hearts together along the central fold, then glue the following hearts, just to the outer rounded parts. The result is a long and beautiful garland, colored hearts look especially impressive.


4. Garland wire hearts.
We cut the wire into segments 15 cm long, bend the segments in the center. Then we take a glass jar and scroll the wire around its neck, so an even part of the heart will form. We act in the same way with the second part of the wire, give the product a heart shape, and glue it with transparent glue with a moment. We prepare the required number of wire hearts, and fix them to each other with ribbons, tying them in the form of bows.


5. Garland-pendant of paper hearts.
We cut double-sided colored red paper into segments 12 cm long, bend them in the center, take a pencil and tightly wind the first end of the paper segment onto it, then the second, twist it into the inner part. We glue a thread to each inner part of the hearts with adhesive tape, as a result we get an excellent garland-pendant.

6. Beautiful garland of paper hearts.
It is necessary to cut the paper into pieces 1 cm wide, 6 cm long. Then take one such segment and fasten it from below with a stapler, after which bend its outer edges down, attach the next two strips and fasten everything together with a stapler. Do the same with all other paper pieces. The result is a magnificent voluminous garland.

7. Garland of wire and woolen threads.
We form hearts from the wire, we wrap each such heart with threads, then we create a cobweb effect, for this we simply lead a woolen thread from one side of the heart to the other. From above, we create a suspension from the threads and thread all the hearts onto a long woolen thread of the same color. Everything, the garland is ready, it can perfectly decorate the railing of the stairs.


8. A garland made of felt or thick fabric.
Now we will tell you how to make a fabric heart garland. We cut out hearts from felt or other fabric, sew them with contrasting threads along the outer edge, with an overcast seam, stuff them with cotton wool or synthetic winterizer, and fasten them along the upper part with a thread, in the form of a garland. There is nowhere easier, and what a beauty it turns out in the end, you just can’t take your eyes off.

9. Knitted garlands.
Lovers of knitting or crocheting can create openwork knitted garlands with hearts. Indescribable beauty!

10. Garland of hearts with pom-poms.
We cut out hearts from paper, intentionally cut out a circle in the center. Let's start making pom-poms. We take a fork, wrap its end part with woolen threads, then thread the end of the thread between the cloves in the center and wrap it several times, tie a knot. We cut the side parts of the threads with scissors, we get a fluffy pompom, with scissors we give it a rounded shape. We thread the finished pompom into the center of the previously prepared heart, create the required number of cute fluffy hearts and hang them in a row on a long woolen thread.


11. Colored paper hearts.
This garland is somewhat similar to the first one on the list, only circles are added here, and this garland is vertical. Print on a printer or simply cut out hearts and circles from double-sided colored paper. Sew them on a sewing machine in a long row, alternating hearts and circles. Such vertical garlands can decorate the window cornice.


12. Garland embroidered hearts.
We cut out a heart from paper, apply it to a whole sheet of paper, create punctures with a large needle along its outlines, then create embroidery with a red thread along these punctures, simply leading the thread with a needle from one hole to another. We cut out a square with a margin from the embroidered heart, prepare the required number of embroideries and hang them all on a woolen thread. In addition, you can write the word LOVE on top of the embroidery with a glue gun and immediately sprinkle it with plenty of sand or glue ready-made letters that you can buy in advance in a souvenir shop.

13. Pink hearts on a thread.
We cut out hearts from cardboard, in each of them on top, with a hole punch, we create two holes into which we thread a dense woolen thread, thus we string all the hearts.

 14. Tiny paper hearts.
Using a figured hole punch with a heart-shaped nozzle, we prepare a huge number of small hearts from double-sided colored paper, then we sew them with a sewing machine in a long row.


15. Fabric hearts.
We cut out a heart template from cardboard, redraw it on the fabric, cut out the required number of identical hearts, and sew every two hearts together with a dotted stitch. Stuff with synthetic winterizer or cotton. Then we string the hearts on a long thread forming a garland.


16. Colored hearts on clothespins.
Cut out hearts from colored paper (template below). Then we hang a rope on a shelf, cornice or door, pin hearts to it and grab them with clothespins. Excellent decor, absolutely not time-consuming, but very effective and non-standard.


17. A garland of multilayer hearts.
We cut out a lot of hearts of the same size from paper. Then, on one even heart, we glue the same only bent in half, on it another one of the same bent in half, after which we glue the whole product to the thread, control the number of such hearts yourself. 

Now you know how to make a garland of hearts, we think you should definitely like at least one example from the article, right?! Leave feedback in the comments! Also, the house for Valentine's Day can be decorated with candles or, but still the main element will be exactly the garland of hearts. You can make really impressive things with your own hands, and after the holiday, carefully put them in a box and next year just take them out again and transform your beloved home with them.