Hello friends!
Even when work was underway on the creation of a Children's collection of gift boxes, one of the models just “begged” to be decorated using the paper cutting technique. I'm talking about an accordion box. Well, you must admit, the carved patterns on its sides look simply magnificent! And very harmonious :). Thanks to MK and templates prepared by Olga Kachurovskaya, now you and I can make this lovely paper accordion. All in our hands!
But first, a little announcement: recently the author of the blog “Domovenok-Art” Elena Goloshtenko took it from me interview, and I invite you to take part in our conversation :). By the way, Elena is also interested in creativity, and in its most varied forms - from home cooking to soap making, scrapbooking and creating children's toys. You should have seen what a toy elevator made of cardboard Elena and her husband made for their son - it’s something! With an electro-mechanical drive, on a control panel - it’s worth taking a look, or even doing it yourself.
Let's return to our paper toys. And before you start creating an accordion box, make sure you have the following materials and tools at hand:
— paper for pastels of 2 colors (A4 sheets);
- breadboard or stationery knife;
- ruler;
— a creasing tool (or just a knitting needle, a thin crochet hook, etc.);
- double-sided tape or glue.
We start, as usual, by printing the templates on paper (the templates themselves can be downloaded below).

We cut out the patterns, and then all the details of the future accordion along the contour.

We crease and bend the parts, observing the correct bend direction (different bend directions on details 1 indicated by lines of different types). When folding “fur,” origami skills will be very useful. And for those who don’t have them yet, this will be a good way to practice =).
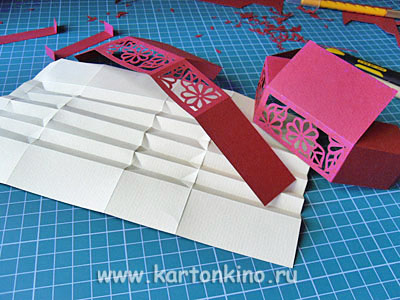
Then apply a strip of double-sided tape to the valve details 1(on the front side), having previously straightened this area.

We collect and glue the “fur” of the paper accordion. This is what it should look like:
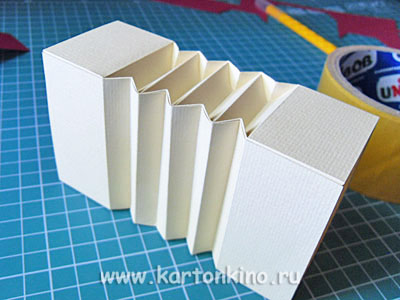
Now let's move on to the side parts. We insert “straps” into the slots of parts 2-1 and 2-2 ( parts 3-1 and 3-2). We glue them on the inside with double-sided tape.

We glue the edges of the sides on the wrong side, as shown in the photo:

And glue the side parts to the “fur”.


It’s actually easier to cut and paste patterns onto the “straps” even before gluing the latter to the sides. It’s just that in this case, the very idea of additional decorations arose after assembling the accordion from paper. And we had to finish it almost by weight, which is not very convenient.

This is how ours looked gift box after modification:

In the file with templates, patterns for straps are already present (this parts 4-1 and 4-2). Therefore, templates for all parts can be immediately printed on pastel paper and assembly can begin, taking into account the adjustments made.

As a gift wrapping, the accordion turned out to be quite roomy, but how paper toy - miniature, but that makes it even more attractive. Although the length of the straps is designed in such a way that a child’s hand (a child under 5-6 years old) can easily fit under them.

And here is another version of an accordion box with carved patterns, but in a more “boyish” design:

Download templates for cutting this model here:
Do you like the idea of gift wrapping? And even more children's boxes, which can also be used as paper toys, you can find in the 3rd issue of the DIY Gift Wrapping series - "Children's collection" .
If you soon have to congratulate relatives or friends on such an important event for every family as the birth of a baby, then I would like to advise you set of touching boxes created Tatiana Okselenko(author of the blog “My World of Beauty”) especially to congratulate parents and newborns.
And finally, since we are talking about harmonics, a small musical surprise for you - a bewitchingly passionate Libertango Astor Piazzola performed by Peter Dranga (accordion) and Dmitry Kogan (violin):
Well, I made my first accordion... I’ll say right away that when it came time to write this article, I was very disappointed to discover that most of the photographs taken during the process were lost. Therefore, you will have to be content with only part of them and what happened in the end...
It took me almost 7 months to complete it. Even though I didn’t make the voice strips myself, but used ready-made ones. Although, a caveat is needed here: not all this time I was doing only this, there were significant breaks for the repair of other instruments (on order) and if I could focus only on this, I could finish it in about three months.
The concept of future harmony
I started work at the very beginning of October 2011. By that time, the concept of the future instrument had already been quite clearly formed in my head: it was supposed to be a small accordion, three-voice (two voices in the same octave, one an octave higher) and, at the same time, almost a full-fledged lame one. Almost - because, to reduce the final dimensions, I decided to remove the unused bottom-most keys of the right keyboard.
Thus, in the end the dimensions of the accordion body along the perimeter were 270x160mm. Keys – 23 on the right, 25 on the left. The bass is a four-voice bass, more typical of cheap factory instruments. The key is F major. Next - in order, what was done and how.
Frame
The body was made from 5mm thick and 60mm wide slats purchased at a hardware store. Material – I don’t know exactly what it is, but I suspect it’s spruce. I selected them carefully, choosing dense, straight-grained, knot-free wood.
At the corners of the body there are metal corners made from the duralumin left lattice of Belarus, the same one that was the donor when converting my Chaika to wooden resonators a year and a half ago.
The outer ends of the body walls are also edged with duralumin strips.
Both decks – left and right – are made of plywood. The right grilles were cut out with a jigsaw. The drawing is simple, invented during the process.
The body was covered with mahogany-colored stain and decided not to decorate it with anything. Maybe only for now, or maybe not at all.
Neck and right-hand keyboard mechanics
I made the neck of the right keyboard from beech planks from shipping boxes, found in the summer on vacation in my grandfather’s village, when I did not yet know that I would start such a task in the fall (I only had the idea of trying to make the neck in my own way).
The neck is glued. All grooves for wooden keys are formed by gluing partitions onto a base board. This method, in my opinion, has at least two advantages over the traditional one, when grooves are cut (or how are they made there?) in a solid block: firstly, the wood fibers are located along the partitions, and not across, which additionally gives them strength; secondly, the hole for the axle is drilled according to the markings even before gluing the partitions, which is simply convenient.
Furs
The furs were made by me from... whatman paper. This is probably not very good in terms of durability, but for the first experience, I think it is acceptable. Only when making them, due to shortsightedness, I made a small mistake - I made only thirteen borins. And for such a small volume of the body, about seventeen of them had to be made... Now I myself cannot answer the question “Why?”... After all, I knew... But, looking ahead, I will say that in the end the problem turned out to be not so critical. It’s just that the direction of movement of the furs has to be changed a little more often.
Voice part
Regarding the voice part, at first I had grandiose plans to make, at a minimum, the drill bars on the right solid, homemade, because I already had such experience. But, subsequently, I abandoned them, deciding that I would save my energy and time for next time.
These strips were brass, albeit in pieces, which I was quite surprised by, expecting to see traditional duralumin. At that moment it was finally decided to install them. I was not even embarrassed by the not very high quality of their manufacture, namely the considerable gaps between the voice and the edges of the opening. The main thing is that it was brass!
The planks were cleaned of corrosion and old glue, and the pledges were re-glued.
Several slats had to be rebuilt from similar ones in tone, since they were not enough for the desired tonality. One broken voice was re-made and riveted. The resonators on the right side are made entirely from scratch with your own hands, with input chambers matched to the tone. I made them for 10 days while on vacation (in October). Due to the small size of the body, the piccolas had to be placed standing, each row on a separate resonator. Although, it would be nice to “put” them on the deck for a more interesting sound.
The bass resonator is made from the resonator of the above-mentioned accordion by removing all the excess (simply sawing off part of it and installing a set of strips of the desired tonality). Seven basses (without F sharp). The bass bars (they were made of aluminum) were “knocked down” to reduce the gaps and, as a result, improve the response.
The chord resonator is also made from scratch.
About setup
It took a week to set up. But when the accordion plays, you will still have to make adjustments, since the interference in the “life” of some voices was quite significant: the donor accordion had a strong spill, and I did not sort the bars before installing them on the resonators. As a result, in place of many combatant votes there were greatly underestimated ones. In general, we still have to tinker with a good setup. And with the bottling, it seems I didn’t get it right; the timbre wasn’t the most interesting.Let’s listen to the sound (the first video is a comparison with Chaika, the second is “Old Maple”, the third video is “Lady”). I’ll say right away that the third video (“The Lady”), recorded closest to the camera, most accurately conveys the sound. And this... It seems that during the time spent on this accordion, I, a little, forgot how to play...:
Origami is one of the most beautiful forms of art. Origami masters make uniquely beautiful and very amazing things. There is a huge variety of paper crafts. They all differ in complexity, beauty, size and materials used for them. It is worth mentioning that origami has a very positive effect on the state of the human nervous system. Origami helps you calm down, learn to concentrate and focus on your goal. It also trains perseverance and perseverance very well, since many actions in origami have to be started all over again. This effect on the human condition has been scientifically proven! In this article we will tell you how to make a simple, but very beautiful and entertaining paper craft. Today our heroine is a paper accordion.
This accordion is quite easy to make for a beginner. It will not cause much difficulty during its manufacturing process. And also, you will not need to search for any special materials. Just a sheet of A4 paper and a sheet of colored paper will be enough. Crafts made using the origami technique are very beautiful.
We assemble a paper accordion with our own hands: an excellent decoration for the interior
Before we begin the actual production of our accordion, we must decide what materials we will need for this craft. And so we will need the following components:
- Stationery knife
- Ruler
- Creasing tool or regular knitting needle, you can also use a crochet hook
- Double-sided tape, if there is no glue, you can easily replace it with glue
We begin production with a small preparatory step - we print our diagrams onto paper. And only after this we move on to direct work with our future accordion.
From the printed blanks we cut out all the patterns that we need. After all the patterns are ready, you need to start cutting out the main elements of the accordion
We crease and bend the resulting parts, observing maximum accuracy and carefully monitoring the direction of the bend. When you start bending the “fur,” it wouldn’t hurt to learn the very basics of origami. However, if you don’t have them, then don’t be upset, five or six attempts and you will succeed.
We stick strips of double-sided tape onto the surface of the valve of the first part. We glue it to the front part and carefully melt this area.
Now we have all the necessary elements for the fur and can glue it together. We do everything as carefully as possible and get something like this:

If your result is slightly different from what is shown in the figure, do not be upset. First, you need to see if you did everything right. If you find your mistake, then try to correct it; in case of failure, the best solution is to do everything from the very beginning. Since, having received a result close to what you expect, your desire to continue practicing origami will increase significantly. But getting a bad, ugly result can completely discourage such a desire.
After the main part is ready, you can safely move on to working on the side parts. We insert special straps into the places for fastening the first and second parts. Removing excess glue, if you are not gluing the parts with tape, glue them on the inside.
Now we must paste over the wrong side of the side edges as shown in the figure:

We finish working on the accordion with the following simple steps. We cut out and paste patterns onto the straps; you can choose the patterns to your liking and even make them yourself. A little tip: it's best to do the last step when the straps are not yet glued to the sides of the final craft.
That's all! Our accordion is ready!
Video on the topic of the article
Origami opens up to the master the incredible boundaries of his imagination. People involved in this type of art do very diverse and amazing things. These are a variety of animals, models of equipment and many abstract figures that amaze the imagination.
When you start making your first paper crafts, be sure to start with the simplest ones! Never take big and beautiful models. After all, due to your inexperience, you most likely will not be able to cope with them and will be very disappointed with the resulting result, which may completely discourage you from doing origami.
Start with simple shapes, curves, folds. This will increase your knowledge of origami and automatically prepare you to work with the most complex models.
Here is a small selection of interesting videos dedicated to origami and everything related to it. Enjoy watching.
The simplest, but at the same time interesting activity that a child can handle is creating a small paper accordion. At the same time, even adults can make complex versions made using the origami technique, perhaps using a template. As for the dimensions, as well as the appearance of the paper product, the accordion can be not only completely small, decorative, that is, a souvenir, but also a life-size model.
What do you need to make a paper accordion?
Depending on the level of complexity of the chosen manufacturing method, different tools and materials may be required. Basically, you need A4 paper, a roll and a printed template. You may also need cardboard, glue, pencils with a ruler, paints and felt-tip pens for coloring products. If desired, you can use any decor.

Advice
The most important thing when making an accordion is patience and perseverance, as well as attentiveness while creating the craft.
Making crafts with a baby
If your child asks you how to make an accordion out of paper, it would be best to offer him the simplest method by which the child can create the desired object himself. If you want to do this with him, then why not make a more complex and believable accordion. Letting the baby paint the finished product and also help create it. If origami has turned into an interesting and exciting activity for you, and you have enough patience, then try to implement the most complex options for creating an accordion. Such crafts not only look like the real thing, but are also unique masterpieces, and are also a great opportunity to show off your craftsmanship. If you need to make a life-size accordion, you will need colored, dark, and light cardboard along with a creasing tool. Before creating a fold, a guide is drawn on the sheet, which will prevent the very thick cardboard from creasing and give a straight and neat line. There are even more complex creation methods. There, the product is made from several parts and a frame. Cardboard and paper are used for this.

Large, decorative accordion
To make such a musical instrument, you will need decorative paper, or wallpaper, cardboard, for example, corrugated cardboard, as well as masking tape and PVA. You can’t do without “Moment” glue or other quick-fixing glue. You will need a pencil with a ruler, clips or clothespins, and various other decorative items. Although the manufacturing technology is very labor-intensive and requires a sufficient amount of time, the materials needed are almost the same as for a small decorative product.

You need to cut out 4 rectangles from the wallpaper. The sizes are selected as convenient. For example, 12x40 or 7x40. Make 2 figures of each size. They will then need to be made into furs. After this, masking tape is glued to the wrong side of the parts. Next, markings are made on the blanks. These are small, barely noticeable stripes at an equal distance from each other. Folds are subsequently made along them. Then, on the inner folds, you need to make cuts 1.5 centimeters deep. To prevent very thin wallpaper from tearing beyond the cuts, masking tape was glued. For parts that will be placed vertically on an accordion in the future, you will need to make corner bends based on the resulting cuts.

You need to cut out rectangles from cardboard that correspond to the height and also the “depth” of the accordion. For example, here it is 12x7 centimeters. Their number should be equal to the number of folds on the blanks. These are kind of stiffening ribs for accordion bellows. Moment glue is applied to the smaller end of the cardboard blank, after which it is inserted into the first fold of the accordion strip, where there are cuts. Then you need to additionally secure it with clamps. You will need to do the same with all cardboard rectangles. This creates the top of the accordion bellows. Next you need to make the bottom part. When the structure is completely dried and glued, it is necessary to cover the resulting “skeleton” with the facade, as well as the back.

Side parts
The sides of the accordion are made in the form of 2 cardboard boxes of appropriate sizes. You can also make an appliqué in the form of buttons and keys - such decor will give the paper accordion more credibility.

Conclusion:
Making an accordion out of paper is not a difficult but interesting process. Even a child can master it. There are many options for creating such a craft. The level of difficulty must be correlated with your capabilities.
How to make an accordion out of paper
DIY paper accordion
Making an accordion out of paper