Easter is the most joyful of religious holidays, which can only be compared with Christmas. The Holy Resurrection of Christ is awaited with reverence and tranquility. The whole family puts the house in order, the housewives bake Easter cakes. And kids love to color and paint colorful eggs. Other touching handmade things also help create a festive mood. An Easter egg made from pasta is one example of an original embodiment of fantasies using simple improvised means.
Crafts from pasta for Easter are the embodiment of every child’s dream of making something unusual, bright from simple materials. Any pasta can be used: shells, stars, horns, spirals, tubes, spaghetti, vermicelli, curly, in the form of bows, wheels and others. Many of them don't even need to be painted, they are already green, yellow, purple, cherry, orange, etc.
For crafts, it is important that it be pasta made from durum wheat. Such products have sufficient strength to ensure their long-term storage and the ability to not crumble when fastened into complex compositions.
Souvenir options for Easter
A description of Easter pasta crafts would be incomplete without talking about the creation of the main masterpiece - a large egg.
Holiday symbol
To make it, you will need step-by-step instructions.
- In a separate bowl, mix PVA with the pasta included in the base design.
- Inflate the balloon to the required size.
- Cover it with openwork pasta in one layer, leaving only a small hole through which it can be removed later.
- After drying, pierce the ball with a needle and remove it.
- The next stage is decorating the base with different shaped pasta. At the same time, you can create flowers, birds, ornaments and more. In this case, you cannot do without a glue gun or Moment glue. It is important to design the auxiliary hole in an original way (through which the burst ball is removed), for example, by creating a braid from spaghetti.
- At the very top, it’s good to lay out a cross from spiral-shaped pasta.
The decorated egg and stand should be painted with aerosol paints, spraying them at a distance of 20–30 cm from the products. It’s better to do this twice so that there are no gaps left. Before painting, be sure to wear a protective respirator.
You can glue the egg to the stand after the parts have completely dried.
miniature temple
In addition, it is worth trying to build a complex structure in the form of a church out of pasta. If you cover the balloon with them not completely, but in the shape of a wide ring, then such a pasta church placed inside it will be a wonderful addition. Another subtlety: it is better to make the back hole of such a ring narrower than the front one and decorate it with a spaghetti lattice.
For such a structure you need 2 rectangular boxes and one oval, glue and, of course, different types of pasta. This craft looks very dignified and solid. A step-by-step schematic description of creating a model of a Christian church from available materials looks like this.
- Glue the rectangular drawers or boxes together so that the lid-door comes out. It is better to paste them on the inside with images of saints or pictures on biblical themes. This must be done before all work begins.
- The outside should be covered with long wavy pasta painted with silver paint.
- The main thing: do not forget to cut through the windows, which can be decorated with platbands made of golden pasta bows.
- You need to place an oval box on the roof, and place a small plastic egg on it. This is the bell tower. It should also be covered with silver-painted pasta.
- It is good to decorate the door with a lattice made of thin spaghetti.
The design is completed by a similarly colored bell.
Basket for paints and angel
Why not make one where you can put crafts in the form of pasta eggs? It is not so difficult to do this according to the description using your own imagination. The materials for this craft are the same: flower pasta, glue, paint and cardboard. Sequence of making an egg basket.
- Cut out a round base for the product from thick cardboard.
- Glue the cardboard side of the basket to it in the form of a ring. Its width matches its height.
- Now it’s time for a cardboard handle attached to the side with a stapler.
- The next stage is pasting the product with pasta.
- And then you need to spray paint the basket.
You can, of course, not make cardboard sides and handles of the product. In this case, building up layer by layer, they are created from pasta. But choosing a craft option is a matter of taste, artistic ability and imagination.
The angel made from the same materials looks impressive. It is appropriate for both Easter and Christmas. To make its “body”, you need a long and thick pasta; the neck will be replaced by a small pasta flower placed on the base. A bead, ball or acorn will serve as the head. All the parts are glued together, then hairs are made from small vermicelli. And a pasta bow is glued to the back of the body, playing the role of wings. In this case, painting the craft in gold, silver or white is appropriate. For convenience, a thin ribbon is glued to the angel.
How to store products
As you know, pasta does not last forever. Even painted, they last up to six months. Moreover, too high humidity (maximum 70%) and room temperature are not allowed. Ideal for these products is about zero degrees or a little more (in the positive direction). If it is a high-quality product with great hardness, then it is stored for the maximum specified time. Less quality ones are stored less well. They soften, mold and break.
Beautiful Easter pasta products, made with your own hands in the family circle, unite it and create a unique atmosphere of preparation for the Holy Resurrection of Christ. Eggs made from these materials are an excellent opportunity to realize yourself as a creator of a unique thing. True, it is not stored as long as we would like. But it doesn't matter.
Every year you can create something new, improving your handmade skills.
The Feast of the Holy Resurrection of Christ in 2020 will be celebrated on April 19. This means there is time to prepare in advance and plan what Easter crafts you can make with your own hands - for example, from pasta.
Ten of the most interesting and at the same time quite simple master classes for kids of different ages, crafts for home, kindergarten and school - are described step by step in the material presented below.
Making an Easter craft like an egg out of pasta with your own hands is, without a doubt, the most popular idea. It is brought to life in different age groups of the kindergarten.
Here is an example of the simplest souvenir that 3-4 year olds can make. For this you will need:
- raw white eggs;
- PVA glue or Moment glue;
- sharp needle;
- spray paint;
- small pasta of different types.
How to make an egg from pasta:
- First, using a needle, make two holes in the egg on opposite sides and blow out the contents.
- Now we pour the beautiful pasta into a plate, and pour glue into another, in which we “bathe” the eggs. Then you need to roll the egg in the pasta.

- When the egg dries after 30-40 minutes, the surface can be coated with beautiful spray paint (or traditionally with a brush).

HELPFUL ADVICE
Along with pasta, split peas and lentils can be used as decoration. The result will be a very elegant and very original craft for Easter.
Wooden egg decorated with pasta
Of course, the previous model has one drawback - since the pasta is glued to an empty shell, there is a risk that the children will overdo it and the shell will crack. To avoid this incident, you can purchase wooden eggs, onto which you can also glue pasta. The technology will be exactly the same.

You can paint the eggs an elegant yellow color, and grease the side surfaces with glue and sprinkle with seeds.

And also decorate the eggs with sparkles. In short, the scope for imagination here is endless.

Golden pasta egg
As we know from the fairy tale about the hen Ryaba, there are simple eggs, and there are also golden ones. Why not use the rich children's imagination and refract its bright currents through the prism of preparation for Easter celebrations?
This golden egg is also made from pasta: children glue mugs, scallops and other pasta onto the surface of an inflated ball with their own hands, which they then burst and remove the remains (a step-by-step description of the actions is given in the section “Composition: Church and Egg”).
Pasta ball (for older children)
On the other hand, why pop the ball? Maybe it’s better to leave it inside, because scallops, feathers and other products will look especially beautiful against a colored background. This DIY version of a pasta ball is perhaps the simplest souvenir for Easter.
The step-by-step instructions are quite clear - inflate the balloon, coat it with PVA glue and glue the pasta. With children 3-4 years old you can make 1 layer, and with older children - 2 or even 3 layers from different products.

Easter angel (for the little ones)
All Easter pasta crafts can be easily made with your own hands. So, with an angel, step-by-step production consists of only 5 steps:
- First, use PVA glue to connect 4 feathers (elongated pasta with sharp edges).
- Then, in the upper third of the figure, a shell is glued so that its convex side is turned towards our face.
- Now, from the same shells (it is advisable to take items of a different color), glue a pair of wings on the angel.
- Then, using a couple of curls, handles are made.
- But the hair can be made from ordinary yellow peas - 6 peas are enough.

You can paint the figurine with white acrylic, after which you can draw a face and glue a star to the hands. This angel can also be hung on a Christmas tree. But making a toy for Easter is also more than appropriate.

Another angel
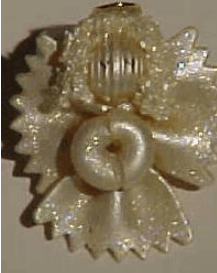 And here is another version of a craft for Easter, also quite simple.
Here, at the base of the angel’s head is a ball or bead. And the wings, arms and legs are made from bows. 2 more scallops are glued in the center, as shown in the photo. Then they are covered with gold paint and decorated with sparkles.
Easter wreath
A beautiful wreath is usually made for Christmas, but its Easter counterpart also looks very beautiful and is completely in keeping with the holiday in spirit.
The step-by-step instructions are as follows:
- First you need to make a base ring. For this, you can take, for example, an expander or any other rubber circle. Or you can sew a ring from fabric, stuffing the base with cotton wool (wire is used as a frame). It is best to cover the circle with green paint (or cover it with fabric) - against such a background, all decorative elements look very beautiful.
- The ring is then covered with colored pasta, as shown in the photo. They are glued using regular PVA glue.
- After this, you can decorate the wreath with decorative figures. The photo shows an option for Catholic Easter: in Germany and many other European countries, chocolate bunnies are given as gifts for this holiday. The wreath can also be decorated with decorative eggs.
- Garters made from strips of light cotton fabric also look very nice. They bring a cozy note and set the mood for a peaceful wave.

This Easter crafts master class can be held in almost any kindergarten group. Of course, the design of the product can be both complicated and simplified, depending on the creative capabilities of different kids.
Church made of pasta (children 6-7 years old)
You can make a craft like a pasta church with your own hands in different kindergarten groups. In the simplest case, a small box is taken as a basis, which is covered with different types of pasta. A small dome is made on top, onto which a cross of 2 feathers or 4 wheels is glued (a visual photo is presented in the next section).
Another option is to make crafts from flat vermicelli and other types of pasta.

Such a church can be done with kids from the preparatory group. You will need the following materials and tools:
- cardboard for children's creativity;
- hot glue;
- ruler, pencil;
- foil.

To make this craft, you can use detailed instructions with photos:
- First you need to make the base of the building. To do this, a regular hexagon is cut out and glued from cardboard, its edges are coated with PVA glue and pasta (hollow tubes) is tightly placed.

- Flat noodles are glued to each of the 6 corners, as well as to the top edges. On top of it there is a frame of pasta wheels, as well as 6 columns (each with 10-12 pieces).

- Now a hexagon corresponding to the size of the model, as well as a cone, is cut out of cardboard. It is inserted into a pre-made round hole in the middle, the edges (with allowance) are glued on the back side. Both surfaces are covered with a layer of flat noodles, as shown in the photo.

- Now you need to make the dome itself from round products. And a cross is glued from flat pieces and inserted into the dome. Its base will be a small cardboard circle that is glued to the cone.


- Now they are making a porch. To do this, take two cardboard blanks and make a separate base and a separate roof. Each piece is decorated with pasta.


- Next, it remains to make the bell. You can take cardboard as a base, roll it into a cone and cover it with foil.

- And the last stage - the porch is glued to the main part of the model, and the bell is attached under the dome. So it turned out to be a very interesting chapel, quite similar to its original original.

Composition “Church and Egg”
Of course, among pasta crafts for Easter 2018, the church occupies a special place. On the other hand, the symbol of the holiday is an egg. Of course, you can make two different crafts. But why not combine them into one interesting design?

This master class harmoniously combines several interesting ideas:
- the church is a rather large craft that will certainly bring joy to the children;
- The pleasure in such a task comes not only from the result, but also from the process itself: a group of guys (4-5 people) can participate in the creation of a church at once;
- Finally, the model looks very natural, because the golden color of the pasta goes well with the basic tones of the church domes.
To understand how to make a church out of pasta for Easter with your own hands, just stock up on several types of pasta:
- bows;

- wheels;

- shells;

- and spirals.

The actual basis will be the first two types of pasta. The wheels are perfect for decorating the “walls” of a church, and you can also use them to make a beautiful openwork cross. Well, the bows are the second layer of the model, which will not only strengthen the entire structure, but also add its own beautiful touch to the architectural appearance of the “building”. Shells and spirals are an additional decorative element that can be used if possible and desired.
Here are some other materials and tools you will need to make such an interesting craft as a pasta church:
- PVA glue;
- hard glue with a gun;
- needle;
- thread;
- an inflatable ball of sufficiently large size (color does not matter);
- 2 stands for the model (for example, instant pasta plates);
- spray can with golden paint;
- a small box is the basis of the church.
To complete this craft for Easter step by step, proceed as follows:
- At the first stage, the balloon is inflated to the size that the craft should be. Here you need to navigate the dimensions of the box from which the church will subsequently be made. It should fit freely inside the egg (taking into account the cross and decorative elements).
- The ball is tied with a thread and placed on a stand. Place some pasta in a plate with glue for 2 minutes, then begin to paste it over the ball. It is better to use pasta circles.
- Moving along the ball from bottom to top, the pasta is placed tightly next to each other. The side parts of the round shape are left unfilled - this will be a through hole for placing the church. It is better to immediately make marks on the ball (ellipses of the same size).

- Make a beautiful cross of 4 circles on top. It turns out to be openwork and looks quite elegant.

- The next stage of making a pasta church with your own hands is to wait 40-60 minutes until the craft is completely dry. Next, the ball is popped. Now its remains can be easily removed. Then they continue to paste pasta on the inner surfaces of the craft.
- Let the structure dry again and cover the first layer with hard glue - now it’s the turn to glue the bows. They will give the model a more beautiful look and additional strength. The photo shows a craft with a balloon that has not yet burst - you can play it safe and remove it after applying the second layer.

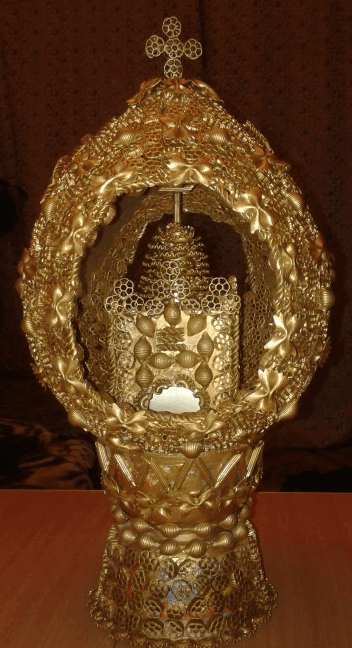
- Now let the craft dry - you can put it in a deep plate. In the meantime, we better get on with the stand. The support will be two identical disposable plates glued together at the bottoms. They can be designed as your imagination dictates. Here you can use any type of pasta - scallops, feathers, snails, etc.

The Easter egg is almost ready. It's time to get involved in the church.
- The simplest option, which in terms of difficulty level is suitable for children from different kindergarten groups, is a craft from a small box (for example, packaging from a glass cup).
- You can cut a small hole at the bottom to create an impromptu entrance to the temple.
- And the box itself is pasted over with pasta according to a pre-designed pattern - you can take the option in the photo as a basis. Of course, let’s not forget to make a small dome of spirals and a cross of two feathers on top.
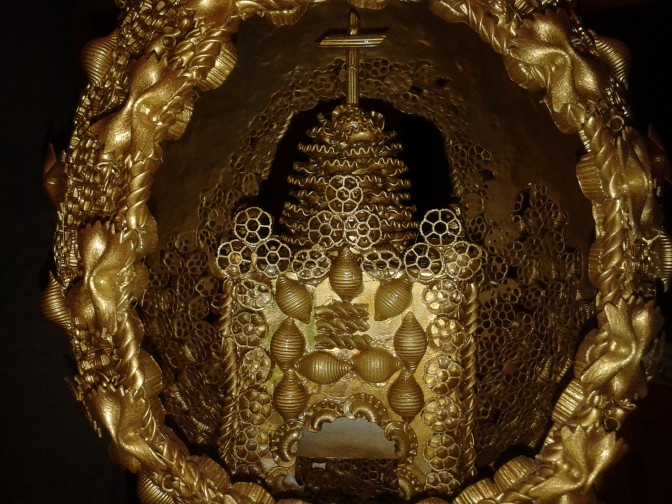
- All that remains is to cover both the church and the egg with golden paint. It's best to do this outdoors.
- The result is a very beautiful craft.
At first glance, it looks like it would be impossible to do with kids. In fact, the principles of making such a craft for Easter are simple - the surface of the box, stand and the ball itself is carefully pasted over with pasta in several layers in accordance with a pre-planned pattern.
A small masterpiece: pasta candlesticks
You are probably already convinced that you can make almost any pasta craft with your own hands, both for Easter and other special occasions. It's time to talk about one of the most original versions of Easter souvenirs - candlesticks.
The technology for their manufacture is clear: you can take a small glass made of heat-resistant material as a basis. Its surface is greased with PVA glue, then pasta is glued and covered with golden paint. It turns out to be a truly bright holiday!

These are the original pasta crafts you can make with your own hands for the bright holiday of Easter. The models are good not only for their original, interesting appearance, but also for the availability of all materials. If desired, each figure can be simplified, adapting it to the creative skills of a child of any age.
From various materials.
You can use napkins, cotton pads and even dough.
You can safely involve children in such creative work, for whom it will not only be interesting, but also useful.
Here are some very interesting Easter crafts that can be made from different materials:
Dough craft for Easter: Easter eggs medallions
You will need:
Salty dough
Ruler
Dough cutter
Spatula
Tube (for small holes)
Aluminium foil
Paints (acrylic or aerosol)
Twine or ribbon.
1. Prepare salt dough. There are many ways to do this.
*If you don't want to make dough, you can replace it with polymer clay.
Here is one way to prepare salt dough:
2 cups of flour
1 tbsp. spoon of fine salt
1 tbsp. spoon of wallpaper glue
* Mix flour and salt. Add a little water to the glue (a few spoons) and wait until it swells.
* Mix flour, salt and glue - knead the dough. If desired, you can add a little water. You should get a dough that sticks to your hands.

2. Using a rolling pin, roll out the dough to the desired thickness. In this example, the dough thickness is 6 mm.
3. Cut out the shapes of chicken eggs from the dough.

4. Place these pans on a baking sheet covered with aluminum foil or baking paper. Make small holes using a straw so that the crafts can be hung later.

5. Bake first at a low temperature - about 100 C. After this, take out the aluminum foil and put the baking sheet back in the oven at 125 C. Try not to burn yourself. You can use parchment paper instead of foil and bake at 120 degrees for 2 hours.

After this, place the salt dough pieces on the wire rack.
You can turn off the oven and wait until the dough is still dry.
6. Start painting your pieces, and after the paint has dried, tie a ribbon and hang it up.

Crafts for Easter from pasta: large Easter egg

You will need:
Pasta of different shapes
Felt pens (markers)
PVA glue
Paint (aerosol)
Big balloon
Hot glue.
1. Inflate the balloon.
2. Using a marker, mark the place on the ball to cut out.
3. Apply PVA glue to the entire ball except the designated area.


4. Start gluing the pasta onto the ball to create a pattern.
5. When everything is dry, you need to remove the ball - pierce it with a needle.

6. It's time to decorate the craft. Here everything depends only on your imagination.
7. You can put the craft on a stand and paint it with spray paint - in this example, gold color.


DIY Easter crafts made from pasta


You will need:
Chicken eggs
Small pasta
PVA glue
Aerosol paints (if desired).
1. Discard the contents of the egg.

2. Apply PVA glue to the shell.
3. Glue small pasta to the shell (you can glue each pasta, sprinkle it, or dip it in a bowl).
4. In addition to pasta, you can use lentils or peas.
5. Once the glue is dry, paint the egg. First, paint one side, and then the other half.


Paper crafts for Easter
Easter chicken. Option 1.
To make such a craft, you first need to draw a template.


Easter chicken. Option 2.
A paper chicken can be made from paper plates or cardboard, from which you need to cut a circle. Simply fold a paper plate in half, cut out wings, eyes, a beak and a scallop from colored paper and glue them to the plate.


3-D Chicken


Crafts from napkins for Easter: stand

1. Prepare a paper napkin and fold it in half diagonally.


2. Fold the corners of the resulting triangle up so that they connect to the top corner. You should end up with a square.

3. Roll the bottom edge of the resulting square with a roller to the middle.

4. Now turn your design over and connect the bottom corners that are under the roller. These corners should be secured with a paper clip.

5. Turn the workpiece back over so that the paperclip is at the back. Spread the ends of the blank in different directions, and you will get a beautiful stand for an Easter egg.
We paint eggs using napkins with our own hands

1. Dip a paper towel into the vinegar, squeeze out the excess, and wrap it around the egg.

2. Place the egg on a plate or baking sheet and carefully begin adding drops of colorful food coloring.

3. When the entire egg is colored, remove the paper towel and place the colored egg in the carton.

Crafts from eggs for Easter: decoupage

You will need:
White eggs
Napkins with beautiful designs and patterns
Scissors
PVA glue.

1. Separate the top layer from the paper napkin; you won’t need the rest.
2. Cut out beautiful designs and patterns. You can cut with white edges and not necessarily neatly.
3. Prepare the egg and coat it with glue or egg white.
4. Glue the cut-out design to the egg, and apply a layer of glue on top with a brush.
When everything is dry, you will have a beautiful Easter egg.
Crafts from cotton pads for Easter: chicken


You will need:
Cotton pads
Yellow egg paint
Colored paper
Scissors
Chenille wire
1. Dilute yellow paint with water. Dip 2 cotton pads into the solution and color them. After this, leave the discs to dry.
2. Use chenille wire to make the chicken's feet.
3. Cut out a scallop, wings and beak from colored paper.
4. Glue all the parts between two cotton pads.
5. Glue on the toy eyes and the chicken is ready.
DIY Easter wreath

You will need:
Willow wreath (you can make your own wreath)
Plain paper napkins
Corrugated paper
Colored and regular cardboard
Scissors
Simple pencil
Hot glue
1. Making decorations for the wreath. Cut out several circles of different diameters from paper: the circle for the body has a diameter of 5 cm, for the head 4.5 cm. The more circles, the more voluminous the part.

2. Cut out 2 more circles from cardboard, each with a diameter of 2-3 cm. This will be the base of the chicken.
3. Now glue all the blanks. First, apply a little glue to the center of the first circle and glue the next one. Thus, glue all the circles together.

4. Glue the cardboard piece to one of the circles.
5. In a similar way, you need to glue another stack of circles.
6. Make small cuts on the circles, and then fluff the circles.

7. Cut out a chicken beak, legs and wing from colored cardboard. In order to fasten the body of the chicken, you should cut a strip out of cardboard and glue all the parts to it - the wing on one side, and everything else on the other.
8. Make eyes. You can use plasticine, buttons or other parts of suitable size and shape.
*If you wish, you can make another chicken in a different color.

9. We make decorative flowers and eggs. Take dust wipes. You can use felt, but it is more expensive. Cut out ovals that will act as Easter eggs, and various patterns for them.

The bright Christian holiday of Easter is approaching and many of our housewives have already begun to prepare for the joyful event, choosing interesting recipes for making Easter cakes and being interested in different ways of coloring Easter eggs. And another important question faces us - what gifts to choose for Easter for household members, relatives, friends, and acquaintances. Of course, the easiest way is to go to some specialized store and take advantage of the wide selection of a wide variety of Easter gifts. But the most ideal option is to make Easter gifts with your own hands. Beautiful homemade products and original crafts, created with love and attention, will preserve the warmth of your hands and the spiritual harmony of your inner world, which is born in the process of working on each gift.
In this article we will share with you interesting ideas, master classes and video lessons with which you can easily and quickly make very interesting Easter crafts from pasta. Pasta of various shapes and sizes, combined with improvised and even waste materials lying around in a closet or on the back shelves of home furniture, will serve us as a universal material for creating unique Easter crafts with our own hands.
Usually, traditional Easter symbols are chosen as gifts for Orthodox Easter - eggs, candles, angels, Easter cakes (as well as rabbits and chickens, which can be called symbols of the Catholic trend). The good thing about pasta as a material for crafts is that they can be easily painted in any color using different paint options (the most popular is aerosol paints in spray cans) and connected to each other using PVA glue, “Moment” or a glue gun. Since Easter is a spring holiday, shades from the green palette and golden options are appropriate for creating crafts. But the main Easter color is red. So, let's learn how to make crafts for Easter from pasta with your own hands in the form of eggs and angels.
♦ HOW TO MAKE A BEAUTIFUL EASTER EGG ON A STAND.
Materials for work:
Easter is a bright and long-awaited religious holiday. Among the annual celebrations, many eagerly await its approach. Even people with atheistic views still cannot resist and prepare at home dishes that are customary to decorate the holiday table: Easter, Easter cake and boiled eggs. By the way, for Easter the latter are painted with food coloring or decorated with stickers. However, if you strive for originality, we suggest you make unusual Easter eggs with your own hands. To decorate them, you can use not only the most common materials, but, for example, pasta.
How to make an egg from pasta?
If you decide to decorate eggs with pasta, start with the simplest option. For this you will need:
- first of all, the eggs themselves;
- PVA glue or Moment crystal;
- paint, preferably aerosol;
- pasta, preferably small.


This simple DIY Easter egg craft is ready! It's so simple that you can involve children in the activity.
Master class: Easter eggs from pasta
The eggs will seem brighter and more interesting if you make them according to the master class offered below. With such crafts you can not only decorate your home for Easter, but also give them as a souvenir to relatives and friends. They will be pleased by such a sweet little thing, and it will not cost you anything.
So, to make decorative Easter eggs with your own hands, you will need the following materials:
- wooden eggs;
- PVA glue;
- pasta, preferably small, star-shaped pasta;
- spray paint;
- dry glitter.


