We always have beads left lying around and waiting in the wings. This “hour” came for me and I wove a basket. So, girls, let's get started.
 We collect all the remaining beads of the same size, mix them and simply put them on the spool.
 1) Now we make the frame. We take a thin aluminum wire 25-30 cm long - seven or eight pieces (eight is more convenient) and wrap it with floral tape.
 2) Twist the axes together.
 3) We move the axes apart symmetrically.
 4) Attach the wire with beads to the twist and weave the bottom. In the first row - one bead at a time, and in the next row we add so that it is even and beautiful.


 — After the bottom is ready (size is at your discretion), bend the axles upwards. The twist stays inside. The shape of the basket can be adjusted by expanding or narrowing the axes towards its middle.


 — We continue to weave to the required height. I shaded the top of the basket with gold beads. I also decorated the handle with it.

 — We cut off the excess ends of the axles, leaving 7-10 mm.
 — We bend them inside the basket.
 - Now we will make a handle for the basket. Take the wire of the required length.
  This is arbitrary, but it should reach at least the middle of the height of your product, or better yet, to the bottom. We bend it.
 — We wrap it with floral tape. Once again we give the shape.
 — We collect gold beads onto the wire. Fold it in half (the length should be one and a half times the length of the handle) and fasten it on one side of the arc.
 — Then we wrap the arc with a double thread with beads. Make sure that the thread does not twist. For convenience, you can use a single thread and wrap it once or twice. We fix it at the other end of the arc.
— We straighten the threads and attach the arc to the basket using the wire on which the beads were collected. We fasten it inside the basket, fixing the arc to the axles.

 All! The cart is ready! It turns out quickly and beautifully. It took me almost 300 grams of large beads to make a plain gold basket.
  But it turned out to be not small. Five poppies were planted in it.
Creative success, don’t be afraid to experiment.
We bring to your attention the work that won the “Autumn Bouquet” competition in our VKontakte group
Maria kindly shared her experience of working with beads and talked about how you can make such a beautiful bouquet with your own hands.
Description of the work by Maria Mazhar
This bouquet in the basket turned out completely by accident. My grandmother embroidered women's shirts with beads; such work took her several kilograms of beads and several months of work. Here are the remains of beads from her work. I decided to find a use for them.
All work is made using the method parallel weaving.
The first were roses(that’s why they hid in the back of the basket). I wove roses from the magazine “Funny Figures from Beads.” And I already came up with the leaves for them myself.


Then I made a daffodil. For it, I took the wire a little thinner than necessary, so the petals do not hold their shape very well, but at the same time they look very realistic.


Bells I wove based on the works of Virko Elena, but I varied the leaves according to my taste - for blue and white bells I made the leaves wider, and for pink bells, on the contrary, narrower.


Magazine “Flowers from beads. Indoor and garden" E. Virko.
And here's what I got:


Next in my basket was chamomile.— I don’t have a diagram, but there are 9 smaller petals (2,3,5*4,3,2,1) and 10 larger ones (2,3,7*4,3,2,1). The middle, as far as I understand, is French weaving, and the leaves of the stem are parallel weaving according to the pattern (1,2,3,4,3,2,3,4,3,2,1)

Next I wove cornflowers, but this story is known to all needlewomen. We accidentally go into a store, see beautiful beads and... we buy them without even deciding what to make from them. The same happened to me - I really liked the beads! And amazing cornflowers came out of it.


After looking at the result, I wanted to add a bright color to the bouquet! This is how the idea of cuckoo color came about.
- this is needle weaving and parallel. I took the diagram from the Internet.

When I assembled the basket, it became clear that the handle of the basket simply needed to be decorated with something. This is where it started to curl.
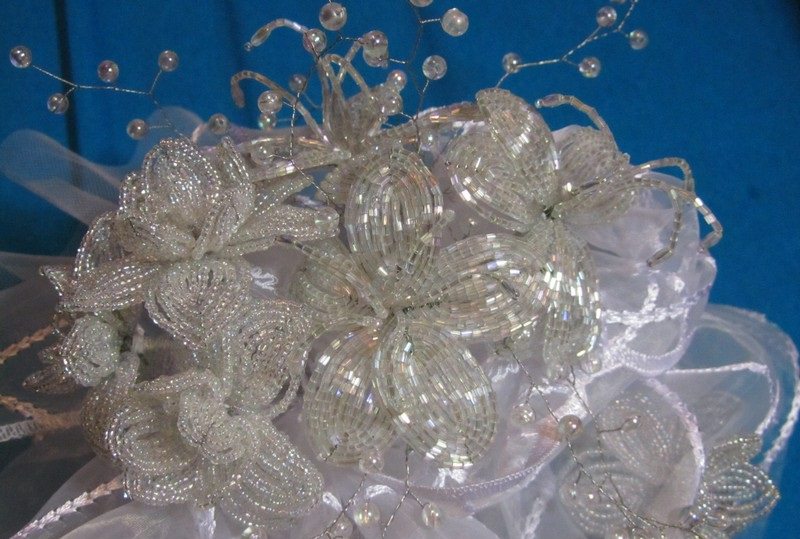
Flower bouquets and beaded compositions in master classes (photos)Flower bouquets and beaded compositions in master classes (photos)
Beadwork allows us to create amazing floral arrangements from beads that delight with their sophistication, simplicity and unique charm. Such a cute bouquet, made by yourself, can become an exclusive gift for a loved one or good friend. 


How to make a bouquet for the bride from beads
This type of creativity like beadwork opens up many different possibilities for us and allows us to create real works of art from small beads and seed beads. Perhaps one of the most beautiful and delicate creations is a wedding bouquet made of beads, because it complements the image of a happy and loving bride and accompanies her throughout one of the most important days in her life.
Our master class will tell you how, using beadwork, you can create an exclusive and incredibly delicate bouquet. Before starting work, let's prepare all the necessary materials in advance:
- white transparent beads and cutting;
- clear rice;
- beads of the same color;
- the wire is thin and thick;
- White floss threads;
- acrylic lacquer;
- ribbon;
- glitter;
- special packaging material for wedding bouquets;
- white rigid mesh.
We will start the master class with making
.
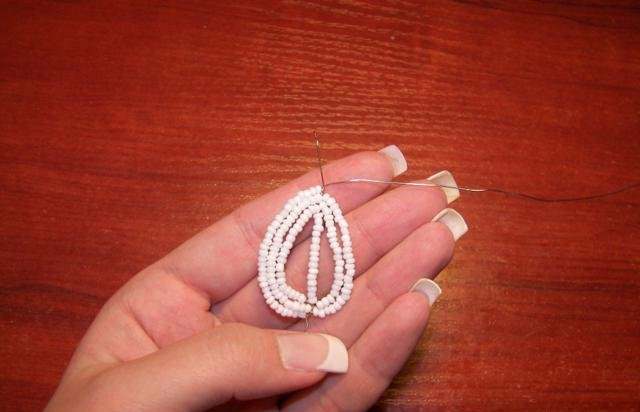
First, we will need to make 5 petals consisting of 15 beads using the loop technique. Here is a diagram according to which you will need to weave the first row of petals: 
Then you will need to string 15 white beads onto a thin wire, and then make a loop and secure it. After this, stepping back a little, you will have to create another loop with your own hands and scroll it 3 times.
We will make the second row of petals using the French weaving technique. It will also consist of 5 petals. 
First we will need to make a small loop at one end of the wire. Then put 8 beads on the resulting axis. 
After this, we make a slightly larger loop at the second end of the wire and secure it. 
Now we must string 10 beads onto the free end of the wire. 
Having done this, we secure the wire. 
Continuing the beading according to the pattern, we form the second side of the future petal in the same way. 
Next, we weave a petal from three arcs and, having finished beading, cut the wire approximately 1 cm from the base. Please note that the loose ends must be twisted 3 times.
We will also make the final, third row using French technology. However, each of its petals will already consist of four pairs of arcs.
As a result, we will get such a wonderful flower as in this photo: 
We will need to make 9 flowers for the bouquet and 1 for the boutonniere.
Now our master class will tell you how to make a flower from a cutting:
We will weave it using the French technique. However, it is worth noting that its axle will consist of 7 pieces. cuttings, and the petals have 5 arcs.
In addition, for each such flower we will have to make stamens. They are made using the needle technique: 
Each stamen will consist of a transparent grain of rice and approximately 5 cm of cutting. We will need one such flower for the boutonniere and 3 more for the beaded bouquet itself. 
At the next stage, the master class will help you create another decoration for your bouquet.
The photo clearly shows that for it we will need silver wire and transparent beads. You will need to thread the bead onto the wire and then twist it about 7-10 times.
In this way, you will need to make one small branch for the boutonniere and 9 larger branches for the beaded wedding bouquet. 
Having completed the beading, we will need to start assembling the bouquet. We will have to attach 3 branches of decoration to each flower from the cutting and wrap the resulting stem with threads. 
If you look closely at this photo, you will notice that the branches for decoration are tied so that their tops are several cm higher than the flower itself. Thanks to this, our bead composition will turn out more voluminous and lush.
Then we will need to attach 3 beaded flowers to a thick wire and wrap the resulting stem with white threads. 
After you twist all the branches and wrap them with threads, you will need to spray them with varnish and sprinkle them with glitter. Thanks to the varnish, the flower stems will retain their original appearance for a long time and will not lose their beauty and attractiveness.
We will make a wedding boutonniere from two flowers and a branch decoration. Its stem also needs to be sprayed with varnish. 
Having finished forming the branches, we can begin assembling the bouquet itself. The center of our composition will be 3 flowers from the cutting. We will wrap them in special wedding packaging. Then we will pack each branch with flowers separately. After this, we will need to assemble the entire composition together and wrap it in a rigid mesh. 


At this point, our master class can be considered almost complete. All we have to do is wrap the stems of the wedding bouquet with white satin ribbon.
Look what beautiful flowers we ended up with: 

In conclusion, I would like to note that wedding bouquets made of beads can be brighter, bolder, and more saturated. To verify this, you can look at the photos of the finished work: 


DIY compositions and bouquets made of beads
This master class will help you create a whole composition of flowers from beads yourself. We will place our bouquet of daisies and beautiful lilies in a regular basket and decorate it with a ribbon, and plant a bright, exotic butterfly on top.
So, let's get started by preparing all the necessary materials:
- bamboo sticks;
- green and white wire;
- beads: green, white, yellow and beige;
- golden beads;
- green floral ribbon;
- an ordinary plastic pot;
- green wool threads;
- basket;
- glue gun;
- gypsum;
- PVA glue;
- plasticine;
- ribbon;
- Double-sided tape.
It is best to start beading with a lily, as it is the most voluminous and labor-intensive:
First we will need to take 40 cm of wire and fold it. Then you need to put 19 beads on the long tip, and 15 beads on the short one. After this, we screw the longer end to the short one. After this, we again string 19 beads onto the long end and secure it. Thus we have the first row. Each side of the second row will consist of 24 beads, and the third - of 32 pieces. Using the French weaving technique, we will make a petal for our lily. 


In total we will need 6 such petals.
Then we will need to make the center for the lily. To do this, we need to string 21 beige beads and a golden bead onto a 30-centimeter piece of wire closer to one of the edges. Now we must pass the long end of the wire through the beads and secure it, and then string the beads and beads onto it again and push it through the beads again.
Using this weaving pattern, we need to create 5 stamens and connect them together. 


Then we will need to connect together all the details of the future flower. The resulting lily will need to be attached to half a bamboo stick and wrapped with floral tape. 


After we finish weaving the lily, we will need to prepare a pot so that it can be “planted”. First we will cover the bottom of our pot with plasticine. Then, using double-sided tape, decorate the handle of the basket with ribbon. After this, we will need to place the pot in the basket. In order for it to hold tightly and not fall out, we first coat the edges of the basket with glue using a gun, and then insert the pot there. Now we can “plant” a lily in our pot. 


At the next stage, our master class will tell you how to make small beautiful daisies.
First, we will need to string 14 white beads onto a 25-centimeter piece of wire. Then we will have to pass the wire through 1 bead, and carefully tighten it to secure the resulting loop. In this way we will need to make 7 petals for the chamomile. 


Now we can start making the core. To do this, we will need to string 6 yellow beads onto a piece of wire 9 cm long. Then we will have to insert one end of the wire through the 3 outer beads. By carefully pulling the wire and twisting its ends, we get a core like this: 


After this we will screw the core to the petals. Having made 3 such daisies, we will screw them to half of a bamboo stick. Then we will need to wrap the resulting stem with green thread. Having created the required number of stems with daisies, we will need to insert them into the basket. 


Then, using the French weaving technique, we will need to make jagged leaves according to this pattern: 


We will have to attach each leaf to a bamboo stick and wrap it with floral tape.
After this, we will need to “plant” them in the basket. Then we will have to fill the drainage basket and carefully pour the plaster. After the plaster has dried, we will need to pour PVA glue into the pot and place green woolen threads on it. In the end, all we have to do is attach a beautiful butterfly to the handle of the basket and we can say that our composition is ready. 


In order to find inspiration and find something new and interesting for yourself, you can also look through photos of finished works, which depict various beaded flowers in pots: 


Whatever exotic flower or unusual composition you decide to make from beads, the main thing is that you are not afraid to experiment and boldly bring your fantasies to life. After all, each of your creations will undoubtedly become a real work of art and will delight you and your loved ones for many years.
To make such a basket with spring flowers, it is not necessary to specifically buy beads of the same type from which this basket is made. You can make it from waste beads; try making flowers from beads of different shades, then the flowers will be even more rainbow and interesting.
MATERIALS
Beads of different colors.
The wire is thin; medium thickness wire (for stems).
Wicker basket.
Green silk thread.
Decorative grass (for bedding in a basket).
Pliers.
COMPLETING OF THE WORK
Weaving peonies
The petals of these flowers are woven using the circular weaving technique according to the patterns in Fig. 1,2 and 3 from yellow beads.
You need to collect a certain amount of beads on the wire (middle row), then make a fixing loop (Fig. 1), and then string several beads of the next row onto the free end of the wire (Fig. 2).
The fixing loop must be made smooth, neat and small, so that when completing the ring rows it does not peek out.
In each new row the number of beads must be increased (Fig. 3)!
At the end of the weaving, bring the end of the wire through the middle row, twist the ends of the wire, but do not cut it.
Complete 3 round rows.
Make 5 petals for each flower.
Weaving daisies
Weave the petals similarly to the petals of peonies using the circular weaving technique according to the diagrams in Fig. 1,2 and 3 from white beads.
For the middle row, use more beads to make the petals longer.
Complete 1 round row.
For each flower, make 10 petals.
For the core, collect 40-50 yellow beads on the wire and bend them in half (Fig. 4). Then twist the resulting threads into a spiral.
Weaving blue flowers
Weave the petals using the “towards” technique according to the diagram in Fig. 5 of blue and turquoise beads. Make 8 petals.
Weave the stamens according to the diagram in Fig. 6 of black and lilac beads.
Weaving lilac flowers
On a wire 20 cm long, collect 17 lilac beads, bend the last bead and insert the end of the wire back into the collected beads (similar to the stamens for blue flowers - Fig. 6). Twist the ends of the wire, but do not cut them.
For each flower, make 25-30 such petals.
Weaving gypsophila
Weave according to diagram 7.
Weaving leaves
The leaves are woven from light green and green beads in the same way as peony petals using the “circular weaving” technique according to the diagrams in Fig. 1,2 and 3.
Complete 4 round rows.
Bow
Weave using the weaving technique “towards” according to the diagrams in Fig. 8 (top part), 9 (tips of the bow) and 10 (tie, weave 15 rows of 8 beads each).
The upper part consists of 2 identical halves. Sew both halves together, fastening the starting and ending beads. Wrap a tie around the middle and sew that too. Then, on one side, sew 2 ends to the tie.
Ladybug
Weave the body using the weaving technique “toward” according to the pattern in Fig. 11. Then attach the antennae to the head, as indicated in the diagram.
Dragonfly
Weave according to the patterns in Fig. 12 (torso) and 13 (wings).
Assembly
First, collect the flowers: attach the petals to the core, distributing them evenly in a circle. Since peonies do not have a core, attach the petals by twisting the ends of the wires of adjacent petals.
Twist the stems from medium-thick wire and attach flowers to them. Then attach leaves along the entire length of the stems. Wrap the stems with green thread. To make the thread fit better on the wire, lubricate it with a small amount of PVA glue.
Fill the bottom of the basket with a small amount of ornamental grass (about 1/3 full). Then insert flowers and sprigs of gypsophila there, making sure that you get a beautiful, evenly filled bouquet. Attach ladybugs and dragonflies on top of some leaves and petals. Decorate the basket with a bow.
Our basket of flowers is ready!
How to care for beaded flowers
Beaded flowers They're a joy to eat, they don't need sunlight, they don't need to be watered and they don't need fertilizer! But still, even such flowers need care. Here are some simple tips on how to keep your beaded flowers in good condition for a long time.
1. If the flowers are slightly dusty, gently brush them with a soft brush. Using a cloth moistened with glass cleaning liquid, thoroughly wipe each petal.
2. If the flowers need to be washed, give them a light shower under the tap. Dry the flowers as soon as possible, either with paper towels or with a strip-dryer set on low.
3. If you want, move the flowers to another vase, but remember that they are heavy. Fill this new vase with marbles or pebbles to keep it from tipping over.
4. If the cat knocks over the bouquet, don't worry! You can easily restore the shape of each petal affected by the fall and install the flower in its original place.
Beading is a painstaking, delicate art. The craftsmen show miracles of accuracy and precision, carefully weaving every bead into their work. There are no limits to imagination, and, armed with a variety of beads and wire, creators create incredible products. Natural motifs are not left out either - flower arrangements made from beads can become an original and unique gift, decoration or talisman for both an adult and a child.
An example of an unusual beaded hair decoration is in the photo below.
A little history
Where did beads appear, giving us enormous scope for creativity to this day?
Archaeological research takes us to Egypt. The earliest glassware found during excavations dates back to the reign of the first dynasty of pharaohs, which is five thousand years ago. Some scientists argue that glassmaking originated even earlier - this is evidenced by a greenish bead found by scientists, stored in a Berlin museum; according to some studies, its age is about five and a half thousand years.
On the territory of the former Kievan state, fragments of beads are also found; some of the earliest were found in burials dating back to the 3rd-4th centuries.

The beauty of beads has been admired since ancient times, and to this day interest in it has not been lost - amazing products are created from it, you just have to be patient!
If you are thinking about an unusual gift for relatives and friends or a souvenir for your own collection, then master classes in beadwork will help you bring your idea to life. Plunge into the world of iridescent beads and beads!
Rose garden
You can watch how to create an original version of a bead craft - flowers in a basket - with detailed step-by-step steps in this video.
Let's look at simpler, but no less delightful creations.
The tenderness of forget-me-nots

To create a product we need:
- beads: yellow or orange for flower cores, blue for flowers and green for leaves;
- fishing line/wire, preferably about 0.2 mm thick;
- green threads;
- a stationery knife, nail scissors, whatever is more convenient for you;
- a flower pot or vase to complete the look.
We present a detailed description of weaving forget-me-nots. We take our wire, we need a piece of about 10 cm.
We put one yellow and five blue beads on it one after another, indicated in the diagram as a).

We pass one edge of the wire, from the side of the blue beads, one more time through the first three beads, then pass it through the yellow one; figure b) clearly shows the sequence of actions. It turned out to be a small flower.
We turn the ends of the wire under the yellow center. If you want to get a rather lush bouquet, you need to weave a lot of these flowers. We twist two flowers together and get an inflorescence.
Weaving the leaves is the next step in creating our flower. We will need a longer piece of wire and green beads. The easy technology is well suited for beginners, yet eliminating any questions, let's look at the scheme step by step.
Step 1. Three beads are put on a wire, then threaded through two, both ends crosswise, forming two rows of leaves, pay attention to the photo below:


Step 3. Continue. In the next row we repeat with four beads. Then five beads are pierced in the fifth row.

To create wider leaves, you can increase the number of beads in subsequent rows; you can also create leaves of different sizes.
If you need a thin elongated leaf, we weave several rows with an equal number of beads in each, depending on how long the leaf we want to get.
Step 4. To complete the formation of the element, in each subsequent row the number of beads to be put on is reduced by one.

Step 5. Now you have one bead left on the wire, pull the wire through it from both sides and screw both ends, fixing the shape.

When forming a bouquet, its splendor, the number of leaves and flowers depends only on your imagination. You can also weave flowers in different shades of blue. And use not only yellow, but also orange beads for the core. All the resulting details are put together, gradually twisting them and forming a bouquet.
Step 6. In order for the wire to be hidden from view and the work to be clean, it is necessary to tightly intertwine all the elements with the prepared thread, thus simulating a stem. Pebbles or sand are suitable as a fixative in the pot. So our bouquet of forget-me-nots is ready.
It will serve as desk decor or living room decoration. Give it to your mother or grandmother - they will surely appreciate your work. Or start collecting your own line of beaded flowers! Please note that the proposed algorithm for weaving flowers is also suitable for creating other plants. By combining the color scheme, number, size of flowers and leaves, you can create an extraordinary garden. So don’t stop there, but continue to improve your talents.
Video on the topic of the article
You can find many more different master classes on creating flowers in the selection of videos: