Anyone who thinks that sewing a men's tie is a troublesome, time-consuming and simply thankless task is mistaken. In fact, 80% of success is the correct pattern of a men's tie, which you don't even need to do yourself. It is enough to use a ready-made pattern on the website, transfer it to paper, and then to fabric.
The result of simple manipulations is a beautiful, neat tie of the required length and width from the chosen fabric with minimal investment of time, effort and money. A man who receives such a job as a gift will be endlessly pleased and grateful for his efforts and efforts.
Fabrics and sizes: where to start?
To make a men's tie with your own hands, you need to decide on the fabric. It can be thick wool, an extraordinary twist, or jacquard silk, which is especially fashionable today. Be sure to use non-woven fabric along with the material for the products - with its help, the tie will take the desired shape.
Consider the option of sewing a classic model of a men's tie made of jacquard silk. Why silk? This is a natural dense fabric that allows you to create spectacular and practical ties. Also suitable as an alternative:
- velvet;
- cotton, etc.
The fabric for the tie can be plain or printed. If this is the second option, then when working with the pattern in the future, you need to try to lay it out in such a way that the brightest and most interesting places are visible on the main wide part of the product.

The main secret that allows you to cut a tie really neatly and efficiently is on the bias. This method will require more fabric than the classic straight one, but it is thanks to it that you will be able to achieve the desired effect when tying a tie.
However, it is possible to reduce fabric consumption with a bias cut. To do this, the product is divided into parts (two or three). The longest main part to the corner, taking into account an allowance of a few centimeters, should be equal to the length of the square-shaped piece of fabric for a handmade tie.
It’s good if there is a ready-made accessory model with parameters that meet the requirements. Using it, you can measure the parts of which it consists. As for the width, it can be chosen at the discretion of the master, depending on the design of the product.
Don't forget about the hidden back "pockets" on the tie. Usually these are small triangles of a suitable shade made of lining silk. To sew them, you will need very little fabric, taking into account an allowance of up to 1 cm in the corners.

Features of a DIY tie pattern
In order to sew a men's tie, the first thing to determine is the model and size of the product. Since we are talking about a classic men's tie, its standard length is 150 cm from corner to corner. The width at the base is 11 cm, in the upper zone - 4 cm. If this is a narrow model of a classic tie, then in the lower part it is no more than 4-6 cm, in the upper part from 3 to 4 cm.
Considering that the product is divided into three parts, we can highlight the parameters of each of them:
- part A - 76-90 cm;
- part B - 15-25 cm;
- part C - everything else.
If this is a teenage model, then the length is 10-12 cm shorter.

When there is no ready-made tie that can be used as a model for measuring parameters, and ready-made patterns on the website are not suitable for some reason, you can try to make a paper model yourself.
To do this, cut out a strip of thick paper of the required length and try to tie it like a tie in such a way that the lower wide part slightly covers the belt buckle according to the standard, while the narrow part does not reach the level of the belt a few centimeters. Using a paper prototype, patterns are prepared first on paper and then on fabric (you need to design several parts), maintaining the necessary parameters.
When transferring patterns to fabric, it is important to add 1-2 cm at the joints. It is important to place parts on the material obliquely, as already noted. In the same way, a pattern is prepared from non-woven fabric. Two triangles are cut out from the lining for the wrong side, adding an allowance of 1-2 cm along the bias.

How to sew a tie: stages and algorithm
A correctly cut tie just needs to be sewn. To do this, you will need a standard master's kit, including ready-made patterns. They start by strengthening the fabric with non-woven fabric. To do this, the parts of the product are folded with the front side inward, cleaved and swept away. The next stage is the analysis of the sides. It is important that they form a straight line. If it was done correctly, the product is stitched, ironed, and if necessary, protruding corners are removed.
Next, iron the allowances of the triangles and the corners of the part to the wrong side. Fold the triangles with the main part and sew them by hand. Iron the seam allowance inwards along the entire length of the product, then fold it in half, chop it off and iron it again. The entire length of the tie is processed manually, fixing both edges, and the finished product is ironed.
We women have long realized our desire for equality with our stronger half. At least when it comes to clothing. Men's shirts, shorts, trousers and even ties have migrated into women's wardrobes and feel quite good there. Moreover, a modern lady, wearing a tie or even a bow tie, looks damn seductive. Such a purely masculine (until recently) accessory only emphasizes femininity.
And needlewomen have room to expand. If not everyone can sew a shirt or pants on their own, then by learning how to sew a tie, you will be able to cope with this task. This means you will realize your creative potential and get a new stylish item. So, let's begin.
Where to begin
First of all, you need to master the basics of sewing. If you have never held a needle and thread in your hands, then do it. Look through fashion pages, see what ties designers combine with what clothes. When they use butterflies to complement the image. Decide on the style and select a pattern (the network is at your service!). Also find suitable fabric and thread. Finally, decide what you need? A universal accessory that will go with any shirt, or an exclusive item that complements your specific suit.You can also rip out an old men's tie and make a template from it, which will serve as the basis for the pattern. You can sew a tie not only for yourself, but also for your man. This will be a great gift! And by reducing the finished pattern, you can also sew a children’s tie. Such ties, by the way, are much more difficult to buy than those intended for adults.
Sew a classic tie
How to sew a classic (traditional style) tie? So, you have selected the fabric, made a template using a pattern or a tailored men's tie. You will also need thick canvas fabric for the lining, which is inserted inside the tie. Also prepare threads of the desired color, pins for chopping parts, chalk or pencil. Naturally, you will also need a sewing machine and an iron.
So, we lay out the fabric on the table so that it lies along the bias thread. Otherwise, nothing will work out - the finished tie will be skewed. Place the template on the fabric and make a pattern, leaving seam allowances of about one and a half centimeters. We cut out a gasket from thick fabric. If the length of the prepared piece of fabric allows, then we make the tie one-piece. But in order to save money, it is quite acceptable to sew it in two parts (the face of the tie and its reverse side). In this case, we also leave seam allowance on both parts in the places where we will connect them.
We fold the two parts right sides together, chop them off at the seam and grind them down. Then iron the seam thoroughly. Now you need to process both corners. To do this, we mark the boundaries on the main part. Then we transfer the same outlined lines to the lining. On the main part we iron the corners.
Now you need to place the corner of the lining on the front side of the main part and pin both parts together with pins. Next, fold the edges of the fabric and stitch along the intended seam. We do the other side of the tie in the same way. All that remains is to turn the corner out and iron it.
Now we put the base into the tie, set the corners and fix it in the middle using pins. Baste both parts of the tie. Then we also fasten the edges of the allowances with pins, and lay a hidden patch stitch right in the middle. We sew both parts together.
We prepare the part for the loop: we cut out a strip of fabric four centimeters wide along the bias. Fold this strip right side inward and secure with pins. We machine stitch along the center of the folded strip, turn it inside out and press it with a hot iron. Now sew the loop to the main tie piece, taking only the top layer of fabric and leaving a gap for the narrow tie end.
That's all! Our tie is ready!
Sewing a bow tie
You will be able to do this much faster, because sewing a bow tie is much faster. After all, what is a bow tie? This is a bow. And a bow, it is a bow, even if it is a tie. Moreover, you and I will not be sewing a real butterfly, but an imitation of it. That is, a bow tie that you don’t have to tie, but can simply put on and fasten around your neck. And we will sew this stylish and unusual accessory from a traditional men's tie. Do you have one in mind? Then let's get to work!
First, let's prepare everything you need:
- a men's tie, from which we will make a pattern;
- threads of suitable colors;
- sticky sewing tape (20 centimeters long) or black elastic band (one and a half wide and 20 centimeters long);
- scissors.

We take the first two blanks, fold them right sides together and make a stitch along two opposite corners (diagonal eight centimeters). We leave the second pair of corners unstitched - it will become the detail of the future butterfly. Turn it inside out and put a thick pad inside. We fasten everything with stitches (“forward needle” stitch).

From the main fabric we cut out a strip 4 centimeters wide and 11 centimeters long. We assemble the butterfly piece in the middle with even folds and secure it with regular stitches. We wrap it twice with a strip cut from the main fabric and fasten it by hand. Now, inside out, about three centimeters wide, we wrap the corners of our butterfly and manually secure them with neat stitches.

We also cut out another strip 3 centimeters wide and 22 centimeters long from the main fabric. When finished, this strip should be one and a half centimeters wide. We hand sew the butterfly to the middle of this finished strip. We cut an elastic band the length of the collar of the shirt and sew it to the ends of this strip. Finally, attach two small hooks to the ends of the elastic. If we use Velcro tape instead of an elastic band, we do without hooks.
That's all there is to making stylish accessories - a traditional tie or a bow tie. Try, dare, create. And you will succeed!
Ties are gaining more and more popularity as a fashion accessory that can be worn not only with an office suit. And given the growing interest in making things with your own hands, it is not surprising that many people are making their own unique ties. A tie can be made from almost any fabric, choosing any color, pattern and length, and the price will be significantly lower than that of a purchased tie. Regardless of whether you are sewing a tie for yourself or preparing an original gift for your father for the New Year or Defender of the Fatherland Day, use our simple instructions.
Steps
Selection of necessary materials
- A popular lining fabric option for ties is rayon.
- The main fabric for an informal tie can be cotton, linen or denim with a pattern.
-
Purchase some interlining material for the inside of the tie. Ties are made using interfacing materials that can be sewn or iron-on to the wrong side of the main fabric of the tie. They allow the tie to keep its shape. You will need 1.35m of interlining material that matches the tone of the main fabric.
Purchase other necessary materials. In addition to fabric and padding, you will need to purchase the following:
- thin threads in the color of the main fabric of the tie;
- good fabric scissors;
- a sewing machine or sewing needle (if you sew by hand);
- sewing pins;
- measuring tape;
- iron.
-
Choose a suitable pattern. There are many possible tie patterns. When you decide on the product model you like, you can easily print the corresponding pattern for free directly from the Internet. An alternative to printing out a pattern is to trace the outline of an existing tie using a pencil and ruler.
Purchase your favorite fabric from your local fabric store. To make a great tie, there is no need to stick to any specific type of fabric, however, keep in mind that thicker fabrics are better suited for this purpose. To make one tie, you will need at least 1.35m of fabric for the main part and a piece of lining fabric measuring about 13x15cm for the back.
Preparing fabric for sewing a classic tie
- If the fabric has a pattern, try to imagine how it will fit on the cut tie. Adjust the position of the pattern so that the fabric pattern looks good on the finished product.
-
Transfer the outline of the tie pattern onto the fabric. Pin the pattern to the fabric with sewing pins or simply press it down onto the fabric. Then use chalk to carefully trace the outline of the pattern onto the wrong side of the fabric. In sewing, chalk is usually the easiest and safest tool for transferring the outlines of patterns onto fabric.
Carefully cut the fabric. Take sharp fabric scissors and cut the fabric 1cm away from the chalk outline. This way you will create seam allowances. If you have chosen a fabric that is difficult to work with for your tie, you may need a roller cutter instead of scissors to cut it.
- Cut out without haste so as not to make mistakes and spoil the fabric.
-
Repeat the cutting process with the interlining material. Place the tie pattern on the interfacing material and use chalk to trace its outline. Then carefully cut out the piece using scissors or a fabric cutter. The interfacing piece will have the same shape as the main fabric piece, however it will not need seam allowances so you should cut it straight along the chalk line.
Cut out the piece from the lining fabric. You will need to measure and cut a piece of lining fabric along the contours of the bottom tip of your tie. It will cover the back side of the tip of the tie, which will remain sticking out after folding and sewing the tie itself. The same part can additionally be used as a pocket to secure the narrow end of a tied tie. This detail has an upper horizontal side, and on the bottom and sides it follows the contours of the lower tip of the tie.
Securing the cushioning material
-
Check the gasket material. Before attaching the interlining material to the main fabric of the tie, once again make sure that it has been pre-planted at the factory or by you personally. Also, depending on whether the material is adhesive or sewn, follow the appropriate instructions for working with this material.
Iron on the adhesive interlining material. If you purchased adhesive interlining, this step is where you should iron it to the fabric. To do this, you must place the shiny or bumpy side of the interfacing material on the wrong side of the main tie piece. The easiest way to do this is to place the main part of the tie face down on the table. Then you need to put the shiny side on top of it, made from cushioning material. To protect parts from shifting and sticking to the iron when ironing, cover them with a thin towel before ironing rather than ironing them directly.
- Make sure that the adhesive interlining material is evenly adhered to the entire surface of the tie.
-
Sew on the sewing interfacing. If you purchased interlining material that does not have an adhesive layer and is intended for sewing, you will need to sew it to the main fabric. This type of interlining material is well suited for sewing ties on fabrics that are sensitive to heat treatment. You can sew the cushioning material by hand using a needle and thread or using a sewing machine. Sew interlining material to the wrong side of the main tie piece all the way around.
Sewing the product and ironing the finished tie
Sew the sides of the tie. To do this, you can use a needle and thread or a sewing machine. For most tie designs, you will first need to hem the tip of the piece, then you will fold the tie and sew the center back seam.
- Make sure you align the sides of the tie evenly and sew a straight stitch.
- The center seam of the tie is made from the wrong side so that when turning the tie right side out, the seam allowances are not visible.
-
Start with a classic tie pattern. This model is quite simple and versatile. You can find various patterns of the classic tie model, which will differ in their length and width. Just print out the one you like best, but just make sure that it is the classic tie model with a corner at the bottom.
Please be aware that the fabric may shrink. If you chose something other than natural silk as the main fabric of your tie, you should pre-shrink the fabric by washing and drying it before ironing. This will allow you to avoid worrying about the fabric shrinking after steaming or washing the finished tie.
Prepare the fabric. Before cutting, iron the fabric (at a low temperature) from the wrong side to remove any wrinkles or creases that could cause the fabric to cut unevenly. To iron, lay the fabric on the work surface, wrong side up, and begin moving the iron over it in small circular motions.
Cutting fabric
Position the tie pattern correctly on the fabric. It is very important to cut the tie on the bias (diagonally to the direction of the grain thread), as this will make the tie more elastic. Be sure to make sure that the fabric lies flat and without any wrinkles before cutting.
So, let's begin!
To make a bow tie we will need:
A piece of fabric is 24*13 cm (I use suiting fabric, you need to choose something similar: not too thick or thin, and it is desirable that the fabric does not stretch practically, you can take the simplest gabardine);
A piece of fabric 4*7 cm for the jumper;
Dublerin is also 24*13 cm, as the main part (it’s not in the photo, you don’t have to use it if the fabric is thick enough to keep its shape);
Elastic band 50 cm, width 12 cm;
Regulator and hook for a bra 12-13 cm (the width of these parts depends on the width of the braid);
Scissors, chalk, pins, ruler or measuring tape.
Step 1
We cut out the parts: main and small. First of all, we need to glue the main part with doubler tape so that it can keep its shape in the future. If your fabric is already thick enough, you don’t need to glue it.

Step 2
Fold the main part in half lengthwise, wrong side out, and stitch it, retreating 4-5 mm from the edge. For convenience, I pin it with pins.


Step 4
The next step is to fold the ironed part in half with the seam facing out and stitch it, retreating 5 mm from the edge.

Step 5
Let's take up the iron again. The part needs to be turned out so that the seam is inside and placed in the middle, then ironed. The photo on the left shows the stitched part. On the right - turned inside out and ironed. The main part is ready.


Step 6
We take a small part, the future jumper. Fold lengthwise, with the right side of the fabric facing out and stitch, retreating 3mm from the edge.

Step 7
Iron the small part so that the seam is in the middle. The photo below shows how it should turn out.

Step 8
We fold the jumper in half, with the seam facing out, and stitch it, as shown in the photo. The distance from the edge depends on your fabric. The thinner it is, the greater the indentation. Then we turn out the jumper.


Step 9
We take the main part, form folds and push it through the jumper.


This is what you should end up with:


Step 10
Making a strap. To do this, take an elastic band and thread it through the jumper. Next, we first insert it into the regulator, then pass it through the hook, and then again into the regulator from the reverse side and sew the tip. I tried to photograph it as clearly as possible :) And at the other end of the tape we simply make a loop, it can be seen in the photo on the right.


And now our bow tie with an adjustable strap is ready!

I really hope that you liked my master class and found it useful! I will answer all additional questions about tailoring!
Good luck to everyone, thank you for your attention!
Report to moderator
First of all, decide on the style, shape and size of the tie. We'll show you how to sew a standard tie that is 145cm long, 9cm wide (measured at its widest part), with facings at the top and bottom edges.
Attention: the most suitable material for sewing a men's tie is thick plain weave silk.
You will need
- Silk fabric 90 x 90 cm (enough for two ties - one standard size, see above, and a second narrower one)
- Woolen fabric 80 cm long (the width will depend on whether you will reinforce the tie with 1 or 2 layers of interfacing: to strengthen the tie, you can take a regular plain dress woolen fabric, but the ideal option is 100% combed wool fabric, elastic and dense)
- Template for cutting to the shape of the front side of a tie from thick cardboard or thick film (for production, see step 2)
- Sharp scissors () or roller cutter ()
- Cutting mat
- Silk pins ()
- Ruler ()
- Pencil
- Marker()
- Needle and thread for sewing
- Tape measure ()
Description of work
Step 1: Prepare tools and materials
Prepare everything you need for cutting and sewing in advance so that everything is at hand. Determine the length of the tie using a cord, which you then attach to a measuring tape. When calculating the length of the tie, take into account the additional allowance for tying the knot. Choose the width and shape of the tie.Step 2: make a template
On thick cardboard or film, draw the bottom part of the tie (widened downwards or straight) with a length of at least 30 cm, and preferably more, up to 70 cm. Draw the bottom corner, as shown in the photo, or any other shape (you can, for example, draw the bottom edge in a straight line).Note: The width of the template should be 3 times the width of the finished tie, since you will be tucking the long sides of the tie toward the middle three times. Plus add 3mm for the fold overlap in the middle of the tie.
On the bottom corner of the tie, draw 2 parallel seam lines along the edges at 5mm intervals. At the bottom corner, draw a transverse seam line through the intersection point of the inner seam lines so that the distance between the ends of the transverse line and the bottom corner is the same.Make a template for the top edge of the tie in the same way, and also draw the seam lines, but the template should be narrower than the template for the bottom.

Step 3: cut out the main part of the tie from silk
Carefully lay the silk out in a single layer, right side down, and smooth it very evenly with your hands onto the surface. Place the template of the lower edge of the tie on top of the silk, at a certain distance (having calculated the required length of the tie), lay the template of the upper edge of the tie - the sharp-angled ends are directed in different directions - and connect the points of the ends of the templates in a straight line (if they do not dock).Be careful: the template must be laid exactly at an angle of 45 degrees relative to the straight thread. Its acute angle should lie either at the intersection of the lobar and transverse threads, or on both sides at the same degree relative to the lobar and transverse threads.
Now run a roller knife along the outline of the template and along the marked line, or cut out the part with sharp scissors. True, it is still more convenient to cut out on a special mat with a roller cutter, but be sure to use a new, sharply sharpened blade for cutting.If you have a piece of silk measuring 90 x 90 cm - as in our version, do not refuse the opportunity to sew a second, narrower, less formal tie at the same time. Cut and sew it using exactly the same technology as described for a classic tie.
Step 4: Transfer the seam lines of the facings
Now, on the wrong side of the silk, draw the seam lines for stitching the bottom edge facing - these are exactly the lines that you drew on the template (including the cross line). Next, repeat the same operation with the upper end of the tie.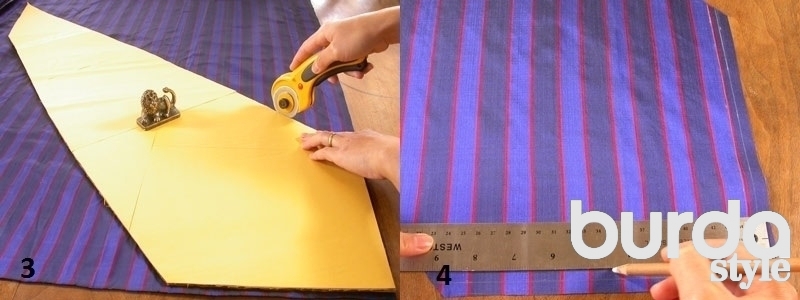
Step 5: Cut out additional parts
In addition to the main part of the tie, you will also need to cut out 2 facing parts: one for the bottom edge, the second for the top. They represent the lower (upper) corner and part of the tie with a height of at least 30 cm. For lining, additionally cut out 1 or 2 pieces of woolen fabric. If the wool is thin, then it is better to cut out 2 parts, baste them over the entire surface with long stitches (do not use adhesive pads!) and then process them as a single-layer part. For cheaper options, you can use non-woven fabric. It is better to cut out the spacer piece after grinding the facings of the upper and lower edges of the tie; for dimensions, see step 8.From silk you also need to cut out a strip for fastening with a length = the width of the tie minus 2−3 cm and a width of 6−8 cm - in finished form it is 2.5 - 3.5 cm wide.
Be sure to iron all cut parts, setting the appropriate heating temperature. Do not iron directly on silk to prevent it from becoming shiny; iron silk only through an ironing iron.
Step 6: Finish the top and bottom edges of the tie
Now comes the most important part of the job: you need to flawlessly finish the top and bottom edge of the tie with a facing. The hemming of the edges gives the tie a beautiful look on both sides, which is very important when, for example, it flutters in the wind.Attention: do not overcast the edges of the tie!
Place the facing on the bottom of the tie, right side to right side, precisely aligning the beveled edges and the bottom corner, pin, or better yet, baste. Check that the fabric of both parts lies flat.First stitch from the top edge of the facing to the first corner. Then stitch along the second side from the top edge of the facing to the first corner.
Now sew along the marked line of the outer seam to the very bottom corner, raise the machine foot, turn, lower the foot and sew to the other corner. Similarly, make a second, parallel seam down to the lowest corner and then up. Finally, stitch across to form a sharp corner on the finished tie.
Tip: To perform this operation very accurately, use a piece of whatman paper cut exactly in the shape of an equilateral triangle.
Experienced craftsmen sew the corner of a tie “by eye,” but for beginner sewing enthusiasts without templates and markings, it will be difficult to perfectly perform this important operation. Finally, cut the corner along the cross stitch at a distance of 5 mm. Trim the remaining seam allowance close to the outer stitch line.
Step 7: Turn inside out and iron
Now turn the top and bottom ends of the tie right side out. Carefully pull out the corners, straighten the seams - there should not be a single wrinkle on them. Gently press the seams on both ends so that they are not completely flat.Step 8: Install the Gasket
Place the wool (or non-woven) part on the wrong side of the tie exactly in the middle. The spacer piece should be of such length that one end fits exactly with the top end of the top edge facing and the other end fits exactly with the top end of the bottom edge facing of the tie. The width of the part is exactly equal to the width of the finished tie. Cut the top and bottom edges in a straight line.
Step 9: Fold the long sides to the middle
Fold the long sides of the silk tie inward by a sixth of the width, then fold it inward again so that both folded halves meet exactly in the middle of the tie on its inner side, with one half overlapping the other by 1-3 mm. Pin the edges together.Tip: use special silk pins, ones that won't leave holes in expensive fabrics.
Step 10: Sew on the bartack
Fold the fastening strip in half with the wrong side facing in and stitch the long edge. Turn the strip inside out and iron it so that the seam is at the bottom. Fold the bartack in half and place the open edges inside the fold of the tie, as shown in the photo. Fastening will allow the tie to retain its shape longer and better.Hand sew the bartack carefully under the fold, then spread it into a cross strip shape (see photo), lay it flat on the inside of the tie and hand sew it to the tie on both sides with blind stitches. Do not pierce the needle on the front side!
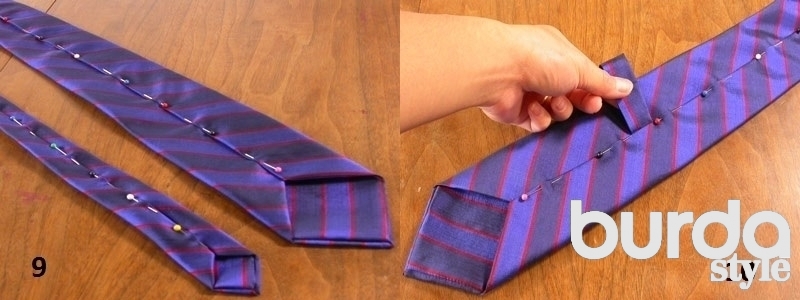
Step 11: Start stitching the middle fold from the bottom of the tie
Now, using blind stitches (as in our case) or sew both folds of the fold in the middle of the inside of the tie.Step 12: Finish the seam in the middle of the inside of the tie
Do not pull the thread too tight so that the seam remains elastic and does not pull the right side of the tie. Sew slowly and carefully from the bottom edge up, gradually removing the pins. Make sure the seam is even. Finish the seam on the top side of the tie, which should look the same as the bottom.
Step 13: Custom Label - Proof of Handmade
Do not forget to sew your own label just below the bartack: sew it not with several stitches in the corners, but with small stitches on both short sides, of course, without piercing the needle on the front side.Step 14: Iron and try on
Iron the tie again using the iron. Now your handmade tie is ready! All that remains is to try it on with a new shirt.
Photo: BurdaStyle, PR.
Material prepared by Elena Karpova