Do you like to do handicrafts? Then you will love making Christmas tree decorations with your own hands! This is a pleasant and exciting activity for the whole family that will not leave anyone indifferent - you will spend several evenings with pleasure making Christmas tree decorations with your own hands.
What do you need to make your own New Year's decorations? You can use almost anything you can get your hands on. If you want, you can buy special supplies (sold in craft stores), or you can use what you have in any home. So what to prepare:
- plain paper (good for making patterns);
- pencils and markers;
- regular cardboard, white and colored (you can use velvet);
- sharp scissors and a breadboard knife;
- glue (PVA or glue gun with sticks);
- threads and needles;
- yarn of different shades;
- various decorative materials - these can be sparkles, sequins, confetti, multi-colored foil, stickers and much more.
This is the basic set, but in order to make a specific Christmas tree toy, you may need something else.
Simple crafts from scrap materials
Of course, you've probably seen how New Year's balls are made from thread and glue with your own hands, but why not expand the range? We make various Christmas tree decorations with our own hands.
From yarn
This is a simple and at the same time spectacular Christmas tree decoration that can decorate any Christmas tree.

For production you will need:
- yarn;
- tailor's pins;
- plate or bowl;
- porous material (for example, a disposable tray);
- cutting paper;
- marker.
The threads need to be soaked in glue - the glue should saturate the yarn well, it is thanks to it that the decoration will keep its shape. While the threads absorb the glue, you need to make a template for your toy - draw what you want on paper. These could be DIY New Year's balls, strange birds or neat little houses. You can also try making a snowman, a couple of small trees and a star.

The template needs to be attached with pins (or ordinary toothpicks) to the porous material, and the design you need should be laid out on top - first the outline is laid out, then the interior decor. You should not cross the threads too often; the toy should be fairly flat. Once you are finished, dry the item and remove it from the pins and tie a loop in the eye. If desired, you can decorate with sparkles or rain.

From wire
How to make New Year's toys with your own hands in just a couple of minutes? Use wire!

To make toys you will need:
- two types of wire - thick and thin (thin wire can be replaced with bright threads, for example, floss. Pure white strong threads look very beautiful);
- beads, beads;
- colored tape;
- pliers.
In order to make figures or balls for the Christmas tree, cut several pieces from thick wire and give them the shape that your New Year's decoration will have. In our case, this is a star, but you can use any geometric shapes and simple silhouettes.
The ends of the thick wire need to be twisted. You need to string beads and seed beads mixed together on a thin wire, tie the end of the thin wire to the future Christmas tree decoration, and wrap it randomly.

When the toy is evenly wrapped, you need to wrap the free tail of the wire around the toy and tie a ribbon in the shape of a bow - your toy is ready.
Another original idea:

Made from ribbon and beads
Who said that making New Year's toys with your own hands must take a long time and painstakingly? Not at all. In just five minutes you can create one that will decorate both the New Year’s tree and the interior.

You will need:
- beads;
- narrow tape;
- yellow, golden or silver cardboard;
- glue "Second";
- needle and thread.
We fold the ribbon like an accordion and string it on a thread, after each loop of the ribbon you need to string a bead. The more “tiers”, the smaller they are - you see, a Christmas tree is already starting to look like. When the ribbon ends, you need to tie the thread in a knot and cut out a small star from cardboard. Next, you need to glue your Christmas tree to the star, and make a loop on top so that the decoration can be easily hung.

Interior decor made in this way looks very attractive.
From cardboard - in a couple of minutes
Some New Year's toys made of paper or cardboard take a lot of time to make, but not in this case - here you really only need a couple of minutes to make an elegant hand-made New Year's decoration.
So, you will need:
- ordinary cardboard;
- a little twine or thick yarn;
- glue;
- paints and brushes;
- napkin or cloth;
- varied decor.
Make two figures out of cardboard, glue them together, placing a thread with a loop between them - the blank for the toy is ready.

Use a loose tail of twine to wrap the tree in different directions. After some kind of thread pattern appears on the tree, you can start gluing it with a napkin. You can tear the napkin into pieces, coat the tree well with glue, and seal it tightly with the napkin. This will give a nice texture to the future toy.

After the toy has dried, you can start painting - paint the Christmas tree green.

After the paint layer has dried, shade the texture of the toy using a dry, hard brush and white paint, and then decorate it to your taste.

From bright shreds
Here you will need a sewing machine, but if you really want to, you can do it without it. This is the best way to make Christmas toys from cotton wool and fabric - just choose fabric with a Christmas pattern, or use what you have on hand.

Prepare several paper patterns - for example, deer, stars, gingerbread men, bears, letters and hearts. Cut out fabric blanks with your own hands, sew them in pairs, leaving a small gap (for stuffing), and through this small hole, tightly stuff the toys with cotton wool or padding polyester. It is most convenient to fill with a pencil.
Patterns can be downloaded here:
By the way, don’t forget - we sew on a machine from the inside, but if you decide to make toys from thick fabric with your kids, then it is better to sew them with a decorative seam over the edge - a toy with your own hands will look simply charming and will be suitable for either a home Christmas tree or a kindergarten - Usually, for kindergarten Christmas trees, children make decorations themselves.
Made from twine and cardboard
New Year's toys made of paper and cardboard will be much more interesting if you add a couple of simple materials to them. To make such a toy you will need ordinary cardboard, simple paper or natural twine, a little felt or any other fabric, as well as ordinary paper, a pencil and ruler, and a drop of glue.

The star template can be downloaded here (click on the picture, it will enlarge):
First, make a pattern on plain paper, and then transfer it to cardboard. Don't forget that the star must be double. You shouldn’t make the star too thin; it’s better to make it a centimeter or more. The tail of the twine is glued to the cardboard, then you need to gradually wrap the entire workpiece.

Place the thread as tightly as possible so that there are no gaps. To decorate the star, make a couple of leaves and berries from fabric and decorate one of the rays. Your decoration is ready.

From yarn and cardboard
Do you want to make original and at the same time charming Christmas tree decorations with your own hands? Then it's time to make small gift hats with your own hands from scrap materials. This is a wonderful Christmas gift that looks cute and will keep you warm all winter long!

To make Christmas tree decorations in the form of hats, you will need:
- a couple of toilet paper rolls (you can just glue cardboard rings together);
- remnants of colored yarn;
- beads and sequins for decoration.
You need to glue rings approximately 1.5-2 cm wide from cardboard. If you are using a toilet paper roll as a base, cut it into several segments of approximately the same width.

The threads need to be cut into pieces of approximately 20-22 centimeters. We fold each piece in half, pass the loop through the cardboard ring, and pull the free edges of the threads through the loop. It is necessary that the thread is firmly fixed to the cardboard base. This needs to be repeated until the cardboard base is hidden under the threads.

All the thread tails need to be pulled through the ring so that our hat has a “lapel”.

Now we pull the loose tails tightly with thread and trim them into a pom-pom shape - the hat is ready! All that remains is to make a loop and decorate your Christmas tree toy with sequins and sparkles.

From beads
Making a New Year's toy in a minimalist style is easy and simple - you will need wire, beads and seed beads, a ribbon and a coin (can be replaced with a small candy, but it looks much more impressive with a coin). Try to make this Christmas tree toy with your own hands, the master class is very simple.

Make a loop on the wire and string green beads mixed with large beads on it - they will play the role of New Year's balls on our Christmas tree. Once the wire is filled, give it a herringbone shape by folding it in a spiral.
Once your tree has taken shape, bend the free edge into a loop.

We cut off a piece of ribbon, form a loop from it for hanging and pull it through the Christmas tree, and decorate the free tail with a coin (the easiest way is to glue it with double-sided tape). We tie a decorative bow on the hanging loop - your decor is ready!

Christmas balls
How to make a New Year's ball from threads? It’s as easy as shelling pears, watch our master class on spectacular lace balls for the Christmas tree.
Required:
- several balloons;
- cotton threads;
- PVA, water and sugar;
- scissors;
- polymer glue;
- spray paint;
- decor.

First you need to inflate the balloon - not completely, but according to the size of the future decoration. Mix two tablespoons of water, two teaspoons of sugar and PVA glue (50 ml), and soak the thread in this mixture so that the thread is saturated. Then you need to wrap the ball with thread randomly. The balls need to be dried for several hours. After the glue has completely dried, you need to deflate the ball and take it out, and carefully paint the ball of thread with spray paint and decorate it with sequins and sparkles.
DIY thread Christmas balls will turn out to be very, very impressive if you make them in different tones - for example, red, silver and gold. Try to make New Year's balls with your own hands using different techniques - you can sew or knit balls, make them from cotton wool with your own hands, or, for example, sew them from felt - you can never have too many of these toys.
From paper
New Year's decorations made of paper are very popular among both big and small admirers of the New Year's miracle - try making paper Christmas balls with your own hands.

A DIY paper Christmas toy is made like this:

There is no additional need to decorate such a toy; it is already expressive.

Another ball option:

Or you can make a ball like this according to the master class:


From felt
DIY felt Christmas toys look very warm and cozy, and they are very, very easy to make. To make your own charming felt Christmas tree decorations you will need:
- red, white and green felt;
- red, white and green threads;
- Crystal glue;
- scissors and needles;
- cardboard;
- a little satin ribbon;
- soft filler (cotton wool, holofiber, padding polyester).

First, make sketches for your future toys. It can be anything. Once the patterns are ready, transfer them to felt and cut them out. What is good about this material is that it does not crumble, you will not need to additionally process the edge of each workpiece.
Make identical decorative elements - for example, sprigs of holly (by the way, did you know that this is a symbol of joy and Christmas reconciliation?). The berries need to be glued to the leaf using glue, and then a decorative knot should be made - this will give the berries volume.
We sew each piece together in pairs. By the way, it is best to sew it with contrasting threads; it will be fun and elegant. How to make New Year's decorations voluminous? Stuff them with holofiber before sewing them up completely! Straighten the product well, so the Christmas tree toy will be filled more evenly. You can use the back of a pencil for stuffing.
Sew on the decorative elements and your New Year's toy is ready!


Try to sew felt decorations not only for the New Year tree, but also for your home - for example, a Christmas wreath decorated with felt toys looks very stylish. Look at the selection of DIY New Year's decorations, photos of master classes - and you will understand how many interesting things can be made from ordinary felt of two or three colors.

Master class on how to make a Christmas garland with your own hands from felt:

Below you can download templates and patterns of different Christmas trees for felt crafts:
- Cut 10-12 identical strips of paper about two centimeters wide.
- Fold each strip into a loop and secure with a stapler at the very edge.
- When all the strips are folded like petals, assemble the flower by gluing the petals to each other with pieces of double-sided tape.
- Cut out the center from colored paper and secure it with double-sided tape; secure a ribbon or thread under the center. Your paper toy is ready!
See how you can make paper toys that are just as simple and beautiful!

Now you know how to make a Christmas tree toy from any material that you have at hand - it can be fabric and cardboard, paper and twine, wire and beads, you can use everything - the main thing is the inspiration and spirit of the New Year that will fill your hearts in the process of making cute Christmas decorations!
A few more original ideas with master classes


How are Christmas tree decorations made? Nizhny Novgorod children can get the answer to this question at the Ariel glass Christmas tree decorations factory. Here, all year round - in spring, summer, autumn, and winter - Christmas tree balls and funny glass figurines are made, which then decorate Christmas trees in different countries of the world.
The masters of the factory, where the New Year is celebrated non-stop, are happy to tell and show everyone how they make their favorite Christmas tree decorations, both for children and adults. And there are quite a few of them: every day the factory receives 16 excursion groups! About 300 children of all ages - from elementary school students to high school graduates and college students - come to the factory to get acquainted with the process of creating Christmas tree toys.
“Journey to the Land of Christmas Tree Decorations” begins with an introduction to the history of Nizhny Novgorod Christmas tree decorations and the history of the craft. It turns out that the first glass balls appeared in Germany in the mid-19th century. Using a glass tube, which was heated first on a kerosene stove and later on a gas burner, glassblowers blew out balls of different sizes. Hot glass becomes viscous and can take on a variety of shapes. At the Ariel factory, glassblowers blow out 250-300 balls in 6 hours of work! Each ball is unique because it is made by hand and not by machine. To verify this, just look at the bottom of the ball - there is a mark left where the glass thread was twisted - or, as glassblowers call it, a “tendril”. The second tendril - on the opposite side of the ball - is either twisted into a neat glass loop, or - which makes the work cheaper - sawed off and covered with a metal cap, by which the toy is hung on the Christmas tree.
 All balls first turn out transparent, like soap bubbles. They are dipped into a barrel of paint, giving them a background color - red, blue, green or, for example, gold. And when the paint dries, the master artists begin work. They hand paint the surface of the ball. This could be an image of a fairy-tale hero, a winter landscape, or some architectural landmarks from around the world.
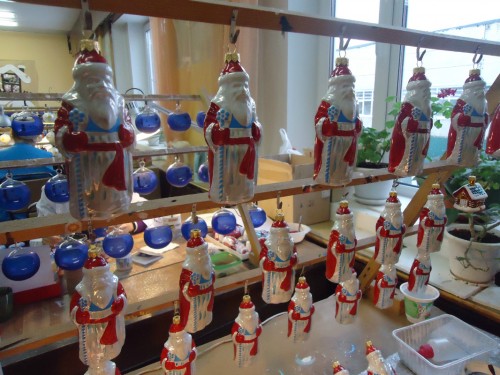
Glassblowers can make not only balls, but also various figures. To do this, a heated glass tube is lowered into special shapes - in the form of a bunny, snowman or Santa Claus. Such toys are called shaped toys. One of the first molded toys that began to be made at the Ariel factory was a Nutcracker figurine. Then dozens of other very different figures appeared: various animals, cockerels, goldfish, heroes, grandmothers with a pockmarked chicken, etc.
You can see all this variety of New Year's toys in the factory museum: about a thousand different Christmas tree decorations are collected here. The museum's exposition includes both New Year's toys made and painted by Nizhny Novgorod craftsmen over the years, as well as ancient Soviet toys produced by various factories of the Soviet Union. From these figures you can trace the most important milestones in the development of the country - the first manned flight into space, the massive sowing of corn - a symbol of the era of Nikita Khrushchev, and much more. At the exhibition you can also see Christmas tree balls from different collections: balls with images of Santa Claus and Father Frost - as he is represented in different countries of the world; balloons with scenes from famous fairy tales - “The Three Little Pigs”, “Little Red Riding Hood”, “Cinderella”, etc., as well as with heroes of Russian fairy tales - for example, Emelya.
A separate place is allocated for “New Year’s Khokhloma”: balls and matryoshka dolls with the famous gold painting, glass spoons and even samovars, 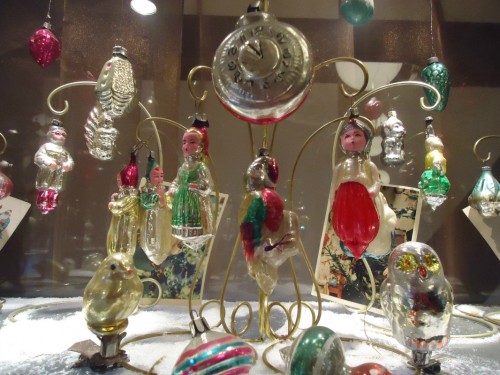 which glassblowers managed to blow out of glass! There, in the museum, you can see fragile Easter eggs and glass medallions with delicate Easter drawings.
Among the exhibits there are also balloons depicting Moscow metro stations, made for the anniversary of the metro. On the convex surfaces of the balls, the artists managed to depict both the deep metro tunnels and the splendor of old Moscow stations.
A special place in the exhibition is given to balloons from the collection of famous people: for example, Vladimir Putin presented balloons depicting the sights of Moscow, St. Petersburg and Nizhny Novgorod to German Chancellor Gerhard Schröder. In a separate box are balloons depicting Russian winter fun, which were given to guests at Dmitry Medvedev’s reception.
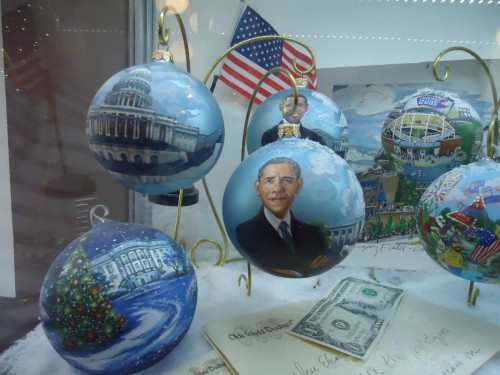 And in the collection of Nizhny Novgorod craftsmen there are balloons with the image of Barack Obama, which were made by special order from the US presidential administration. The craftsmen say that they received a special order for their production from the US Presidential Administration. The approval took a long time and was not easy: first, the artists painted an image of Obama with a wide smile on the ball, because they knew that this charming smile was his calling card. But the Americans said that the president in the image was “too cheerful” and asked to portray him more sternly. As a result, the option with a discreet smile was adopted as the basis. And the broadly smiling Obama remained as a souvenir for Nizhny Novgorod residents!
The craftsmen are especially proud of the unique New Year's balls dedicated to the 200th anniversary of the Bavarian crown. For work, Nizhny Novgorod residents were sent images of Bavarian castles and their decoration, the crown itself, and portraits of Bavarian kings. And the customers were satisfied with the results of the work!
The masters tell and show all this to the children who came on the excursion.

Ariel factory. Boys and girls watch with bated breath as glassblowers blow out balls of different sizes and make shaped toys - figures of snowmen, bunnies, Santa Claus, etc. Factory employees explain the subtleties and secrets of craftsmanship.
And in the art workshops, in front of the guests, factory craftsmen hand-paint fragile glass Christmas tree decorations. Children are told how a design is applied, paints are selected, and how toys are powdered with glitter and “golden flecks.”
At the end of the excursion, the children go to a master class, where they are given the opportunity to paint their own Christmas tree figures or balls. Then these toys are packaged in special boxes so that children can take fragile souvenirs home and show them to their relatives. Such balls become the best souvenir of a trip to the factory, where New Year lives all year round.


In 1992, the Ariel Christmas tree decoration factory opened in Nizhny Novgorod. They make New Year's balls, candlesticks, medallions and even Easter eggs. The factory takes part in many international exhibitions and competitions. They managed to almost immediately attract attention in the Western market, so now the Nizhny Novgorod factory is one of two enterprises in Russia that export their products to other countries, including Germany, France, England, America, Italy, Switzerland, and Denmark.
About how Christmas tree decorations are made.
The process of making Christmas tree decorations begins with blowing. Medical glass is used for this:

From each such glass pipe, 2-3 blanks are obtained:

First, it is heated in the middle to separate into two parts:

Having received the desired piece, each pipe is heated from the inside so that the craftsmen can begin blowing:

A Christmas tree decoration is blown out in one exhalation. So when you see a huge ball, know that it was made using a different technique. Using two tendrils, the master gives the shape:

Depending on what kind of decoration you want to get, a mold is selected. In this case, the glassblower makes a “house”:

One tendril is twisted into a small loop (mainly for the Western market), or left for further cutting, and the second is removed, leaving a unique mark on the bottom of the ball:

To make a decoration that looks like an owl, a special tool is used to press through the glass of the ball. In this way, her characteristic eyes are obtained:

In 6 hours, glassblowers blow out 250-300 balls. There is nowhere to learn this, so all glassblowers, as in the old days, pass on their knowledge directly to the next generation:

Currently there are only 4 glassblowers working at the factory. Workplace of one of them:

After blowing, the blanks go to the painting room. Here a layer of varnish is applied, but then the decoration will be a little transparent (for a candlestick, for example), or before that another layer of aluminum is applied. Aluminum completely removes transparency and adds more shine:

The second tendril is immediately cut off:

Painting work is followed by artistic work, the most difficult, in my opinion:

Orders from the factory vary: from presidential gifts to balloons with metro stations. Almost all drawings are performed in several stages (at least 3-4). By the end of the work, these balls will appear:

Brushes, feathers, sponges and sour cream jars are used for drawing.

There are approximately 4 times more master artists than glassblowers. Those who work longer in the factory do more difficult work, while the new ones do easier work. But art education is compulsory:

A visual demonstration of the stages. The result should be a bullfinch:

Final decorative touches:

Most of the time the decorations dry:


Toy from the latest collection:


This is what the workplace of a graduated master artist looks like:

There are also tours to the factory. This type of service is even in great demand! Now all excursion times are scheduled until the end of January:

The end of this excursion is a master class on painting balls and figures:


Of course, you can take the result home to show off your work to your parents:

This is how Christmas tree decorations are made.

You've already grown up, but you probably remember that childhood delight when your parents took out a box of Christmas tree decorations, how you unwound the tangled wires of a New Year's garland, how you looked for a burnt-out light bulb in it... And the smell of fresh spruce or pine, because the Christmas tree must be real , no artificial crafts! It’s a little childish miracle to be involved in the creation of a holiday - decorating the New Year tree! There were only a few factories of Christmas tree decorations in the Soviet Union, one of them was in the village of Klavdievo, Kyiv region.
But the most interesting thing is that twenty years after the collapse of the USSR, the process of producing Christmas tree decorations remains the same handmade and vintage! They heat the glass manually, blow out the balls, and paint them. An absolutely amazing flashback - at other enterprises there are computers, conveyors, sterile cleanliness, but here there is a very cozy scoop. In the positive sense of this term! I have a great continuation today! :)
The factory was founded in 1949, survived the crisis of the 90s, but still restored its functioning and is still operating, gradually increasing production volumes, trying to achieve Soviet indicators.
On the territory itself, despite its rather dilapidated condition, everything is very bright and lively, because a huge number of children come here every day:
Do the stoves burn real wood?! Vintage and naturalness even in this :)
Let's move on to the production itself, the first stage is the glass blowing shop:
The starting material is 50cm glass tubes, which are produced in Belarus.
The tube is heated at a temperature above 1000 degrees, from one tube up to 20 balls or 5-10 “icicles” or tops are obtained per tree.
And then balls of varying diameters are manually blown, the maximum size being 150mm. The lungs of the workers in this workshop blow out a strictly dosed volume of air, the error is no more than 5% when the number of balloons per shift is 150-200! At the end we get a transparent glass ball, which needs another 5 minutes to cool.
Fisheye 15mm gives a very cool effect :)
Sergey aquatek_filips
Ira siv2203
The next stage is silvering. This is exactly the most spectacular and interesting moment. Everything is very simple from a chemical point of view, but very impressive in person. The children are delighted, the excursion groups change every 5-7 minutes, there are so many people!
First, a solution consisting of silver oxide, ammonia and distilled water is injected into each ball blank:
Then they dip into hot water (50 degrees) for a few seconds and shake the solution inside the ball; the so-called "silver mirror reaction" when silver is deposited on the walls.
Here is another transparent ball:
And a second later it’s silver:
Then the balls are painted in one background color and dried:
How can you not create your own silver look?! :)
At the last stage, the toys are decorated artistically. For some reason you can’t shoot here, but in reality no one controls it:
High production technologies are not used here, so the “blue screen of death” is quite sufficient:
This kind of “golden” crumb is applied to a toy that has been pre-treated with glue.
Anyone can blow out a balloon, but can you try blowing out a train?! For this, the factory workers have 3D-printers, 3D-light - 100,500 blows at a certain angle and flow intensity and the locomotive is ready!
Each worker in the decoration workshop makes from 3-4 to 50 toys in one shift, depending on the complexity.
These are the balls that are produced per shift: 4-6:
A popular entertainment for large companies is toys with a logo:
What I really liked was that every corner of the workshop, which does not look very representative, is covered with some kind of banner or banner. Visually, everything is modest but cozy:
Well, the last room is where the “necks” are cut off and the fasteners are put on, and then the balls are packaged. The machine that performs the cutting is equipped with a diamond wheel:
Master classes and celebrations are held here for schoolchildren, but there are a lot of people.
How much does it cost?
The cost of balls in the store is from 15g ($2) with thermal printing to $15-30 for handmade balls:
There is also a small room - a museum where Christmas tree decorations from different eras and countries are exhibited. But this is worth showing in a separate report, which I will do in the coming days.
Of. website of the Christmas tree toys factory.
The Village visited the Nizhny Novgorod factory of glass Christmas tree decorations "Ariel" and learned how elegant New Year's figures are born.
Photos
Ilya Bolshakov
It’s hard to imagine, but from 1927 to 1935, neither New Year nor Christmas were celebrated in the Soviet Union - they were seen as an ideological threat. But then the tradition came to life and began to develop with renewed vigor, albeit with a flavor of propaganda. The Ariel factory, founded in 1996, is one of only two year-round production facilities in the country. She is also the legal successor of the glassblowing and art workshop of the Gorky artel "Children's Toy", opened in 1936. After the holiday was returned to the people, standards for making toys and teaching aids for teachers began to appear on how to properly decorate a Christmas tree with children, because each era had its own symbolism, designed to strengthen the spirit of citizens, faith in leaders, and the list goes on. If you remember the retro figurines, it’s easy to guess during whose reign they hung, for example, corn and onions on Christmas trees. All forms were developed and approved centrally, and ready-made samples were sent for production. Today, everything is dictated mainly by fashion, and factories themselves decide what and how they will do.


Idea development
Creativity at this stage can refer to both the shape of the toy and the pattern on it. A specially created creative group of artists is developing several options for new decoration, inspired by fashion trends, traditional symbols of the year, and retro motifs. Next, the chief artist approves those samples that will go into production. If it is a ball with a new design, then the approved version becomes the standard from which the craftsmen will copy everything. If the figurine is new, then a ceramic mold is sent to glassblowers for production.
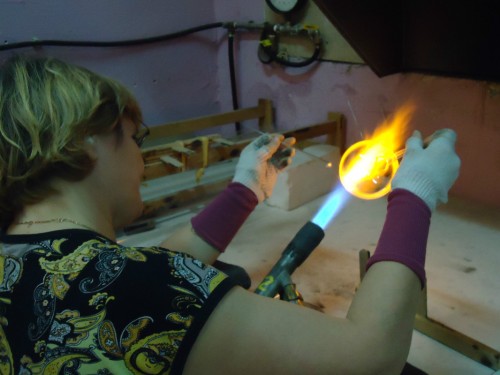
Working with glass
As a raw material, the factory purchases glass darts - hollow tubes one and a half meters high. All you need to turn these darts into beautiful figures is a 650 degree gas torch and the skill of a glassblower. The flame quickly heats the tube, the glass becomes plastic, which allows you to separate a small piece from it for further work - “pulling out the bullet.” You can make any toy out of it, but first you need to heat its main part again.
When the master understands that the glass has melted enough (and this can only be understood through experience and intuition, because touching it with your hands or measuring the temperature will not work), he removes the bullet from the heat and begins to blow air into it through one of the “whiskers” - long ends of the workpiece. The air from inside pushes the walls and, constantly turning the bullet in his hands, the glass blower blows out the ball, and then heats the mustache, twists and tears it off. All handmade balls are not perfectly smooth, but it is almost impossible to notice.
If you need to make a figurine from the blank, for example, a snowman, it is also heated, but before blowing it is placed in a ceramic mold. Air is then blown through the mustache in the same way, but the glass expands exactly as far as the walls of the mold allow.


Okolpachka
After blowing, the toys are sent to the paint shop, where they are given color: pink gloss, matte chocolate. For the remaining mustache, they are dipped into a barrel of varnish and placed on a stand until dry. Then this mustache is cut off and a cap is put on, the same one into which the thread is threaded to hang the toy on the Christmas tree. For some toys, these stages become final; they are packaged and sent to customers.
painting
This is the longest and most labor-intensive process, because the artist literally draws a picture on every piece. But this is precisely what makes the factory so remarkable and the toys so in demand. Over the years of work, it has developed its own recognizable school of painting, detailed and realistic. And orders come not only from other regions, but also from Europe and the USA. For comparison, there are only four glassblowers in the state, and sixty artists.
On the table, each of them has a rack where toys, acrylic paints, brushes and water, a palette, napkins and the sample itself are hung. Since painting occurs step by step, one master has several items in his work at the same time, and it is difficult to count how many times a day each of them is picked up and hung back. First, the underpainting is applied - the main color spots, then the details, from large to small. If you need to draw a house, then first draw the first wall on all the balls, followed by the second. This helps save paint and the craftsman’s time.


Since the main audience is children, four thematic workshops for independent painting were created for them: confectionery, sea, space and fantasy. Each child brings home from an excursion a toy decorated with his own drawing, although far from perfect, but no less valuable. Next to the workshops there is a museum with many works produced throughout the history of the glass Christmas tree decoration, and photo zones conventionally divided into eras and styles. Here you can see both a traditional retro Christmas tree with toys on clothespins, pioneers and corn, and very conceptual metal pyramid frames decorated with black glossy balls. But what is most surprising is that this working atmosphere with a year-round holiday does not discourage factory workers in the least from decorating Christmas trees at home. The only thing that has changed since they came here is that the approach to choosing jewelry has become more conscious and thoughtful.


